SDK Quickstart
Get up and running with mobile subscriptions



This guide shows you how to get up and running with subscriptions and the RevenueCat SDK with only a few lines of code.
Prerequisites
You need the following before you start:
- A RevenueCat account.
- A project in your RevenueCat account.
- Products configured in the RevenueCat dashboard.
1. Install the RevenueCat SDK
The RevenueCat SDK implements purchases and subscriptions across platforms while syncing tokens with the RevenueCat server.
Choose your mobile app platform to install the RevenueCat SDK, then return here to initialize and configure the SDK.
SDK Installation Guides →
2. Initialize and configure the RevenueCat SDK
Initialize Purchases with your public API key:
- Swift
- Obj-C
- Kotlin
- Kotlin MP
- Java
- Flutter
- React Native
- Capacitor
- Cordova
- Unity
// on iOS and tvOS, use `application:didFinishLaunchingWithOptions:`
// on macOS and watchOS use `applicationDidFinishLaunching:`

func application(_ application: UIApplication,
                 didFinishLaunchingWithOptions launchOptions: [UIApplicationLaunchOptionsKey: Any]?) -> Bool {

    Purchases.logLevel = .debug
    Purchases.configure(withAPIKey: <revenuecat_project_apple_api_key>, appUserID: <app_user_id>)

    return true
}
// on iOS and tvOS, use `application:didFinishLaunchingWithOptions:`
// on macOS and watchOS use `applicationDidFinishLaunching:`

- (BOOL)application:(UIApplication *)application didFinishLaunchingWithOptions:(NSDictionary *)launchOptions {
    // Override point for customization after application launch.

    RCPurchases.logLevel = RCLogLevelDebug;
    [RCPurchases configureWithAPIKey:@<revenuecat_project_apple_api_key> appUserID:<app_user_id>];

    return YES;
}
// If you're targeting only Google Play Store
class MainApplication: Application() {
    override fun onCreate() {
        super.onCreate()
        Purchases.logLevel = LogLevel.DEBUG
        Purchases.configure(PurchasesConfiguration.Builder(this, <revenuecat_project_google_api_key>).build())
    }
}

// If you're building for the Amazon Appstore, you can use flavors to determine which keys to use
// In your build.gradle:
flavorDimensions "store"
productFlavors {
    amazon {
        buildConfigField "String", "STORE", "\"amazon\""
    }

    google {
        buildConfigField "String", "STORE", "\"google\""
    }
}

///...

class MainApplication: Application() {
    override fun onCreate() {
        super.onCreate()
        Purchases.logLevel = LogLevel.DEBUG

        if (BuildConfig.STORE.equals("amazon")) {
            Purchases.configure(AmazonConfiguration.Builder(this, <revenuecat_project_amazon_api_key>).build())
        } else if (BuildConfig.STORE.equals("google")) {
            Purchases.configure(PurchasesConfiguration.Builder(this, <revenuecat_project_google_api_key>).build())
        }
    }
}
import com.revenuecat.purchases.kmp.LogLevel
import com.revenuecat.purchases.kmp.Purchases
import com.revenuecat.purchases.kmp.configure

// If you have common initialization logic, call configure() there. If not,
// call it early in the app's lifecycle on the respective platforms.
// Note: make sure you use the correct api key for each platform. You could
// use Kotlin Multiplatform's expect/actual mechanism for this.

Purchases.logLevel = LogLevel.DEBUG
Purchases.configure(apiKey = "<google_or_apple_api_key>") {
    appUserId = "<app_user_id>"
    // Other configuration options.
}
// If you're targeting only Google Play Store
public class MainApplication extends Application {
    @Override
    public void onCreate() {
        super.onCreate();
        Purchases.setLogLevel(LogLevel.DEBUG);
        Purchases.configure(new PurchasesConfiguration.Builder(this, <revenuecat_project_google_api_key>).build());
    }
}

// If you're building for the Amazon Appstore,
// click the Kotlin tab to see how to set up flavors in your build.gradle:
///...

public class MainApplication extends Application {
    @Override
    public void onCreate() {
        super.onCreate();
        Purchases.setLogLevel(LogLevel.DEBUG);

        PurchasesConfiguration.Builder builder = null;

        if (BuildConfig.STORE.equals("amazon")) {
            builder = new AmazonConfiguration.Builder(this, <revenuecat_project_amazon_api_key>);
        } else if (BuildConfig.STORE.equals("google")) {
            builder = new PurchasesConfiguration.Builder(this, <revenuecat_project_google_api_key>);
        }

        Purchases.configure(builder.build());
    }
}
import 'dart:io' show Platform;

//...

Future<void> initPlatformState() async {
  await Purchases.setLogLevel(LogLevel.debug);

  late PurchasesConfiguration configuration;
  if (Platform.isAndroid) {
    configuration = PurchasesConfiguration(<revenuecat_project_google_api_key>);
    if (buildingForAmazon) {
      // use your preferred way to determine if this build is for Amazon store
      // checkout our MagicWeather sample for a suggestion
      configuration = AmazonConfiguration(<revenuecat_project_amazon_api_key>);
    }
  } else if (Platform.isIOS) {
    configuration = PurchasesConfiguration(<revenuecat_project_apple_api_key>);
  }
  await Purchases.configure(configuration);
}
import { Platform } from 'react-native';
import { useEffect } from 'react';
import Purchases, { LOG_LEVEL } from 'react-native-purchases';
import { GALAXY_BILLING_MODE } from 'react-native-purchases-store-galaxy';

//...

export default function App() {

  useEffect(() => {
    Purchases.setLogLevel(LOG_LEVEL.VERBOSE);

    if (Platform.OS === 'ios') {
      Purchases.configure({ apiKey: <revenuecat_project_apple_api_key> });
    } else if (Platform.OS === 'android') {
      Purchases.configure({ apiKey: <revenuecat_project_google_api_key> });

      // OR: if building for Amazon, be sure to follow the installation instructions then:
      Purchases.configure({ apiKey: <revenuecat_project_amazon_api_key>, useAmazon: true });

      // OR: if building for Galaxy Store, install react-native-purchases-store-galaxy, then:
      Purchases.configure({
        apiKey: <revenuecat_project_galaxy_api_key>,
        store: 'GALAXY',
        galaxyBillingMode: GALAXY_BILLING_MODE.TEST,
      });
    }

  }, []);
}
const onDeviceReady = async () => {
  await Purchases.setLogLevel({level: LOG_LEVEL.DEBUG});
  if (Capacitor.getPlatform() === 'ios') {
    await Purchases.configure({ apiKey: <public_apple_api_key> });
  } else if (Capacitor.getPlatform() === 'android') {
    await Purchases.configure({ apiKey: <public_google_api_key> });
  }
  // OR: if building for Amazon, be sure to follow the installation instructions then:
  await Purchases.configure({ apiKey: <public_amazon_api_key>, useAmazon: true });
}
document.addEventListener("deviceready", onDeviceReady, false);

function onDeviceReady() {
  Purchases.setLogLevel(LOG_LEVEL.DEBUG);
  if (window.cordova.platformId === 'ios') {
    Purchases.configure(<revenuecat_project_apple_api_key>);
  } else if (window.cordova.platformId === 'android') {
    Purchases.configure(<revenuecat_project_google_api_key>);
    // OR: if building for Amazon, be sure to follow the installation instructions then:
    await Purchases.configure({apiKey: <revenuecat_project_amazon_api_key>, useAmazon: true});
  }
}
See Unity installation instructions https://www.revenuecat.com/docs/getting-started/installation/unity
Configure the shared instance of Purchases once, usually on app launch. After that, access the same instance anywhere in your app through .shared.
Identifying users
The app_user_id field in .configure is how RevenueCat identifies the Customers of your app. If your app has a user authentication system, you can provide a user identifier here at configuration time or later with a call to .logIn(). Omit this value for RevenueCat to generate an anonymous ID for you.
For more information, see our Identifying Users guide.
If you're planning to use RevenueCat alongside your existing purchase code, be sure to tell the SDK that your app will complete the purchases.
3. Check subscription status
Your app should check the Customer's subscription status whenever it decides which UI to show, typically on app launch and before presenting a paywall, so Customers who are already subscribed aren't asked to purchase again.
Check the Customer's CustomerInfo object to see if a specific Entitlement is active, or check whether the active Entitlements array contains a specific Entitlement ID.
- Swift
- Obj-C
- Kotlin
- Kotlin MP
- Java
- Flutter
- React Native
- Capacitor
- Cordova
- Unity
- Web
// Using Swift Concurrency
let customerInfo = try await Purchases.shared.customerInfo()
if customerInfo.entitlements.all[<your_entitlement_id>]?.isActive == true {
    // User is "premium"
}
// Using Completion Blocks
Purchases.shared.getCustomerInfo { (customerInfo, error) in
    if customerInfo?.entitlements.all[<your_entitlement_id>]?.isActive == true {
        // User is "premium"
    }
}
[[RCPurchases sharedPurchases] getCustomerInfoWithCompletion:^(RCPurchaserInfo * customerInfo, NSError * error) {
    if (customerInfo.entitlements.all[@<your_entitlement_id>].isActive) {
    // User is "premium"
	}
}];
Purchases.sharedInstance.getCustomerInfoWith(
    onError = { error -> /* Optional error handling */ },
    onSuccess = { customerInfo ->
        if (customerInfo.entitlements[<my_entitlement_identifier>]?.isActive == true) {
            // Grant user "pro" access
        }
    }
)
Purchases.sharedInstance.getCustomerInfo(
  onError = { error -> /* Optional error handling */ },
  onSuccess = { customerInfo ->
    if (customerInfo.entitlements[<my_entitlement_identifier>]?.isActive == true) {
      // Grant user "pro" access
    }
  }
)
Purchases.getSharedInstance().getCustomerInfo(new ReceiveCustomerInfoCallback() {
    @Override
    public void onReceived(@NonNull CustomerInfo customerInfo) {
        if (customerInfo.getEntitlements().get(<my_entitlement_identifier>).isActive()) {
            // Grant user "pro" access
        }
    }

    @Override
    public void onError(@NonNull PurchasesError purchasesError) {
    }
});
try {
  CustomerInfo customerInfo = await Purchases.getCustomerInfo();
  if (customerInfo.entitlements.all[<my_entitlement_identifier>].isActive) {
    // Grant user "pro" access
  }
} on PlatformException catch (e) {
  // Error fetching purchaser info
}
try {
  const customerInfo = await Purchases.getCustomerInfo();
  if(typeof customerInfo.entitlements.active[<my_entitlement_identifier>] !== "undefined") {
    // Grant user "pro" access
  }
} catch (e) {
 // Error fetching purchaser info
}
try {
  const customerInfo = await Purchases.getCustomerInfo();
  // access latest customerInfo
} catch (error) {
  // Error fetching customer info
}
Purchases.getCustomerInfo(
  info => {
    const isPro = typeof customerInfo.entitlements.active[<my_entitlement_identifier>] !== "undefined";
  },
  error => {
    // Error fetching customer info
  }
);
var purchases = GetComponent<Purchases>();
purchases.GetPurchaserInfo((info, error) =>
{
   if (purchaserInfo.Entitlements.Active.ContainsKey(<my_entitlement_identifier>)) {
    // Unlock that great "pro" content
  }
});
curl --request GET \
  --url https://api.revenuecat.com/v1/subscribers/<app_user_id> \
  --header 'Accept: application/json' \
  --header 'Authorization: Bearer REVENUECAT_API_KEY' \
  --header 'Content-Type: application/json'
You can use this method whenever you need the latest status, and it's safe to call repeatedly throughout the lifecycle of your app. The RevenueCat SDK automatically caches the latest CustomerInfo whenever it updates, so in most cases this method pulls from the cache.
In a new integration, no Entitlements are active yet. That's the signal to present a paywall, which is the next step.
4. Present a Paywall
The SDK automatically fetches your configured Offerings and retrieves product information from your Test Store or connected stores (Apple, Google, etc.). You can present a paywall using RevenueCat's pre-built UI or build your own.
RevenueCat provides customizable paywall templates that you can configure remotely.
If you prefer full control, manually display products, then handle purchases.
5. Make a purchase
Once your paywall is presented, select one of your products to make a purchase. The RevenueCat SDK handles the purchase flow automatically and sends the purchase information to RevenueCat.
Testing with the Test Store:
- Test Store purchases work immediately without any additional setup.
- They behave like real subscriptions in your app.
- No real money is charged.
Testing with real stores:
- The RevenueCat SDK automatically handles sandbox vs. production environments.
- Each platform requires slightly different configuration steps to test in sandbox.
See Sandbox Testing for platform-specific instructions.
6. Verify the purchase in RevenueCat
When a purchase is complete, you can find the purchase associated with the Customer in the RevenueCat dashboard.
- Log in to the RevenueCat dashboard.
- Open the Customers page.
- Verify the purchase by searching for the Customer by their App User ID or
$RCAnonymousID.
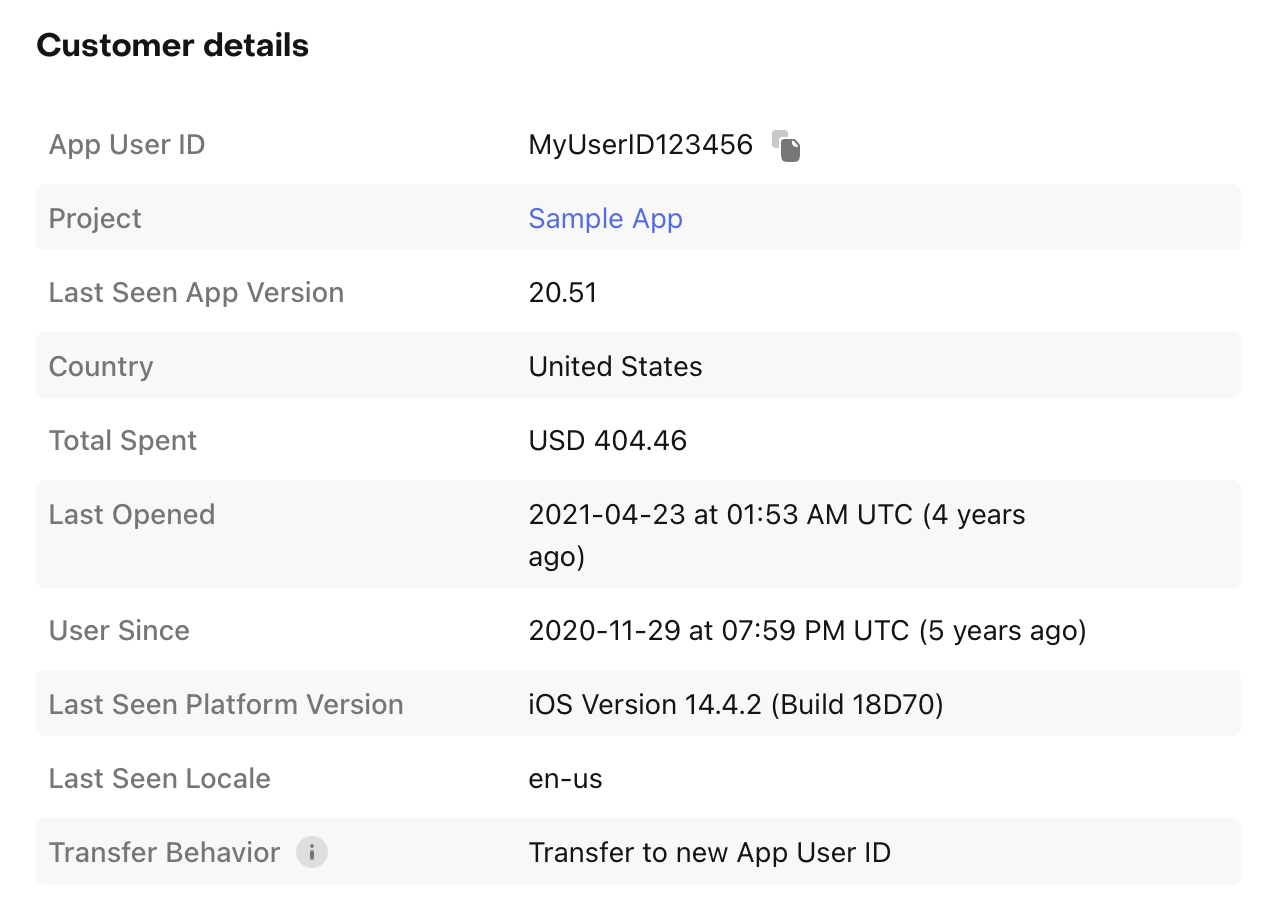
RevenueCat always validates transactions. Test Store purchases are validated by RevenueCat; real store purchases are validated by the respective platform (Apple, Google, etc.).
The RevenueCat SDK automatically updates the Customer's CustomerInfo object with the new purchase information. This object contains all the information about the Customer's purchases and subscriptions.
To see the change in your app, run the status check from step 3 again. The Entitlement attached to your product is now active.
7. React to subscription status changes
You can respond to any changes in a Customer's CustomerInfo by conforming to an optional delegate method: purchases:receivedUpdated:.
This method fires whenever the RevenueCat SDK receives an updated CustomerInfo object from calls to getCustomerInfo(), purchase(package:), purchase(product:), or restorePurchases().
- Swift
- Obj-C
- Kotlin
- Kotlin MP
- Java
- Flutter
- React Native
- Capacitor
- Cordova
- Unity
// Additional configure setup
// on iOS and tvOS, use `application:didFinishLaunchingWithOptions:`
// on macOS and watchOS use `applicationDidFinishLaunching:`

func application(_ application: UIApplication,
                 didFinishLaunchingWithOptions launchOptions: [UIApplicationLaunchOptionsKey: Any]?) -> Bool {

    Purchases.logLevel = .debug
    Purchases.configure(withAPIKey: <revenuecat_api_key>)
    Purchases.shared.delegate = self // make sure to set this after calling configure

    return true
}

extension AppDelegate: PurchasesDelegate {
    func purchases(_ purchases: Purchases, receivedUpdated customerInfo: CustomerInfo) {
        /// - handle any changes to the user's CustomerInfo
    }
}
// Additional configure setup
// on iOS and tvOS, use `application:didFinishLaunchingWithOptions:`
// on macOS and watchOS use `applicationDidFinishLaunching:`

- (BOOL)application:(UIApplication *)application didFinishLaunchingWithOptions:(NSDictionary *)launchOptions {
    // Override point for customization after application launch.
    RCPurchases.logLevel = RCLogLevelDebug;
    [RCPurchases configureWithAPIKey:@<revenuecat_api_key>];
    RCPurchases.sharedPurchases.delegate = self;

    return YES;
}

- (void)purchases:(nonnull RCPurchases *)purchases receivedUpdatedCustomerInfo:(nonnull RCCustomerInfo *)customerInfo {
    // handle any changes to purchaserInfo
}
class UpsellActivity : AppCompatActivity(), UpdatedCustomerInfoListener {
		override fun onReceived(customerInfo: CustomerInfo) {
        // handle any changes to purchaserInfo
    }
}
Purchases.sharedInstance.delegate = object : PurchasesDelegate {
    override fun onCustomerInfoUpdated(customerInfo: CustomerInfo) {
        // handle any changes to customerInfo
    }
}
public class UpsellActivity extends AppCompatActivity implements UpdatedCustomerInfoListener {
		@Override
    public void onReceived(CustomerInfo customerInfo) {
        // handle any changes to customerInfo
    }
}
Purchases.addCustomerInfoUpdateListener((customerInfo) => {
  // handle any changes to customerInfo
});
Purchases.addCustomerInfoUpdateListener(info => {
	// handle any changes to purchaserInfo
});
await Purchases.addCustomerInfoUpdateListener((customerInfo) => {
  // handle any changes to customerInfo
});
// subscribe to the window event onCustomerInfoUpdated to get any changes that happen in the customerInfo
window.addEventListener("onCustomerInfoUpdated", onCustomerInfoUpdated, false);

//...

onCustomerInfoUpdated: function(info) {
    // handle any changes to customerInfo
}
public override void PurchaserInfoReceived(Purchases.PurchaserInfo purchaserInfo)
{
    // handle any changes to purchaserInfo
}
RevenueCat does not push CustomerInfo updates to your app; updates only happen when the SDK makes an outbound network request to RevenueCat.
Depending on your app, it may be sufficient to ignore the delegate and handle changes to customer information the next time your app is launched or in the completion blocks of the SDK methods.
8. Restore purchases
Your Customers can restore their in-app purchases, reactivating any content that they previously purchased from the same store account (Apple, Google, etc.).
By default, RevenueCat Paywalls include a Restore Purchases button, so there's no code to write. If you built your own paywall, you can trigger a restore programmatically. See Restoring Purchases for the SDK methods.
If two different App User IDs restore transactions from the same store account, the default behavior is to merge (alias) the identities for anonymous users, and transfer the subscription between identified users. See our guide on Restoring Purchases for more information on the different configurable restore behaviors.
Sample apps
For more complete examples of integrating the SDK, see our sample apps.
View Sample Apps →Troubleshooting
During development, we recommend enabling more verbose debug logs.
If you run into issues with the SDK, see Troubleshooting the SDKs for guidance.
Next steps
- If you want to use your own user identifiers, read about setting App User IDs.
- To learn how restores work and the configurable restore behaviors, see our guide on Restoring Purchases.
- Once you're ready to test your integration, follow our guides on testing and debugging.
- If you're moving to RevenueCat from another system, see our migration guide.
- If you qualify for the App Store Small Business Program, check out our guide on how to apply.
- See our guide on Subscription Status to learn whether a subscription is set to renew, whether there's an issue detected with the Customer's credit card, and more.
- For more information and best practices for configuring the SDK, see our guide on configuring the SDK.