Google Play Service Credentials
Step-by-step guide for creating Google Play service credentials and connecting them to RevenueCat



This guide shows you how to create the service credentials RevenueCat needs to communicate with Google Play on your behalf. You'll generate a service account in Google Cloud, grant it access to your app in Google Play Console, and upload its JSON key to RevenueCat. By the end, RevenueCat will be validating and managing Google Play purchases for your app. The process has several steps, but the granular control means you grant RevenueCat only the access it needs.
It can take up to 36 hours for new Play service credentials to work with the Google Play Developer API. Until then, you may see "Invalid Play Store credentials" errors (503 or 521) and be unable to make purchases with RevenueCat. Step 3 includes a workaround that often speeds this up.
Prerequisites
- Access to Google Play Console with permission to manage users and permissions
- Access to Google Cloud Console with a Google Cloud project for your app (you can create one during setup)
- Your app created in Google Play Console. If your app is brand new and its initial Play Console setup (store listing, first build upload) isn't finished, Google may not recognize your package name yet (see troubleshooting)
1. Generate your service credentials
There are two ways to generate the credentials. If you're not sure which to choose, use the Automated Setup Script. It completes the Google Cloud steps in this section for you and reduces the chance of a misconfiguration. Choose Manual Setup if you can't run the script (for example, your organization restricts Cloud Shell access) or you want to see and control each step in the Google Cloud Console.
- 🤖 Automated Setup Script
- 📝 Manual Setup
The script runs in Google Cloud Shell, so there's nothing to install locally. It enables the required Google APIs, creates a service account named revenuecat-service-account, grants it the required roles, and generates its JSON key.
1. Open Google Cloud Shell
-
Go to the Google Cloud Shell Editor.
-
Select your project from the dropdown at the top of the page.
-
In the VS Code web editor instance, create a new file named
credentials.shin your home directory.
2. Add the script
Copy and paste the following script into the credentials.sh file:
- Bash
#!/bin/bash

#================================================================================
#================================================================================

# This is a script to automate the setup of Google Cloud service account and credentials, required for integrating your Google Play app with RevenueCat.

# Visit https://console.cloud.google.com/, choose the project you want to use, and then click on the Cloud Shell icon in the top right corner.

# In the Cloud Console shell instance, create a new file called `credentials.sh` and paste the code below into it.

#==[IMPORTANT]== Modify the variables below to match your Google Cloud project and service account.

# After modifying the variables below, run the script by typing `bash credentials.sh` in the Cloud Console shell instance terminal. The console will output the status of the script as it runs.

# Once the script has finished running, you will need to upload the `revenuecat-key.json` file to RevenueCat in your Project Settings > Google Play App Settings > Service account credentials.

#================================================================================
#================================================================================

# Found in Google Cloud Console -> Project Overview -> Project ID
PROJECT_ID="your_google_cloud_project_id"

# The name of the service account to create. You don't need to change this.
SERVICE_ACCOUNT_NAME="revenuecat-service-account"

# The name of the key file to create in this Cloud Console shell instance. You don't need to change this.
KEY_FILE_NAME="revenuecat-key"

#================================================================================
#================================================================================

# Exit on error
set -e

# Helper functions to print styled messages
echo_info() {
  echo -e "\033[1;34m[INFO] $1\033[0m"
}
echo_success() {
  echo -e "\033[1;32m[SUCCESS] $1\033[0m"
}
echo_warning() {
  echo -e "\033[1;33m[WARNING] $1\033[0m"
}
echo_error() {
  echo -e "\033[1;31m[ERROR] $1\033[0m"
}

echo_info "🔎 Starting Google Cloud setup for RevenueCat integration..."

# Check if the PROJECT_ID has been updated
if [ "$PROJECT_ID" == "your_google_cloud_project_id" ]; then
  echo_error "🚨 PROJECT_ID is set to the default value. Please update it with your actual Google Cloud project ID."
  exit 1
fi

echo_info "Switching to project: $PROJECT_ID"
gcloud config set project $PROJECT_ID

# Enable APIs required for this automation script
echo_info "Enabling APIs needed for service account automation..."
gcloud services enable cloudresourcemanager.googleapis.com
sleep 2
gcloud services enable iam.googleapis.com
sleep 2

# Enable APIs required by RevenueCat
echo_info "Enabling RevenueCat required APIs..."
gcloud services enable androidpublisher.googleapis.com
sleep 2
gcloud services enable playdeveloperreporting.googleapis.com
sleep 2
gcloud services enable pubsub.googleapis.com

echo_success "✅ APIs enabled successfully."

# Create Service Account
echo_info "Creating service account: $SERVICE_ACCOUNT_NAME"
gcloud iam service-accounts create $SERVICE_ACCOUNT_NAME \
  --description="Service account for RevenueCat integration" \
  --display-name="RevenueCat Service Account"
echo_success "✅ Service account created successfully."

echo_info "Waiting 30s for service account to be available..."
sleep 30

# Grant Roles
echo_info "Granting roles to the service account..."
gcloud projects add-iam-policy-binding $PROJECT_ID \
  --member="serviceAccount:$SERVICE_ACCOUNT_NAME@$PROJECT_ID.iam.gserviceaccount.com" \
  --role="roles/pubsub.editor"
echo_success "✅ Pub/Sub Editor role assigned."

gcloud projects add-iam-policy-binding $PROJECT_ID \
  --member="serviceAccount:$SERVICE_ACCOUNT_NAME@$PROJECT_ID.iam.gserviceaccount.com" \
  --role="roles/monitoring.viewer"
echo_success "✅ Monitoring Viewer role assigned."

# Create Service Account Key
echo_info "Generating service account key..."
gcloud iam service-accounts keys create $KEY_FILE_NAME.json \
  --iam-account="$SERVICE_ACCOUNT_NAME@$PROJECT_ID.iam.gserviceaccount.com"
echo_success "✅ Service account key created: $KEY_FILE_NAME.json"
echo_info "Keep this key safe and upload it to RevenueCat in your Project Settings > Google Play App Settings > Service account credentials."

# Final Confirmation
echo_info "Verifying service account and key details..."
gcloud iam service-accounts list | grep $SERVICE_ACCOUNT_NAME

echo_info "Listing keys for the service account..."
gcloud iam service-accounts keys list \
  --iam-account="$SERVICE_ACCOUNT_NAME@$PROJECT_ID.iam.gserviceaccount.com"
echo_success "🎉 Setup complete! The service account is ready for RevenueCat integration. Use the file $KEY_FILE_NAME.json for your RevenueCat project, and use the service account $SERVICE_ACCOUNT_NAME@$PROJECT_ID.iam.gserviceaccount.com for permissions in Google Play Console."

exit 0
3. Set your project ID
In the script, set the PROJECT_ID variable to your Google Cloud project ID, as described in the script comments. You can find your project ID in the Google Cloud Console under Project Overview.
4. Run the script
Run the script by typing bash credentials.sh in the Cloud Shell terminal. The console outputs the status of each step as it runs.
If the script logs an error, resolve the reported issue and run it again, or switch to the Manual Setup tab and continue from the step that failed.
5. Download the JSON key
The script saves your service account key as revenuecat-key.json in your Cloud Shell home directory. Download it to your computer: in the Cloud Shell Editor's file explorer, right-click revenuecat-key.json and select Download.
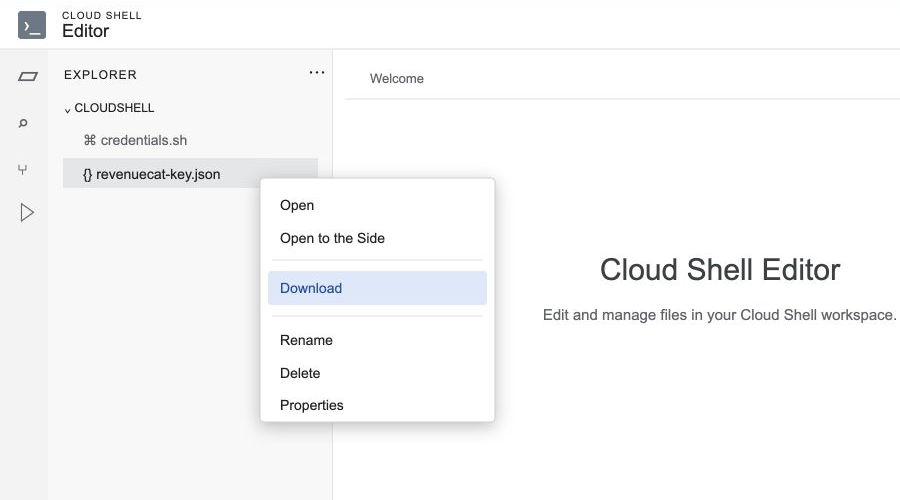
Keep this file handy. Next, you'll grant the service account access in Google Play Console (step 2), then upload this file to RevenueCat (step 3).
If you have feedback on the script and this setup process, let us know in the dashboard Help Center.
All three steps below take place in the Google Cloud Console; you'll switch to Google Play Console in step 2 of this guide. Complete these steps as the Google Cloud project owner, or as a user who holds the Google Play Console permissions listed in step 2.
1. Enable the Google Play Developer and Reporting APIs
- Where: Google Cloud Console
-
Go to the API Console and select the project you want to use from the projects list, or create a new one.
-
Open the Google Play Android Developer API page and click Enable. (The button reads Manage when the API is already enabled.)
-
Do the same on the Google Play Developer Reporting API page.
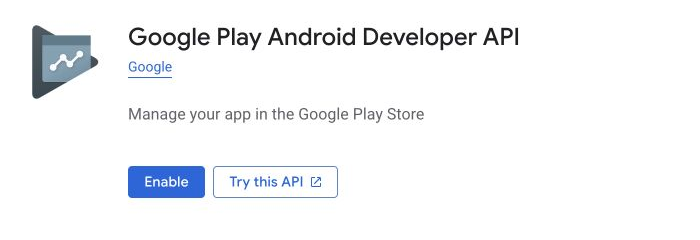
After enabling the APIs, you may see a "To use this API, you may need credentials" message in the API console. That's expected: the credentials are the service account you'll create next, and Google validates them automatically once they exist.
2. Create a service account
- Where: Google Cloud Console ➡️ IAM & Admin ➡️ Service Accounts
- Before you create the account, use the project picker at the top of the page to confirm you're in the same project where you enabled the APIs in step 1.
-
Select Create Service Account. These are the credentials RevenueCat uses to communicate with Google.
-
Name your new account, then select Create and continue.
-
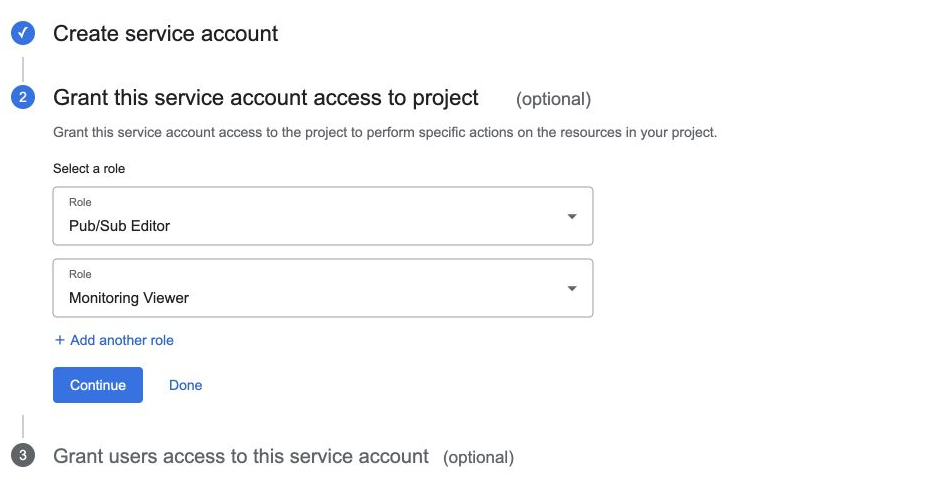
On the Grant this service account access to project step, add two roles:
- Pub/Sub Editor — enables Google Real-Time Developer Notifications
- Monitoring Viewer — allows monitoring of the notification queue
-
Skip the optional third step and select Done.
Google's Create service accounts documentation covers this flow in more depth, and the Google Play Developer API getting started guide describes how service accounts connect to Google Play.
Searching the role filter by name doesn't always surface both roles. You can also find them by scrolling through the list, in the Pub/Sub and Monitoring folders respectively.
While the Pub/Sub Editor role should be enough in most cases, some developers have reported permission errors when creating topics with that role. If you run into issues, try using the Pub/Sub Admin role instead.
3. Create and download the JSON key
- Where: Google Cloud Console ➡️ Service Accounts
-
In the Service Accounts section, select the three dots to open the Actions menu for the account you just created, then select Manage Keys.
-
Select Add Key, then Create new key.
-
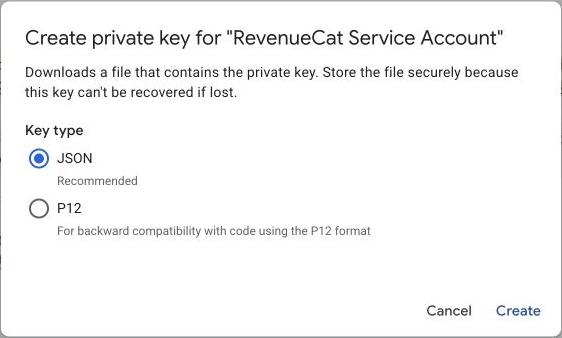
Make sure JSON is selected, then create and download the JSON key. It downloads to your computer. You'll upload it to RevenueCat in step 3.
If you've created your organization in Google Cloud on or after May 3, 2024, there may be some default constraints placed on service account creation and usage.
If you see any errors relating to organization policy constraints iam.disableServiceAccountCreation or iam.disableServiceAccountKeyCreation when creating your service account or creating your JSON key, these constraints may need to be turned off. You can do so by navigating to your project in Google Cloud Console ➡️ IAM & Admin ➡️ Organization Policies ➡️ Disable service account creation or Disable service account key creation.
While you're in the Google Cloud Console, get a head start on setting up Google Real-Time Developer Notifications by ensuring Google Cloud Pub/Sub is enabled for your project.
2. Add the service account to your app in Google Play Console
Your service account exists, but it can't see your app yet. Invite it to your app in Google Play Console and grant it the permissions RevenueCat needs.
-
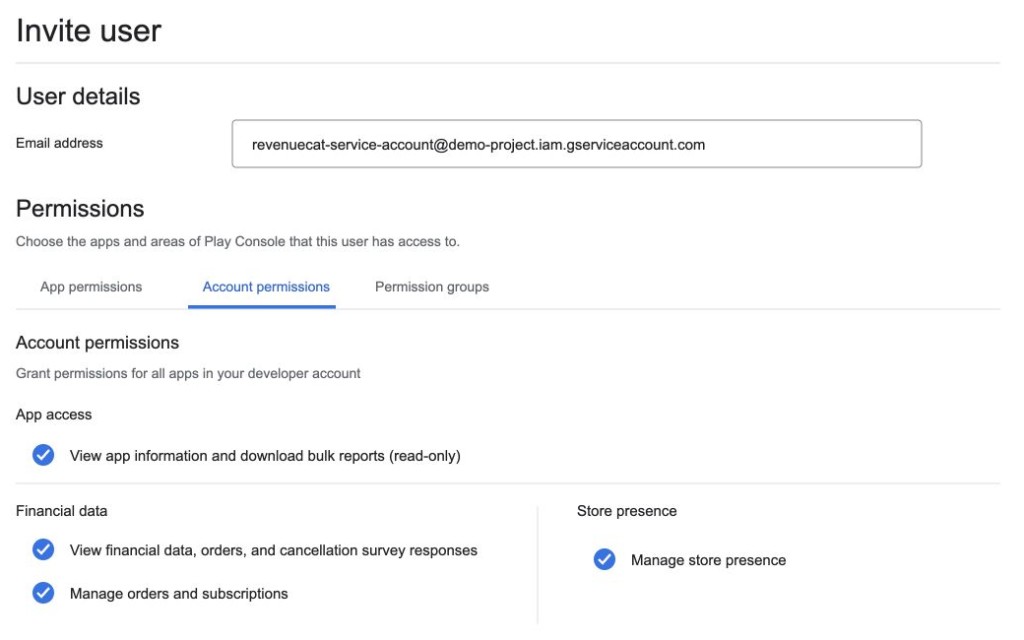
Invite the service account as a user.
In Google Play Console, go to the Users and Permissions section and select invite user.
Enter the service account's email address: it's the
client_emailvalue inside the JSON key file you downloaded in step 1. If you used the automated script, it looks likerevenuecat-service-account@your-project-id.iam.gserviceaccount.com. Don't use your own Google account email or any other email from the script output. -
Add your app.
Under App permissions, add the app this service account should access.
-
Grant the account permissions.
Under Account permissions, grant the following four permissions:
Permission Why RevenueCat needs it View app information and download bulk reports (read-only) Read your app and in-app product details View financial data, orders, and cancellation survey responses Validate purchases and read order data Manage orders and subscriptions Manage subscriptions, for example refunds and deferrals Manage store presence Create and update Products in Google Play from RevenueCat, for example with the Product Editor, the MCP server, or the AI Toolkit Find Manage store presence under the Store presence category. If your service account was already invited without one of these permissions, open it in Users and permissions, enable the missing permission, and save.
The other permissions are yours to choose, as long as those four are granted. For Google's definitions of each permission, see Add developer account users and manage permissions in the Play Console Help Center.
-
Send the invite.
Select Invite user at the bottom of the page and send the invite. You'll be redirected to Users and Permissions, where your newly created account should show as active.
3. Upload the credentials JSON to RevenueCat
- Where: RevenueCat dashboard ➡️ Apps ➡️ your Play Store app ➡️ Service Account Credentials JSON
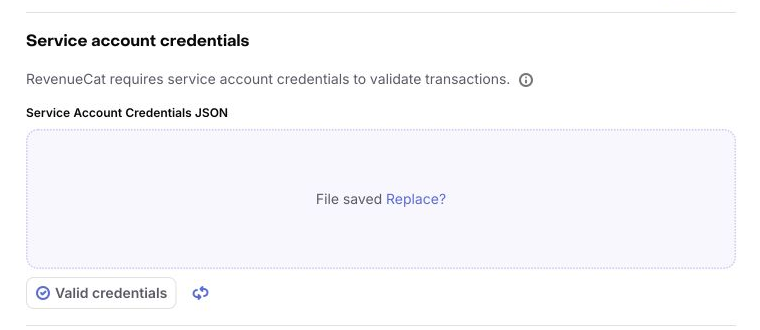
In the RevenueCat dashboard, open your project's Apps page, select your Play Store app, and find the Service Account Credentials JSON field. Drop in the JSON key file you downloaded in step 1 (or select it from the file picker) and save your changes. Within approximately 36 hours, your credentials will be activated and RevenueCat will be ready to handle Google Play purchases.
In Google Play Console, open your app's dashboard and visit the Monetize section. Go to Products ➡️ Subscriptions/In-app products, change the description of any product, and save the changes. This should enable the new service credentials right away (or very shortly), and you can then revert the changes to that product. It's not guaranteed to work, but has worked for others in the past. Otherwise, credentials usually start working within 24 hours, but possibly more than 36.
While you're in your RevenueCat Play Store app settings waiting for your credentials to activate, set up your Google Real-Time Developer Notifications. If you enabled Pub/Sub in step 1 of this guide, skip ahead to choosing a Pub/Sub topic ID.
4. Upload a signed APK or Android App Bundle
- Where: Google Play Console
To start making purchases, upload your signed APK or Android App Bundle to Google Play Console and complete the steps to approve the release. Our Google Play Store sandbox testing guide walks through the process, including setting up a testing track and adding testers.
5. Verify your credentials
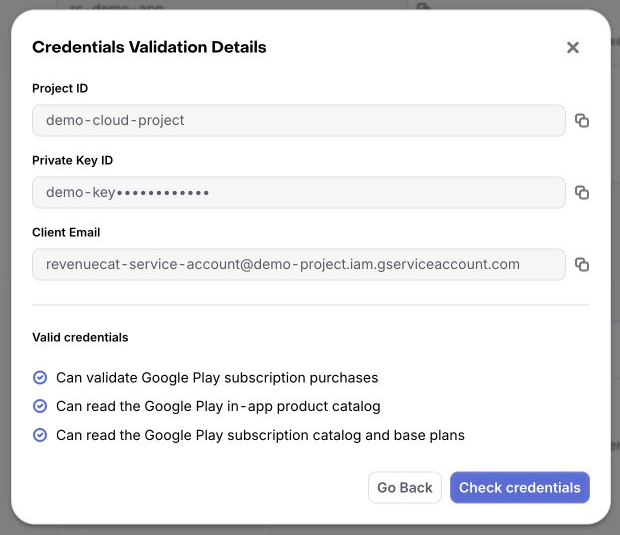
RevenueCat validates your Google credentials every time they're (re)uploaded, and you can re-run the validation at any time from your app settings.
In your Play Store app settings, select the status label under your uploaded JSON file (for example, Valid credentials) to open Credentials Validation Details. The modal shows the credential's Project ID, Private Key ID, and Client Email, and lists each validation check. Select Check credentials to run the validation again.
It can take up to 36 hours for your credentials to be validated. If a validation check keeps failing, see A validation check keeps failing in the troubleshooting article.
Troubleshooting
If your credentials aren't validating or you hit errors during setup, see Troubleshooting Google Play service credentials for the most common causes and fixes. To confirm you completed every step, use the Google Play checklist.
Next steps
- Set up Google Real-Time Developer Notifications so RevenueCat is notified of purchase events by Google as they happen
- Set up your products, Entitlements, and Offerings so RevenueCat knows what your customers can buy
- Make a test purchase by following the Google Play Store sandbox testing guide