Unity
Instructions for installing Purchases SDK for Unity
What is RevenueCat?
RevenueCat provides a backend and a wrapper around StoreKit and Google Play Billing to make implementing in-app purchases and subscriptions easy. With our SDK, you can build and manage your app business on any platform without having to maintain IAP infrastructure. You can read more about how RevenueCat fits into your app or you can sign up free to start building.
Installation

We provide 2 ways to install our SDK: via Unity Package Manager (UPM) in the OpenUPM registry, or as a .unitypackage.
Option 1 (recommended): Install using OpenUPM
-
First you need to import the EDM4U plugin into your project if you haven't already. This plugin will add all the Android and iOS dependencies automatically when building your project. To do this, you can:
-
Then, you can add the OpenUPM scoped registry. To do this, go to your project's settings -> Package Manager, and add a new scoped registry with URL
https://package.openupm.comand scopes:com.openupmandcom.revenuecat.purchases-unity. It should look like this:

- Then, go to the Package Manager and from "My Registries", select the RevenueCat package and click on Install.
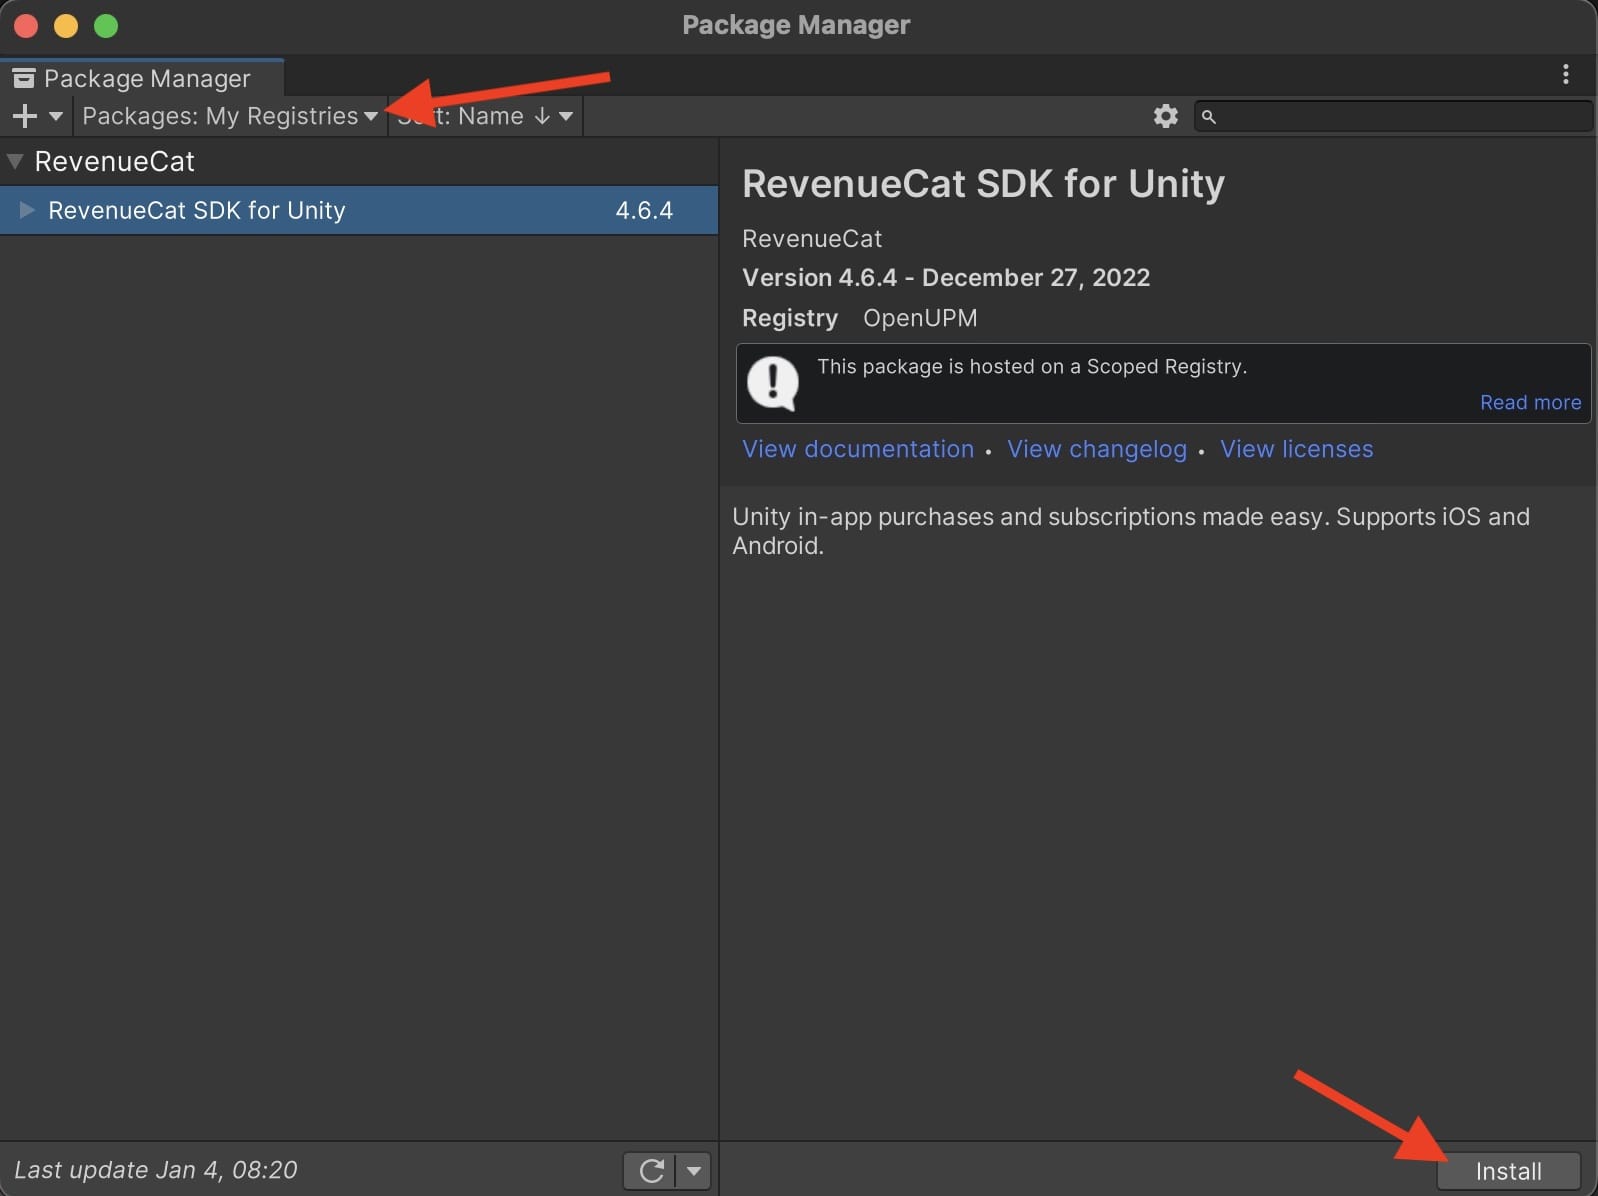
If you prefer, you can also use OpenUPM-CLI to add the scoped registry and the package through the command line. To do that, install the OpenUPM-CLI if you haven't already, then run openupm add com.revenuecat.purchases-unity. That should be it!
If you're using UnityIAP alongside RevenueCat, you need to follow special instructions outlined below.
Option 2: Import the Purchases Unity package
Download the latest version of Purchases.unitypackage.
Now, import the downloaded unitypackage to your Unity project. Make sure the PlayServiceResolver and the ExternalDependencyManager folders are also added. These folders will install the EDM4U plugin, which will add all the Android and iOS dependencies automatically when building your project.
If you're running purchases-unity v3.5.1 or later, also make sure that the RevenueCatPostInstall script is added, since it will set up StoreKit for iOS and prevent issues when uploading builds to App Store Connect in Unity 2020.
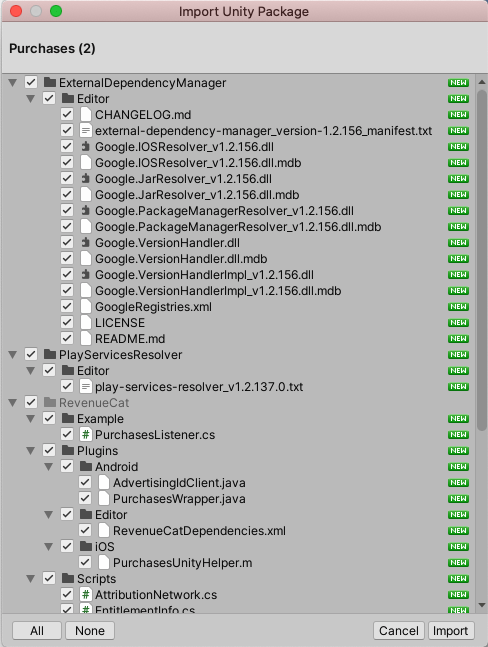
Make sure the ExternalDependencyManager is properly installed. Otherwise our plugin will not be able to compile. If you don't see the option under the Assets menu after restarting the editor, try reinstalling the RevenueCat plugin or manually importing the EDM4U plugin.
iOS dependency manager (CocoaPods or Swift Package Manager)
On iOS, the RevenueCat SDK's native dependencies can be installed through either CocoaPods or Swift Package Manager (SPM). Both are fully supported. SPM support is available starting with purchases-unity 9.1.0 and requires EDM4U 1.2.187 or newer (the external-dependency-manager-latest.unitypackage linked above is sufficient).
Because CocoaPods is being deprecated, we recommend Swift Package Manager. With EDM4U 1.2.187+ SPM is enabled by default. To verify or change the setting:
- In Unity, go to Assets → External Dependency Manager → iOS Resolver → Settings.
- Toggle Swift Package Manager Enabled to the value you want.
- Click OK.
When SPM is enabled, the next iOS build adds the RevenueCat dependencies as Swift Packages to the generated Xcode project. If you are migrating an existing project that previously used CocoaPods, EDM4U also removes the matching entries from the Podfile automatically. Any other CocoaPods dependencies in your project continue to work as before — SPM and CocoaPods can coexist in the same iOS build.
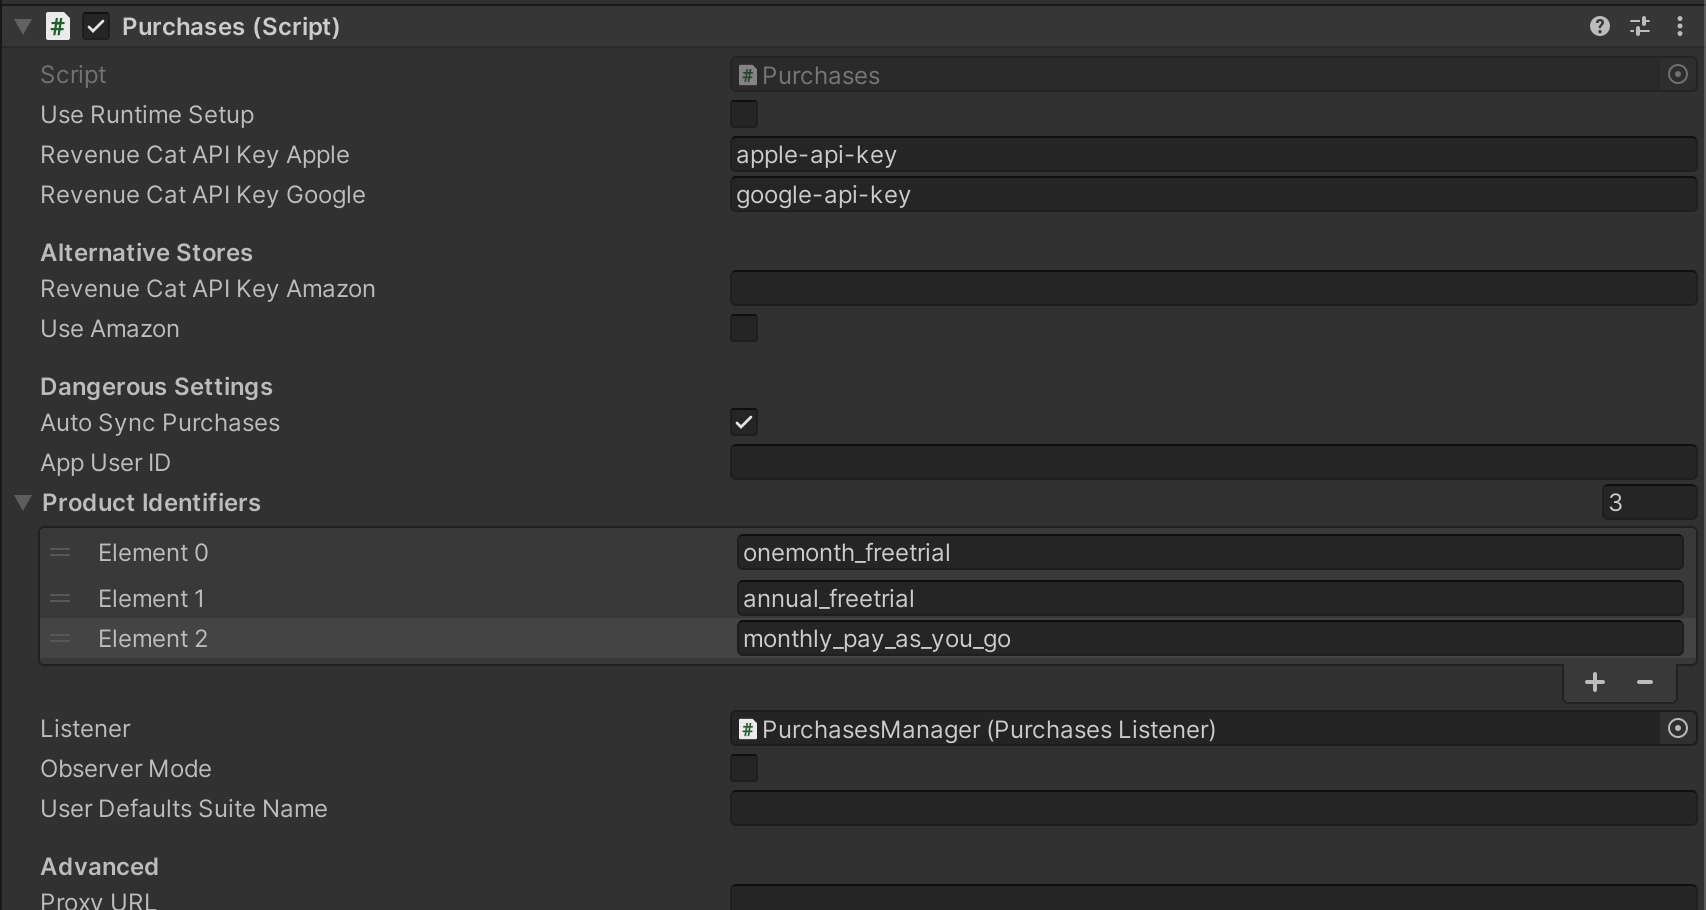
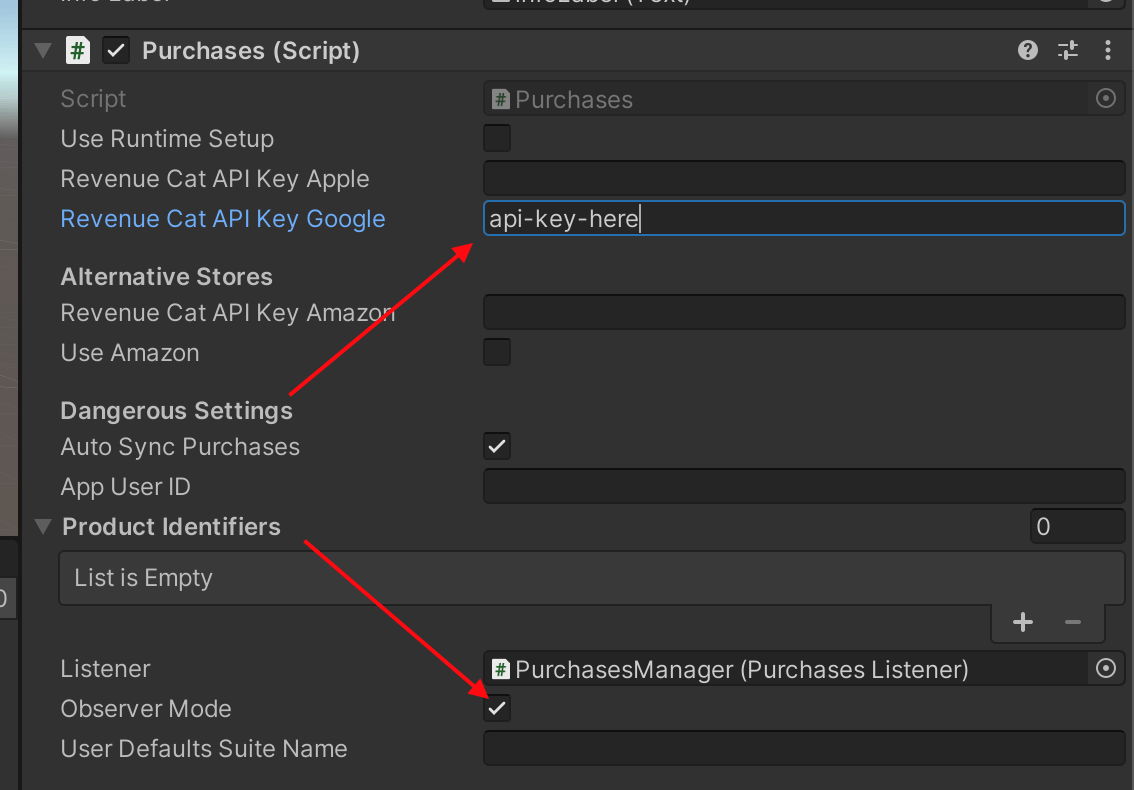
Create a GameObject with the Purchases behavior
The Purchases package will include a MonoBehavior called Purchases. This will be your access point to RevenueCat from inside Unity. It should be instantiated once and kept as a singleton. You can use properties to configure your API Key, app user ID (if you have one), and product identifiers you want to fetch.
Link StoreKit (iOS only)
StoreKit should automatically be linked. If you run into any issues, add StoreKit.framework to Linked Frameworks and Libraries in Xcode.
Set the correct launchMode (Android only)
Depending on your user's payment method, they may be asked by Google Play to verify their purchase in their (banking) app. This means they will have to background your app and go to another app to verify the purchase. If your Activity's launchMode is set to anything other than standard or singleTop, backgrounding your app can cause the purchase to get cancelled. To avoid this, set the launchMode of your Activity to standard or singleTop in your Android project's AndroidManifest.xml file:
- AndroidManifest.xml
<activity
    android:name="com.your.Activity"
    android:launchMode="standard" />  <!-- or singleTop -->
You can find Android's documentation on the various launchMode options here.
Subclass Purchases.Listener MonoBehavior
The Purchases behavior takes one additional parameter, a GameObject with a Purchases.Listener component. This will be where you handle purchase events, and updated subscriber information from RevenueCat. Here is a simple example:
- Unity
using System;
using System.Collections.Generic;
using UnityEngine;

public class PurchasesListener : Purchases.UpdatedCustomerInfoListener
{
    public override void CustomerInfoReceived(Purchases.CustomerInfo customerInfo)
    {
        // display new CustomerInfo
    }

    private void Start()
    {
        var purchases = GetComponent<Purchases>();
        purchases.SetDebugLogsEnabled(true);
        purchases.GetOfferings((offerings, error) =>
        {
            if (error != null)
            {
                // show error
            }
            else
            {
                // show offering
            }
        });
    }

    public void BeginPurchase(Purchases.Package package)
    {
        var purchases = GetComponent<Purchases>();
        purchases.PurchasePackage(package, (productIdentifier, customerInfo, userCancelled, error) =>
        {
            if (!userCancelled)
            {
                if (error != null)
                {
                    // show error
                }
                else
                {
                    // show updated Customer Info
                }
            }
            else
            {
                // user cancelled, don't show an error
            }
        });
    }

    void RestoreClicked()
    {
        var purchases = GetComponent<Purchases>();
        purchases.RestorePurchases((customerInfo, error) =>
        {
            if (error != null)
            {
                // show error
            }
            else
            {
                // show updated Customer Info
            }
        });
    }
}
Unity Editor
Running the Purchases SDK is unsupported in the Unity Editor at this time, and may result in NullReferenceException: Object reference not set to an instance of an object errors. Please build and run your app instead.
Proguard rules
If you have enabled Minify in Unity, make sure to add these custom rules to your Assets/Plugins/Android/proguard-user.txt and enable the Custom Proguard File setting in Publishing Settings:
-keep class com.revenuecat.** { *; }
Installation with Unity IAP side by side
Starting with version 8.0.0, RevenueCat's Purchases Unity SDK is compatible with Unity IAP 5.0.0 and above.
If you're using an older version of Unity IAP, you'll need to upgrade to Unity IAP 5.0.0 or later to use the current version of the Purchases Unity SDK.
Unity IAP 5 has removed support for the Amazon Appstore. If you need to support Amazon purchases, we recommend using the latest Purchases Unity SDK (8.0.0+) and letting RevenueCat handle all purchases directly.
Completing transactions with your own IAP code requires consistent configuration across all stores. If you complete purchases with your own IAP code for Amazon, you must also do so for Google Play. However:
- Unity IAP 4 supports Amazon but uses an older BillingClient
- Purchases Unity 4.16.0 (last version compatible with Amazon SDK 2.0.76) doesn't work with the newer Google Play BillingClient required for current Unity IAP versions
- Unity IAP 5 removed Amazon support entirely
This means you cannot simultaneously support both Google Play and Amazon when completing transactions with Unity IAP. The recommended approach is to use RevenueCat to handle all purchases for both stores.
If your app only supports Amazon (not Google Play) and you want to complete purchases with your own IAP code, you can use Purchases Unity 4.16.0 with Unity IAP 4.
Troubleshooting "duplicated class" errors
If using RevenueCat alongside Unity IAP or other plugin that includes the Android BillingClient library, you may get an error when compiling that warns about some BillingClient classes being duplicated.
The easiest way to remove the error would be to tell Gradle to not include the billingclient library that Unity IAP is already including.
In order to do that, make sure you have Custom Main Gradle Template selected in the Android Player Settings... That should create a mainTemplate.gradle inside the Assets/Plugins/Android.

Modify the mainTemplate.gradle to include the following at the end of the dependencies block:
- Groovy
dependencies {
    ...

    // ** ADD THIS **
    configurations.all {
        exclude group: 'com.android.billingclient', module: 'billing'
    }
}
Perform a clean up of the resolved dependencies using the Assets/External Dependency Manager/Android Resolver/Delete Resolved Libraries menu. This will cleanup the previously downloaded .aars in Assets/Plugins/Android. Otherwise you could end up with duplicated classes errors.
Also make sure to perform a resolve, so External Dependency Manager adds the right dependencies to the generated build.gradle.
The above instructions will also apply if using other plugin that includes the Android InAppBillingService class, or for some other reason you get an error regarding duplicated classes.
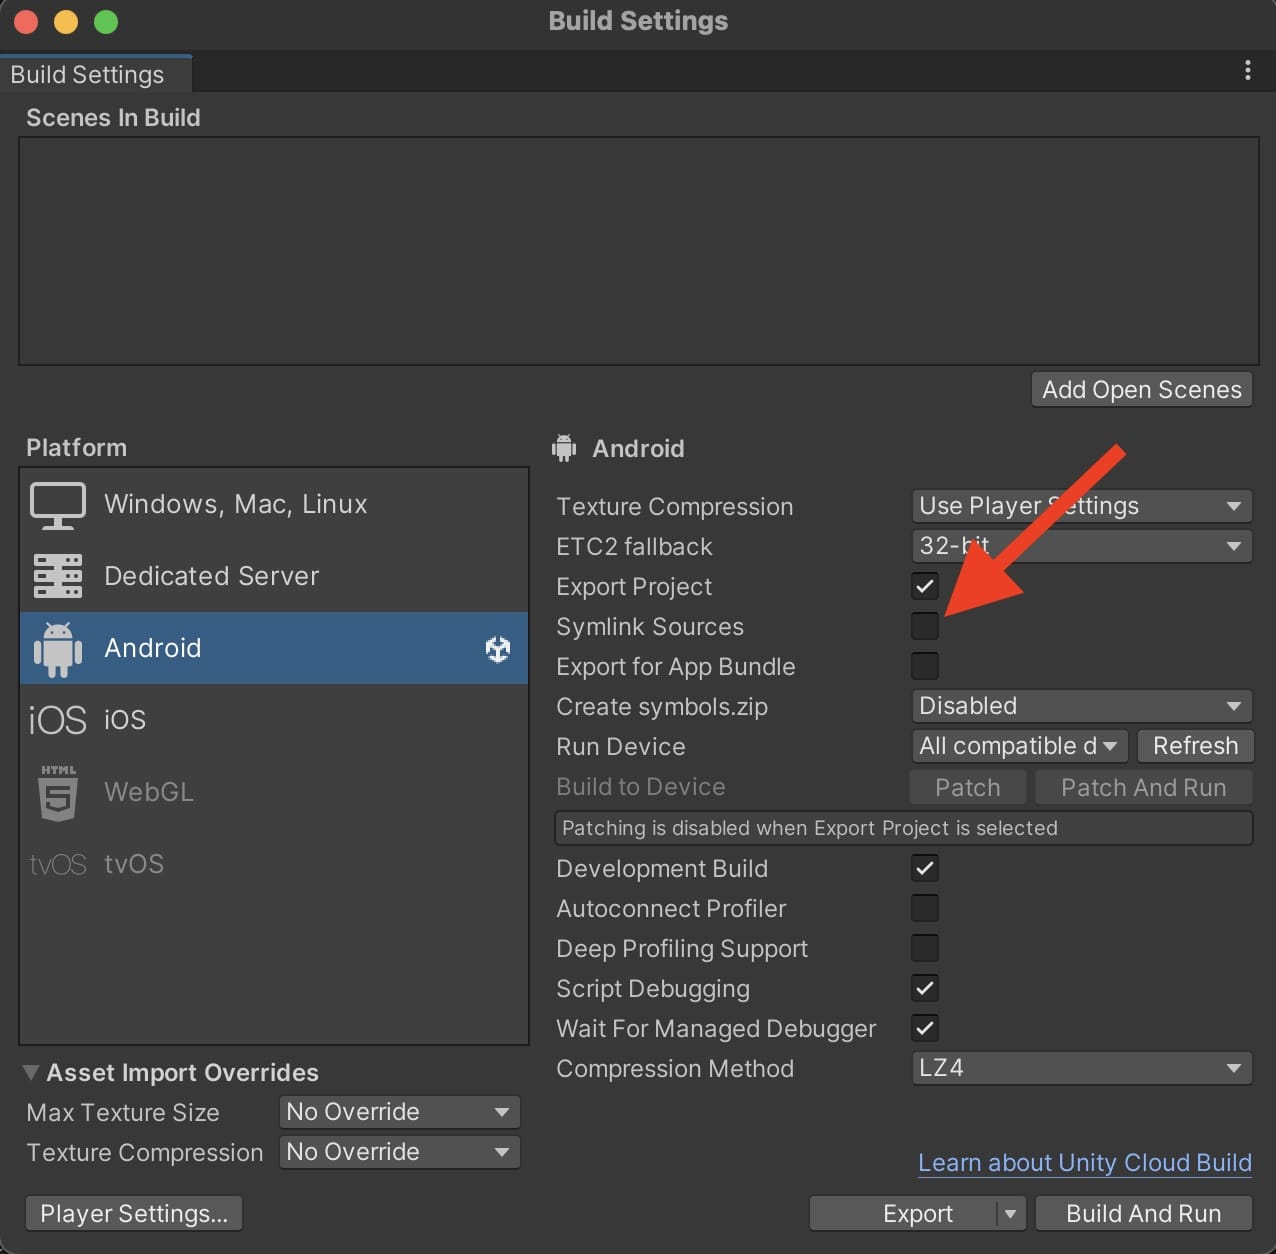
Troubleshooting "ClassNotFoundException" errors at Runtime in Android
When exporting your project to Android, in the Build Settings window, make sure you uncheck the Symlink Sources checkbox. That will make it so Unity actually uses the correct source files for our SDK.
Completing Transactions with your own IAP Code
Due to compatibility issues with Unity IAP and Amazon SDK versions, we do not recommend completing transactions with Unity IAP for Amazon Store. See the Amazon Store Support warning above for details.
For Google Play (can also be done programmatically, see Configuration section)
For Amazon Store (can also be done programmatically, see Configuration section)

If using RevenueCat alongside Unity IAP or other plugin that includes the Android InAppBillingService class, follow these instructions
On Android, RevenueCat will not consume or acknowledge any purchase if you tell the SDK that your app will complete purchases, so be sure your app is handling that. Failure to do so will result in your purchases being refunded after 3 days.
Next Steps
- Now that you've installed the Purchases SDK in your Unity app, get started building with Purchases →