Migrate from the RevenueCat Firebase Extension
Move from the deprecated RevenueCat Firebase Extension to the Firebase function kit



This article shows you how to move from the RevenueCat Firebase Extension to the Firebase function kit. By the end, RevenueCat will send its webhooks to the kit, the kit will run with your extension's configuration, and the extension will be uninstalled.
Google shuts down Firebase Extensions on March 31, 2027. After that date, the extension can no longer be managed, so migrate before then.
Follow this guide if you installed the RevenueCat Firebase Extension (revenuecat/firestore-revenuecat-purchases). If you're setting up Firestore for the first time, install the Firebase function kit instead. The Google Analytics part of the Firebase integration doesn't use Firebase Extensions and isn't affected.
firebase ext:migrate installs the kit with your extension instance's configuration and deploys it. Your shared secret, collections, custom claims setting, and Eventarc events carry over. Your Firestore data and custom claims aren't touched.
Your webhook URL changes from ext-<instance-id>-handler to kit-<instance-id>-handler. RevenueCat keeps sending events to the URL in your dashboard, so keep the extension installed until you've switched it.
Prerequisites
- Firebase CLI 15.32.0 or later. See the Firebase function kit's prerequisites.
- Permission to create service accounts and set the project's IAM policy, for example the Owner role, or Editor plus Project IAM Admin. The migration deploys the kit, which runs under its own service account.
- Your extension's instance ID.
firebase ext:list --project <project-id>lists it. It's also part of the extension's function name,ext-<instance-id>-handler, which you'll find in Webhook URL under Project > Integrations > Firebase in the RevenueCat dashboard. - A Firebase project directory with a
firebase.json. If you installed the extension from the Firebase console and have nofirebase.json, runfirebase initor create an emptyfirebase.jsonthere first.
1. Run the migration
From your Firebase project directory, run the migration. Don't pass --force: it uninstalls the extension without asking.
firebase ext:migrate --ext-instance <extension-instance-id> --package @revenuecat/firestore-revenuecat-purchases --project <project-id>
The CLI asks the following, in this order:
- If it offers to update the extension first, accept.
- It warns that the package is a third-party kit. Confirm to continue.
- Keep the default kit name and instance name. The instance name defaults to your extension's instance ID, so the function becomes
kit-<instance-id>-handler. - If it asks for
FUNCTION_DEFAULT_REGION, enter your extension'sLOCATION. - Confirm the service account and roles the kit's function uses.
- When it asks Uninstall it now?, answer No. RevenueCat still sends events to the extension until you switch the webhook URL.
Like an install, the migration creates a function-kits/<kit-id>/ folder in your project, with the kit's source and configuration. Keep it with your project: you update a migrated kit the same way as any other.
2. Switch the webhook URL
Copy the new function's URL from firebase functions:list --project <project-id>. It ends in kit-<instance-id>-handler.
In the RevenueCat dashboard, go to Project > Integrations > Firebase, paste the URL into Webhook URL, and select Save.
3. Check that events are delivered
Check that new events reach the kit, as described in Check that it works. The first event fails with a 400 InvalidApiVersionError and is retried a few minutes later. That's how RevenueCat learns the kit's version.
4. Uninstall the extension
Once events reach the kit, uninstall the extension:
firebase ext:uninstall <extension-instance-id> --project <project-id> --immediate
Pass --immediate. Without it, the command only removes the extension from your local firebase.json and leaves it deployed.
Your shared secret survives the uninstall: firebase ext:migrate moved it from the extension to Cloud Functions, so the kit keeps using it.
Differences from the extension
The kit keeps the extension's parameters, shared secret, Firestore documents, custom claims, and Eventarc event types. What changes:
- The function runs on Cloud Functions 2nd gen, under its own service account.
- It runs on Node.js 24 instead of the extension's Node.js 22.
- The webhook URL and the function name start with
kit-instead ofext-. - Eventarc events have a different
sourceattribute, shown in the table below. Filters onsourceneed updating, and filters ontypekeep working. - Your migrated kit keeps the extension's Eventarc channel. A fresh install of the kit doesn't create one.
| Publisher | Eventarc source attribute |
|---|---|
| Firebase Extension | //firebaseextensions.googleapis.com/extensions/projects/<project-id>/instances/<instance-id> |
| Firebase function kit | projects/<project-id>/locations/<location>/services/kit-<instance-id>-handler |
Troubleshooting
Webhook events fail with "could not be authenticated" after a migration
After a migration, function-kits/<kit-id>/config-<instance-id>/.env.<project-id> has a FIREBASE_SECRET_REF_REVENUECAT_SHARED_SECRET line that still points at the extension's shared secret. Before you set a new shared secret, delete that line. Then follow the steps in Webhook events fail with "could not be authenticated".
403 Permission denied to enable service (eventarcpublishing.googleapis.com)
If a command that changes the RevenueCat Firebase Extension, such as updating it during the migration or uninstalling it, fails with a 403 error in DeploymentManager, grant the Cloud Services service account the Editor role:
- Open Google Cloud IAM settings and select Grant Access.
- In New principals, enter
<PROJECT_NUMBER>@cloudservices.gserviceaccount.com, replacing<PROJECT_NUMBER>with your project number. - In Role, select Editor.
- Select Save.
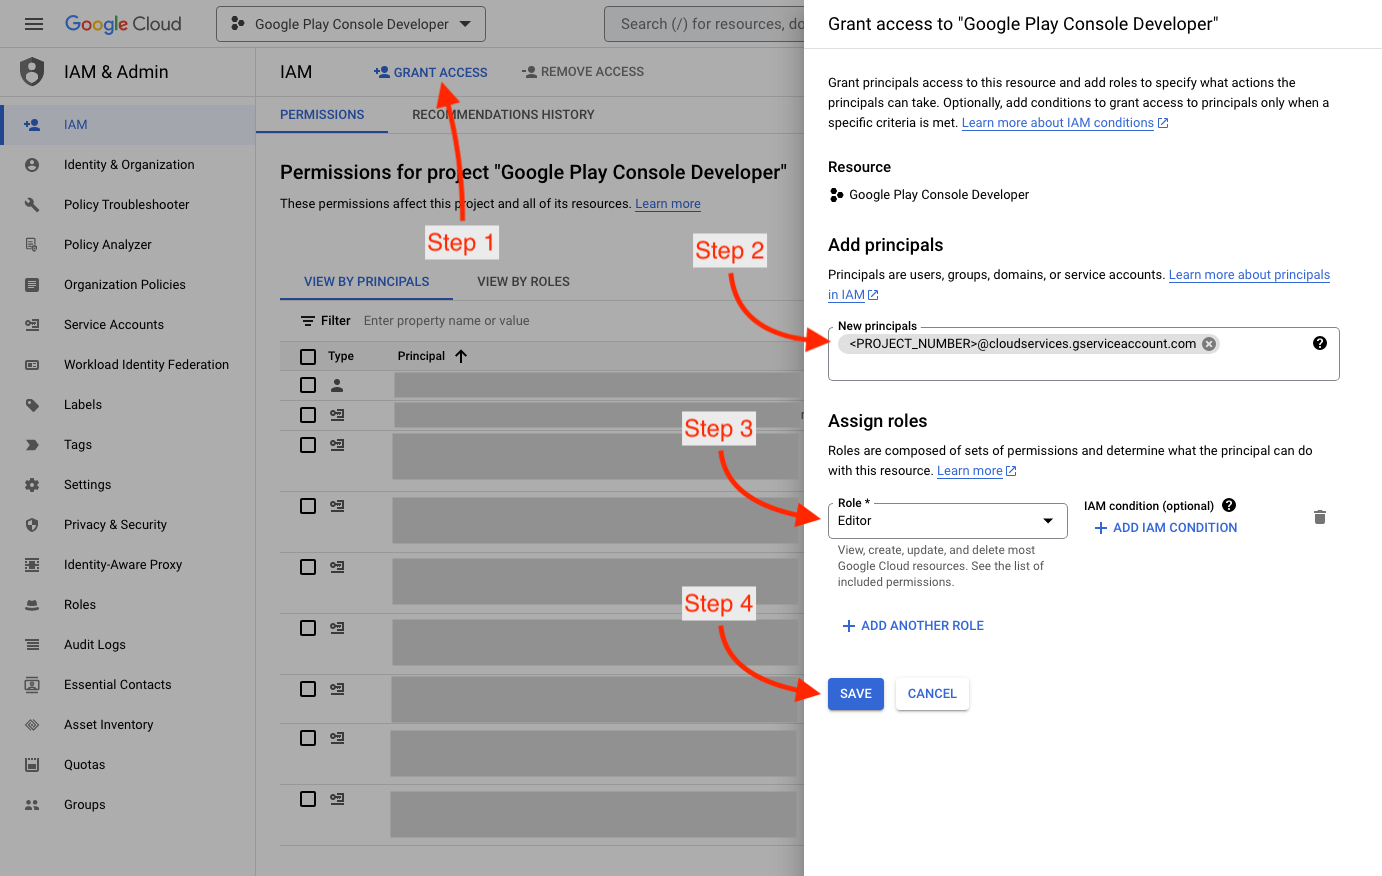
Then run the command again.
Next steps
- Update the Firebase function kit
- React to events with Eventarc
- Troubleshoot the Firebase function kit