
At RevenueCat, we run an ever-changing number of web servers to meet the demands of all of the developers using the RevenueCat SDK in their applications. As we’ve grown, we’ve had to make our code more efficient and scale out horizontally by adding more web servers. Each of these web servers must maintain a pool of connections to our database cluster. As the number of web servers we used grew, so did the limitations we ran into by having each server directly manage its connections to our database cluster.
To mitigate this, we decided to introduce a connection pooler — which would allow us to safely add web servers without drastically increasing the number of database connections, as well as introduce more sophisticated pooling mechanisms that are more efficient for our workload. This was particularly important for us, since we were approaching high connection counts from our web servers, and that could eventually result in a significant performance degradation. Our main database cluster is an AWS RDS cluster using AWS Aurora. Since Aurora is based on Postgresql, which does not have a built-in connection pooler, we decided to introduce PgBouncer into our system in order to centralize management of connections to our database cluster.
This post gives a brief overview of how we rolled out PgBouncer on AWS. Keep in mind that running a connection pooler heavily depends on your application’s workload, and the settings that make sense for one application might not make sense for others. However, we hope this overview gives you an idea of how PgBouncer can be leveraged.
Running PgBouncer on AWS
We’ve already had a pretty good experience using the AWS Elastic Container Service to run other containerized applications, so we decided to use it for PgBouncer as well.
Our AWS configuration for this lives in a Terraform module so we can easily and safely make configuration changes and deploy new PgBouncer instances when needed.
Container Stack
Our PgBouncer ECS task definition uses three containers:
For the image, we used Edoburu’s Minimal PgBouncer image. While it’s unofficial, the Edoburu image does a good job of exposing PgBouncer settings via environment variables. Additionally, the code for the image itself is relatively straightforward and easy to understand.
The other two images are used for monitoring and sending metrics. (More on that later.)
Task Settings
We’re currently running our tasks on AWS Fargate. As a side note, PgBouncer is incredibly efficient. The entire thing is written in C and leverages libuv for asynchronous I/O. We currently run tasks on 1 vCPU with 2 gigabytes of memory, and it rarely goes above 30% CPU usage (this includes the additional Docker containers for collecting metrics).
It’s important to note that PgBouncer is not multithreaded. So if you need more than one core, you’ll need to run multiple processes and account for this in your configuration. Another potential “gotcha” is the possibility of hitting ulimits. Because PgBouncer uses libuv for async I/O, you are likely to hit these if they aren’t tweaked in your ECS task definition. Luckily, it’s easy to set this to a higher number in the container definition for the PgBouncer container:
For redundancy, we run two PgBouncer ECS tasks on subnets in two separate AWS availability zones and evenly distribute connections between the two.
Network Load Balancer vs. Service Discovery
When we first started using PgBouncer, our application code was still running on Heroku. To direct connections from Heroku to a PgBouncer instance, we used an AWS Network Load Balancer. However, we recently migrated our application servers to AWS ECS, so we have switched to using ECS Service Discovery.
If you’re not sure which one to use for your setup, here are a couple of pros and cons to help you decide:
Network Load Balancer
A network Load Balancer is the only option if you want to connect to PgBouncer outside of an AWS VPC. Heads-up: an AWS ELB will incur bandwidth charges even if the traffic is coming from the same AWS region.
AWS ECS Service Discovery
If all of the clients and the downstream PostgreSQL server are already in an AWS VPC, you can save on bandwidth charges by using AWS ECS Service Discovery. With this approach, you’ll have an internal hostname that will resolve the local IP address of one of your PgBouncer tasks. This approach will still evenly load balance connections across tasks, as each DNS query returns a random sorting of A records.
Monitoring
PgBouncer tracks a bunch of metrics on its own; however, the mechanism to access them is a strange pseudo-database that you have to connect to and query. In order to get metrics out in a standardized format and protocol, we used this open-source Prometheus exporter for PgBouncer. It connects to the database and runs a web server that exports Prometheus metrics.
We currently don’t have a Prometheus server to ingest these, but we run an Elasticsearch cluster (mainly for log management), and Elastic provides support for ingesting Prometheus via their Metricbeat tool.
Once you have something ingesting the metrics, it’s easy to make a nice dashboard to track performance:
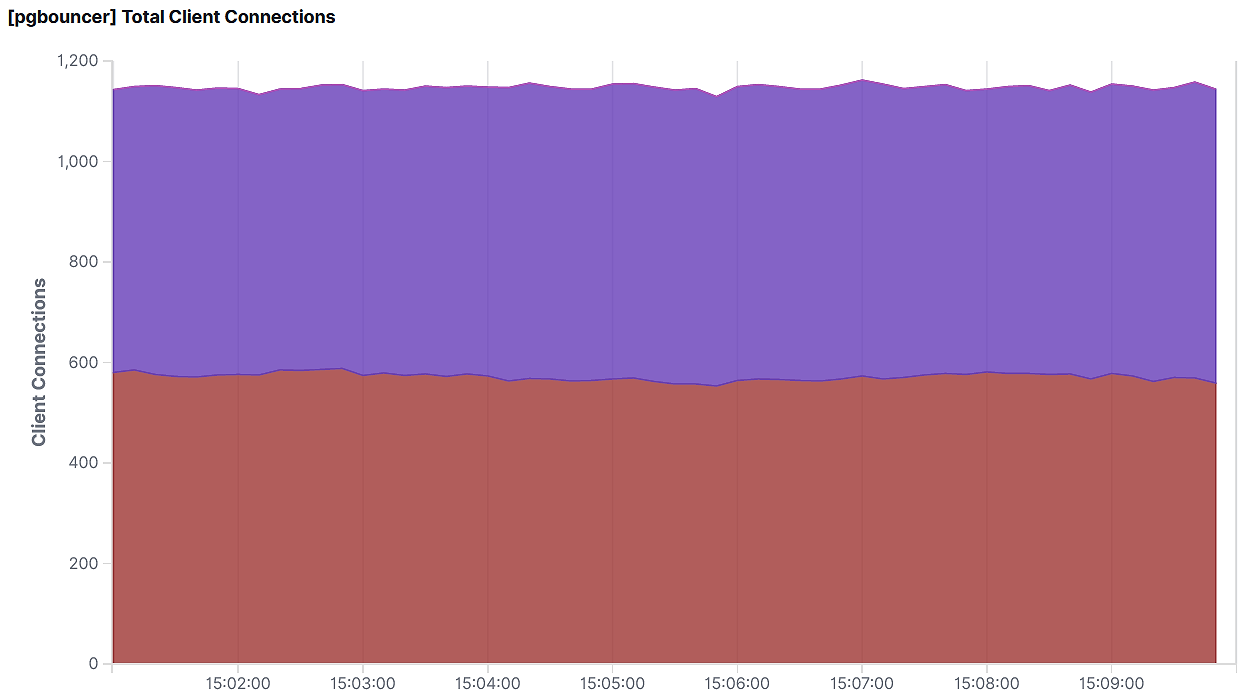
Connections from our application server to PgBouncer
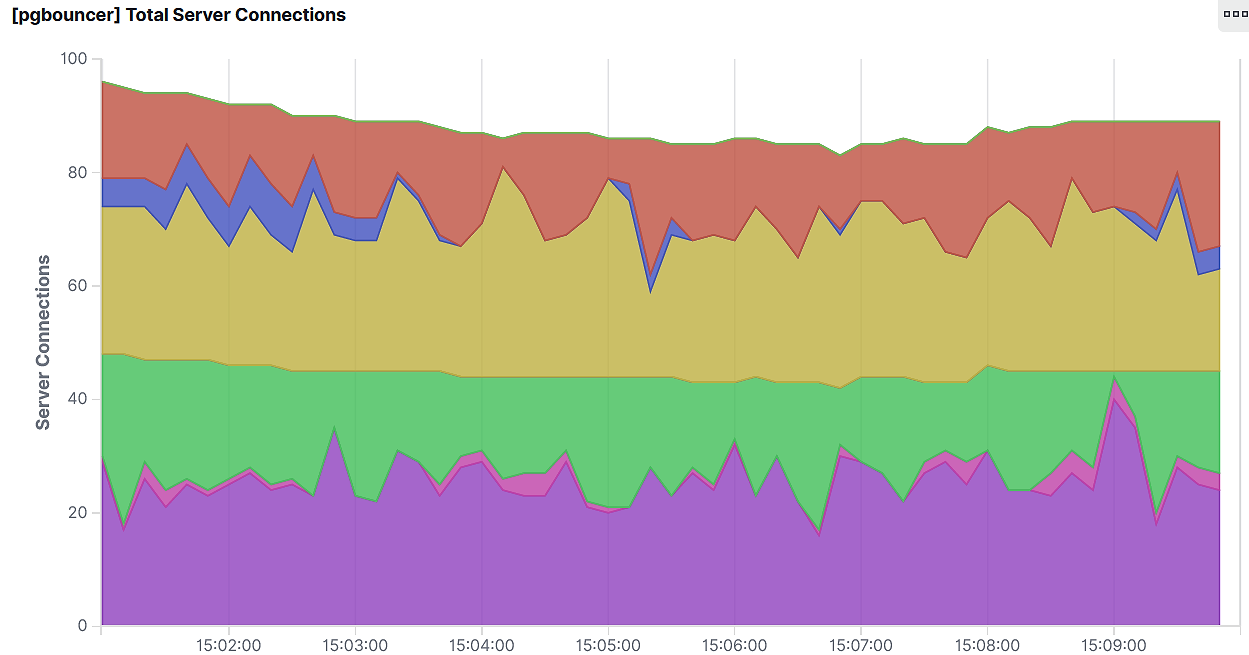
Connections from PgBouncer to RDS — as you can see from the two charts, we’re able to pool 1200 connections from our application servers down to about 100 connections to our RDS cluster.
The Prometheus exporter tool exports everything PgBouncer tracks, but here are the metrics we’ve found to be the most useful:
- Overall number of connections to the backing database (PgBouncer tracks these in separate states depending on how the connection is being used).
- An average and 95th percentile for any time clients spend waiting to get a connection from PgBouncer.
PgBouncer Settings
Now that we have a way to run PgBouncer and monitor it, let’s talk about configuring it to work correctly for your application. Before we dive in, it’s worth noting that PgBouncer has excellent documentation on all of the available settings. There aren’t too many, so be sure to take a look at what’s available.
Here are some of the things we have tweaked in our configuration:
Pooling Mode
This is arguably the most impactful feature PgBouncer has to offer, as it allows you to explicitly configure how connections are shared across downstream clients. We’re currently using transaction pooling. This gives us a nice efficiency boost, since connections do not need to be held by downstream clients for the entire duration of their session — instead, they can be recycled between transactions. For this to work, though, there are some restrictions that you’ll want to double check.
Connection Limits
You’ll likely want to change the default connection limits for both the number of connections to the downstream server and the number of clients connected to PgBouncer.
In our case, we use the following settings:
- max_client_conn — Sets how many clients can connect to PgBouncer. (For us, the default of 100 was way too low.)
- default_pool_size — Sets the limit on how many connections PgBouncer can make to the downstream server.
- min_pool_size — Sets the minimum number of connections PgBouncer should maintain.
After making these adjustments, we’re now able to squish down around 1200 concurrent application connections into roughly 100 connections from PgBouncer to our RDS cluster.
TCP Keepalive Settings
One issue you may run into when running PgBouncer behind an AWS Network Load Balancer is that the default connection timeouts (which you cannot change) are much more aggressive than the default timeouts.
To address this, we had to lower the tcp_keepalive parameter to make it compatible with the load balancer.
Wrap-Up
After introducing PgBouncer, we saw a nice reduction in overall database load. As we have grown to support subscriptions for more and more apps, PgBouncer has proved to be invaluable — we’re able to scale out more efficiently without adding too much strain to our RDS cluster.
Further Reading
If you’re considering PgBouncer and your Postgres database is running on AWS RDS, it might be worth considering the AWS RDS Proxy service. We didn’t go this route because it was a relatively new service at the time and would not work with our Heroku setup (at the time, you could only access the proxy from within a VPC).
For a great overview of PgBouncer and how it works, check out this talk by one of the project maintainers.