


Paywalls V2 makes it possible to create more sophisticated, user-friendly paywalls—including one inspired by Blinkist. In this guide, we’ll walk you through recreating the logic behind Blinkist’s timeline-style paywall using RevenueCat Webhooks and Zapier.
We won’t focus heavily on paywall design (though we’ll briefly cover it). Instead, the goal is to automate trust-building messaging, such as sending reminders before a trial ends. You don’t need to write any backend code. With a few clicks and some setup, you can build an end-to-end workflow that boosts transparency and improves conversion.
What makes the Blinkist paywall different
The most common approach to paywalls is one that highlights the features users will get after purchasing. While this works when the user is already familiar with the product or accustomed to buying subscriptions, it doesn’t do much to reduce the fear of subscribing—especially for new users.
If your user acquisition strategy relies on a “try before you buy” approach, i.e. offering a free trial, the key to conversion becomes reducing that fear.
The Blinkist paywall does exactly this—reduces fear through clearer communication. Instead of focusing on features, the paywall displays a simple timeline outlining what happens after the user subscribes. The timeline usually includes at least the following three elements:
1. Start with a free trial
The user is clearly informed that they won’t be charged immediately. Instead, they get a free trial, typically seven days, to try the app.
2. Remind before trial ends
A few days before the subscription converts to a paid one, the user is notified (e.g. via email or push). This gives them a chance to cancel if they’re not interested. Mentioning this in the timeline directly helps ease concerns about being charged unexpectedly.
3. Show trial end date up front
The timeline explicitly states the day the trial ends and billing begins. This gives users a clear expectation and helps build trust from the start.
This style of paywall not only builds trust, but it also leads to measurable improvements in key business metrics:
- Higher opt-in and trial conversion rates
- Fewer customer support issues related to billing confusion
- Stronger engagement with push notifications and emails
Implement the timeline in RevenueCat
In RevenueCat Paywall builder, this component is called Timeline, and you can add it to any of your existing paywalls, or if you want to create a new paywall, you can also start with the paywall sample that has it already included. You only need to tweak some of the content of the timeline to match the dates of your trial.
To learn more about timeline design, see Charlie’s video about it.

Tools for building automations
To automate notifications like “Your trial is ending soon,” we’ll use RevenueCat webhooks to detect subscription events and Zapier to handle the actual messaging (e.g. email or push).
Why Use Zapier?
Zapier lets you create automations (called Zaps) without writing any backend code. This allows us to build the automation without having to include an engineer in this, instead only requiring access to RevenueCat and Zapier.
Go through Zapier’s onboarding. Once you’re done, come back to this guide to connect RevenueCat and Zapier.
RevenueCat Webhooks
RevenueCat can send notifications (webhooks) to your server or a tool like Zapier whenever something happens in a user’s subscription lifecycle—such as starting a trial, renewing, or canceling. You can find more information about the webhooks in the webhooks documentation.
Build the trial automation
Before we start building our automation in Zapier, let’s outline how our Zap should work:
1. We want to capture all the webhook events about started subscriptions. Since we are only interested in events which are for trials, and not for example win-back subscriptions, we need a way to filter either on RevenueCat side or in Zapier.
2. Once we call the webhook from Zapier, we need the email of the user so we can send them a confirmation two days before their trial ends. You can include this in the webhook call, but you must identify the customer to RevenueCat when you initialize the SDK or fetch the users email and id from your own backend to match the subscription event with the correct user.
Rather than sending the email immediately, we’ll use Zapier’s Delay step to wait five days, timing the message to arrive two days before the subscription converts to paid.
3. We need a way to monitor unsubscribe events so that users who cancel don’t receive the reminder.
Start a new Zap by selecting Create and then Zaps, and you will see something like the image below:

Step 1: Capture webhooks from RevenueCat
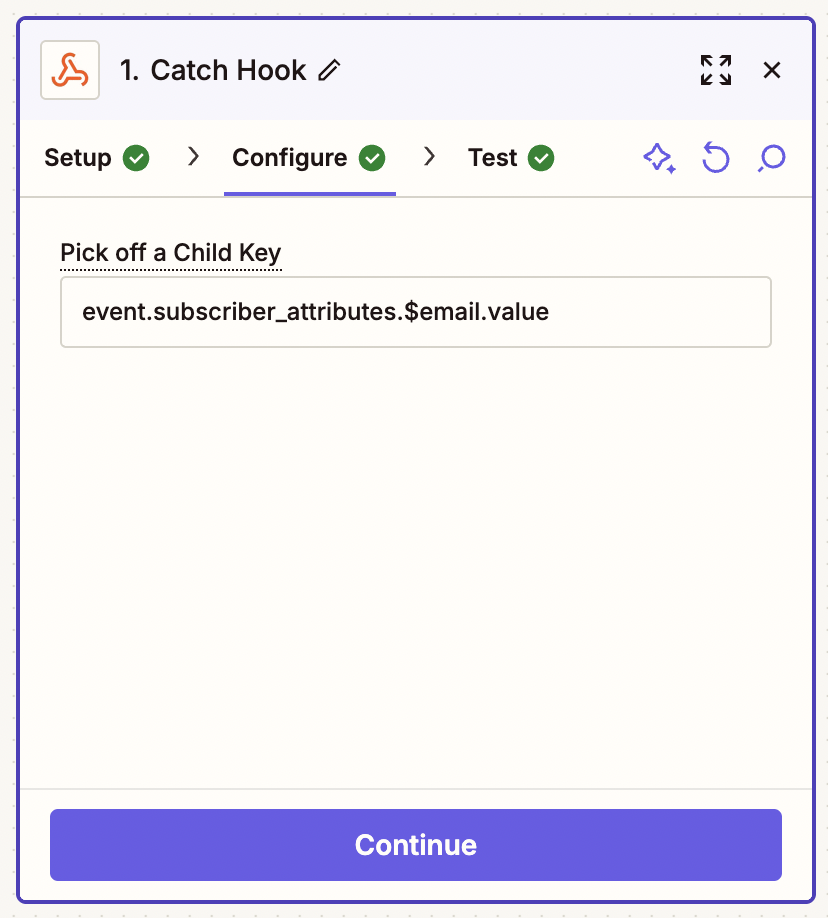
For our first step we need to configure our Zap to receive events from Revenuecat. For that we need to select and add a new webhook. For the trigger event select Catch Hook. In the configuration tab for the field Pick off a Child Key add this
event.subscriber_attributes.$email.value
This will ensure that we will capture the email from all the subscriber attributes, allowing us to use it later for sending email.
Zapier will now prompt you to test the webhook. Copy the webhook URL and navigate to RevenueCat Dashboard. From the Integrations section in the sidebar, press New, and select Webhooks. Click to add new Webhook configuration. Name your webhook for example Zapier | Trial Reminder, paste the webhook URL here, and select Sandbox for the Environment to send events for, we can change it to include Production once we’ve tested our app. Lastly, you can configure if any of your apps should be filtered from sending events, before clicking add webhook.
Now we can test if your Webhook works correctly. Open your webhook if you have not already, and click the button Send test event. Now go back to the Zapier dashboard and click Find new records and you should see a JSON response that looks something like this:
1{
2  "event": {
3    "event_timestamp_ms": 1746471203817,
4    "product_id": "test_product",
5    "period_type": "NORMAL",
6    "purchased_at_ms": 1746471203817,
7    "expiration_at_ms": 1746478403817,
8    "environment": "SANDBOX",
9    "entitlement_id": null,
10    "entitlement_ids": [],
11    "presented_offering_id": null,
12    "transaction_id": null,
13    "original_transaction_id": null,
14    "is_family_share": null,
15    "country_code": "US",
16    "app_user_id": "1bf2f016-d74e-43fc-b3fa-b61156a03799",
17    "aliases": [
18      "1bf2f016-d74e-43fc-b3fa-b61156a03799",
19      "863ee341-6e5b-4dda-b279-f73b77070460"
20    ],
21    "original_app_user_id": "1bf2f016-d74e-43fc-b3fa-b61156a03799",
22    "currency": null,
23    "price": null,
24    "price_in_purchased_currency": null,
25    "subscriber_attributes": {
26      "$email": {
27        "value": "tuxedo@revenuecat.com",
28        "updated_at_ms": 1746471203817
29      },
30      "$displayName": {
31        "value": "Mister Mistoffelees",
32        "updated_at_ms": 1746471203817
33      },
34      "$phoneNumber": {
35        "value": "+19795551234",
36        "updated_at_ms": 1746471203817
37      },
38      "my_custom_attribute_1": {
39        "value": "catnip",
40        "updated_at_ms": 1746471203817
41      }
42    },
43    "store": "PLAY_STORE",
44    "takehome_percentage": null,
45    "offer_code": null,
46    "tax_percentage": null,
47    "commission_percentage": null,
48    "metadata": null,
49    "renewal_number": null,
50    "type": "TEST",
51    "id": "665CA53F-301D-46D3-A977-20C8A3EF336F",
52    "app_id": "app54c5dea9ab",
53    "api_version": "1.0",
54    "querystring": null
55  }
56}
The webhook response includes a lot of valuable information. If you want, you can use this information to customize the email we are going to use later, for example by providing different copy based on which store the user subscribed from. If everything looks good press Continue with selected record.
Step 2: Add a delay to the automation
Next step we need to implement is the waiting for 5 days after subscription has started before sending the user a reminder of their subscription continuing for the full price. Press the + button to add a new step, and select Delay by Zapier. In the setup tab select Delay for as the Action event. In the configuration tab select “5” for Time delayed for (value) and for the Unit select Days.
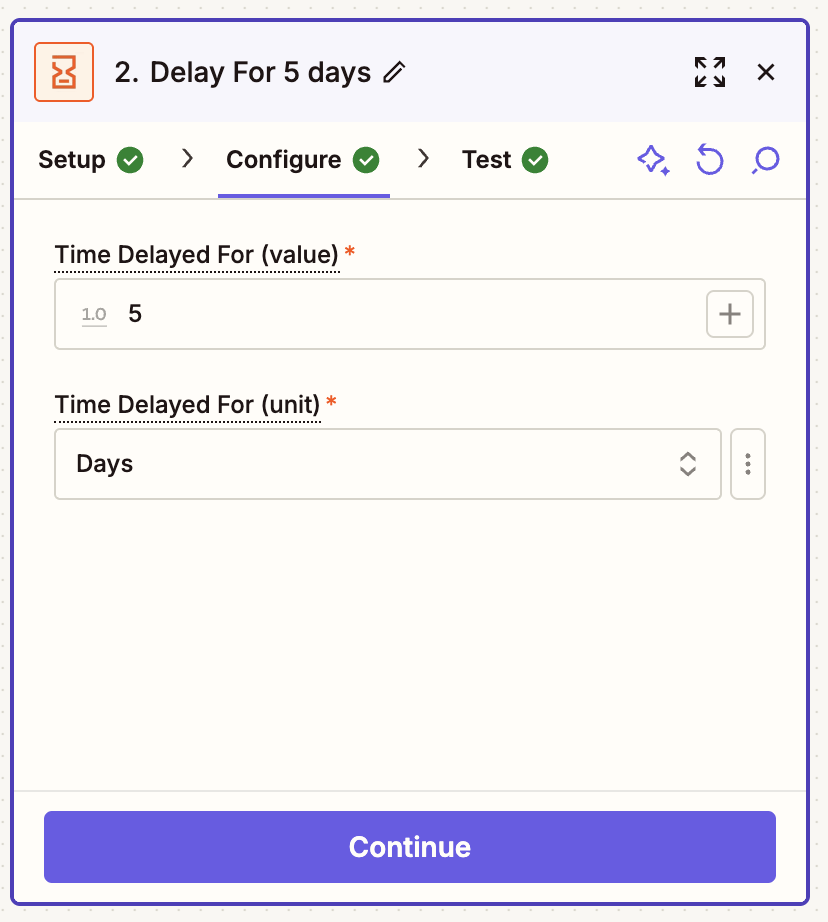
You can adapt the delay time to the amount of time your timeline logic requires. During testing you can also set it to something like 5 minutes, so that you only need to wait briefly during testing before seeing the email.
Step 3: Send reminder email
Now, we just need to configure the email that will be sent. Zapier integrates with many email providers, allowing you to choose the service that best fits your needs. For simple setups or testing, you can use Email by Zapier to quickly send a basic, unstyled message, for example: “Your subscription will continue in 2 days.”
However, for production use or more polished communications, consider using a dedicated email service such as Mailchimp, Postmark, SendGrid, or Customer.io. These services offer better deliverability, customization, analytics, and support for branded templates.
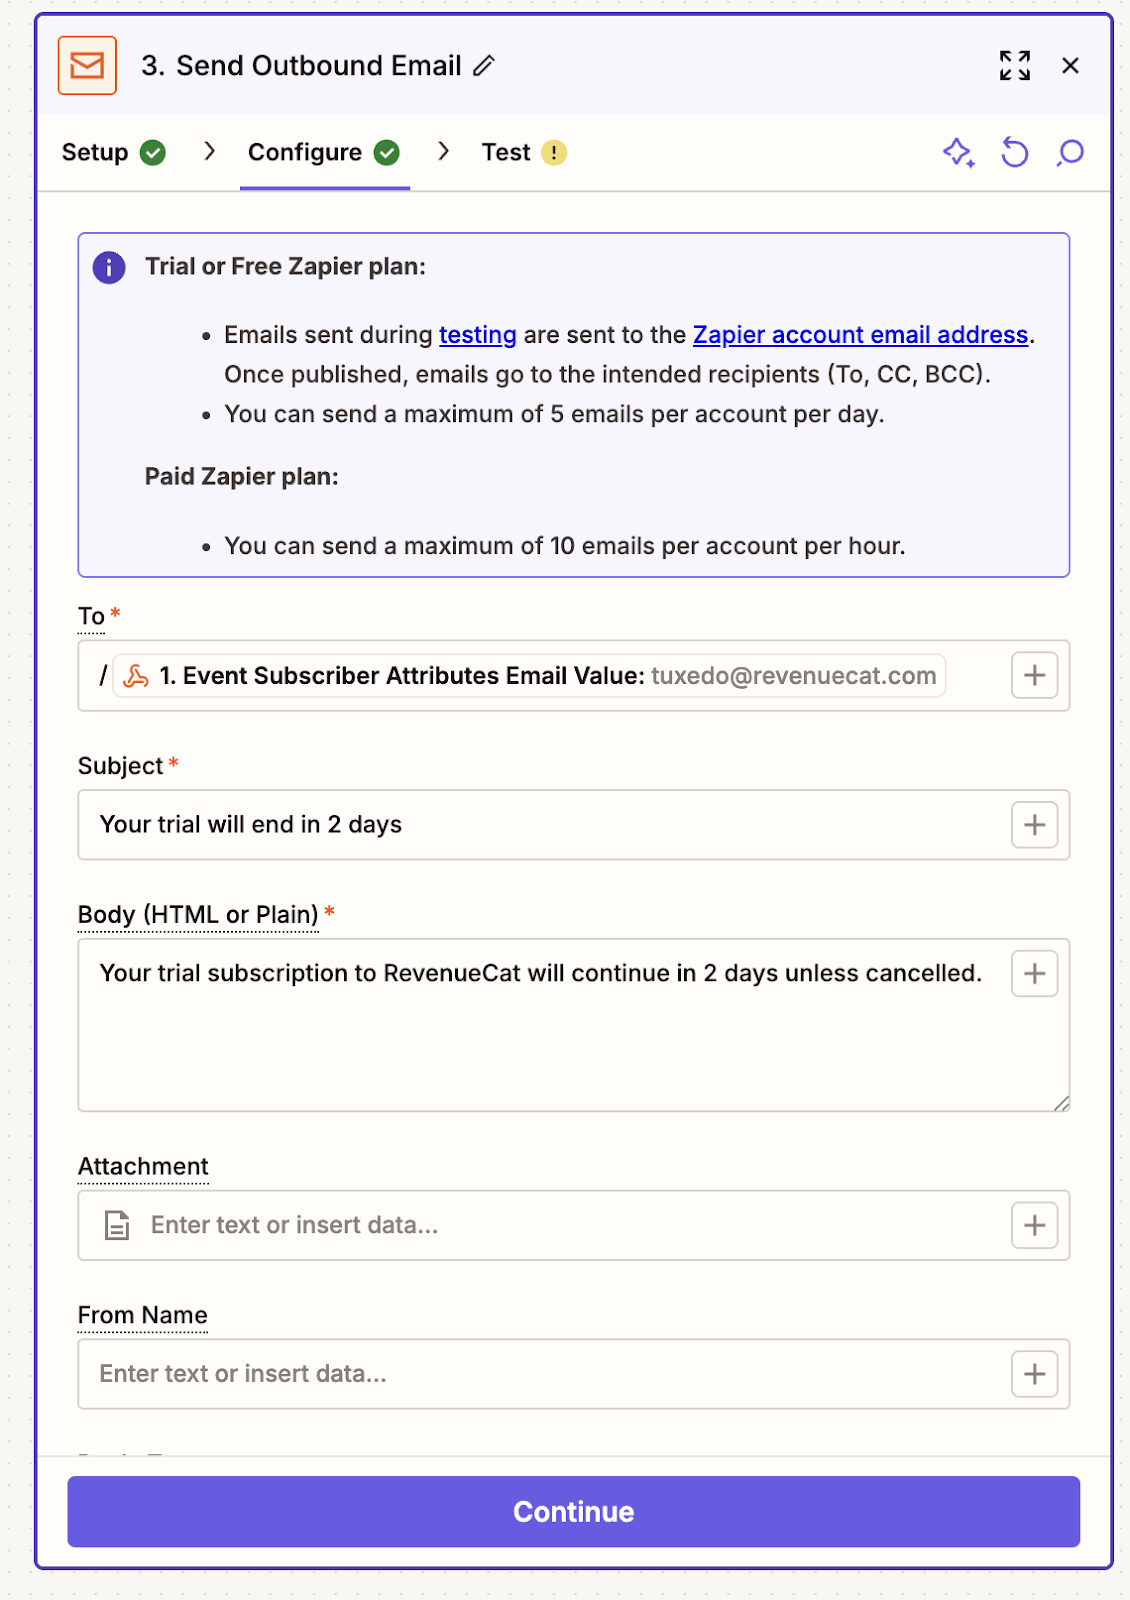
I added my personal email as the CC field value so that I can see all the testing emails. If you ended up doing the same, better to remove this value.
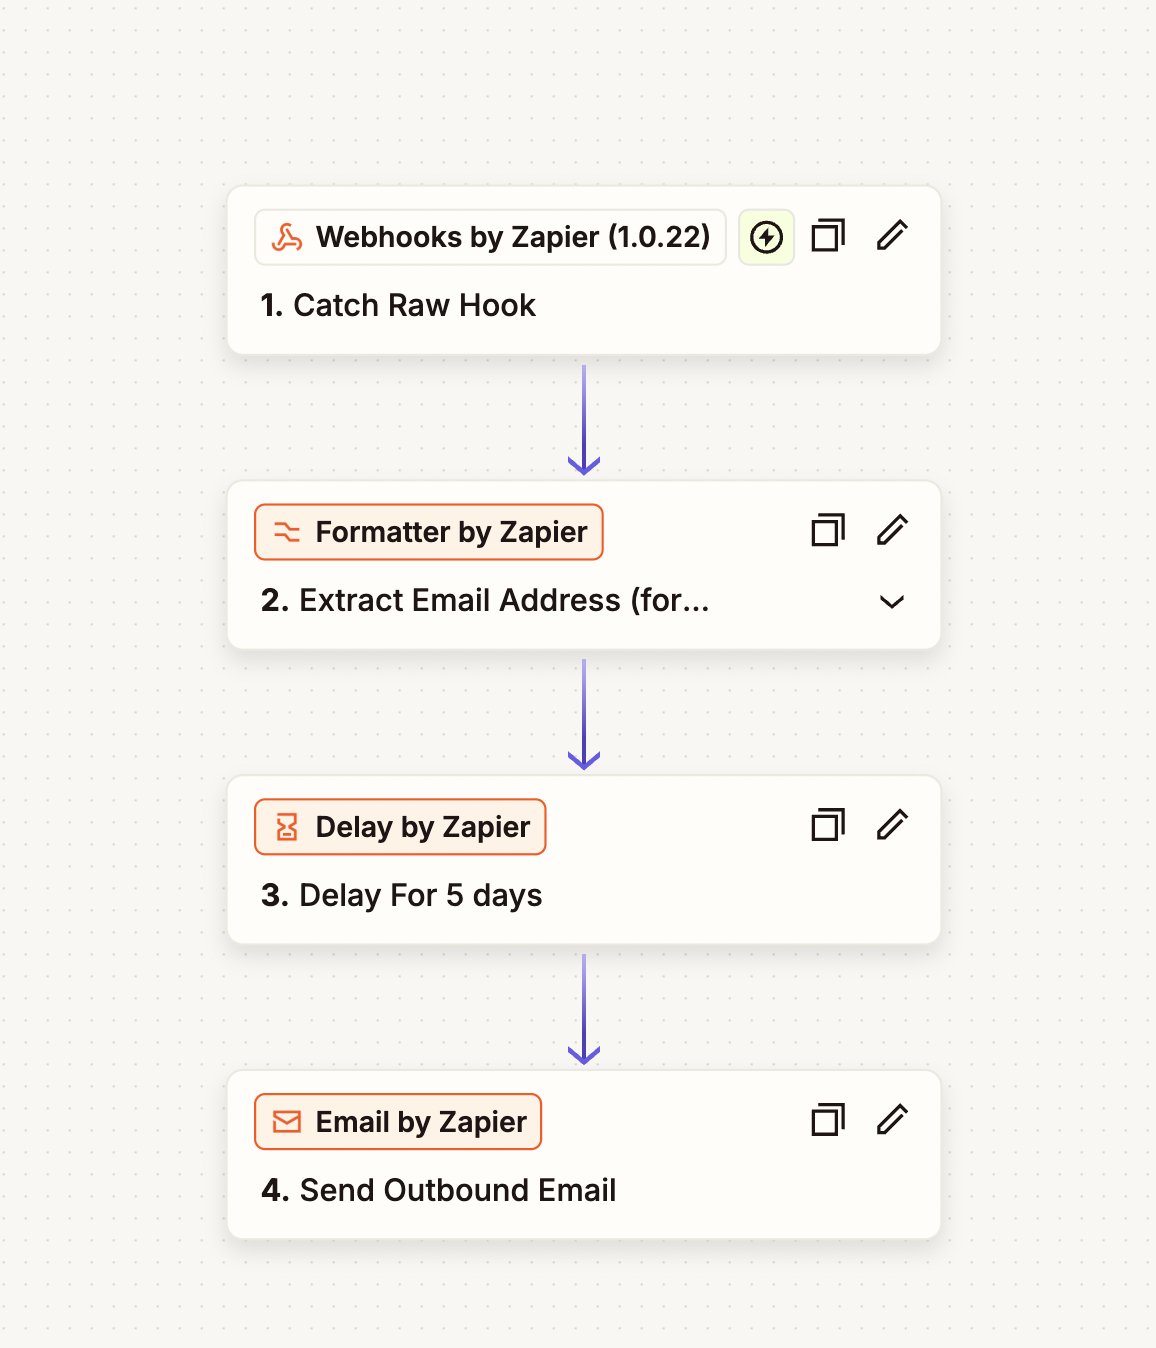
After all this our Zap should look something like this:
Step 4: Test the automation
Our Zap is now ready so let’s test that everything works. Because we don’t want to wait for 5 days after subscribing, let’s go back and change the delay from days to minutes. Now we just need to fire the subscription event. You can either go to your app to start a new subscription or you can add yourself into the CC field in the Send outbound email step and fire the test event. RevenueCat will send this email to a dummy email. After 5 minutes you should see an email in your inbox. After that, remember to go back to change the delay back to days.
Change the 5 minutes back to days and hit publish and you have a fully functioning automation for notifying users before their trial ends!
Conclusion
You should now have a working automation that listens to RevenueCat webhooks and sends a reminder email five days after a user starts a subscription. This setup provides a solid foundation for building trust and reducing churn during the trial period.
To take things further, you can:
- Add filtering logic to ensure reminders are only sent for new users with a 7-day trial. All the necessary data to do this is available in the webhook payload.
- Introduce A/B testing to experiment with different messaging, timing, or channels to see what improves conversion most effectively.
- Send push notifications in addition to or instead of emails, especially if your app has strong in-app engagement. Zapier or other tools like OneSignal or Firebase can help with this.
- Personalize your messages based on attributes like the user’s name, platform (iOS vs Android), or acquisition channel. These attributes can be passed through RevenueCat and used to tailor the experience.