
At Droidcon Berlin, I met a bunch of indie developers who told me the same thing: “I’d love to monetize my app, but it’s too simple for a paywall. No one is going to subscribe just to use a timer / wallpaper pack / calculator / flashlight.”
And they’re right — forcing subscriptions into lightweight apps often creates more friction and annoyance than revenue.
But there’s an option that annoys less: a tip jar.
A tip jar lets users choose when to support you rather than forcing commitment upfront. It’s low-pressure, works great for utility apps and passion projects, and can be surprisingly effective when done right in a beloved product.
In this guide, I’ll show you how to build a fully-functional tip jar using RevenueCat, including:
- How to structure tip products in the Test Store first, so you can build the full UX without real store setup
- A plug-and-play React Native implementation using
react-native-purchasesandreact-native-purchases-ui - How to move from Test Store to App Store Connect and Google Play Console when you’re ready for launch
You can ship this in under 15 minutes — and launch it when you’re confident it works.
Real-world example: tipping in a simple game
Indie developer Peter Porfy implemented this approach in his puzzle game No Ads 2048. Instead of a single “buy me a coffee” option, he offered multiple tip amounts.
Interestingly, players started choosing higher-value tips more often when given several options. You can find the the app here.
This is exactly the kind of lightweight monetization tip jars are designed for — simple apps where users want to support the developer without committing to a subscription.
Step 1: Create your consumable purchases in RevenueCat dashboard
We’ll build this tip jar using consumable purchases. Unlike subscriptions or lifetime unlocks, consumables can be purchased repeatedly, which makes them perfect for tips. Think “buy me a coffee” rather than “unlock premium forever”.
Start in RevenueCat’s Test Store (no App Store setup required)
RevenueCat now includes a feature called Test Store, which lets you define fake-but-functional products entirely inside RevenueCat. These behave just like real purchases — they return CustomerInfo, show up in dashboards, and trigger entitlements — but no App Store / Google Play configuration is needed yet. This lets you iterate on pricing, copy, UX, and code before committing to real store setup.
Enable Test Store
Start by enabling the Test Store which you can do in the Apps & providers section in the sidebar on the dashboard. There you can find this section:

Click Create Test Store, and copy the API key for testing value for later use. We’re going to need it when we set up the SDK.
Create Test Store products
Next step is to create your Test Store products. I suggest making the following products in RevenueCat as the possible tip amounts for your tip jar. You can of course create any level of amounts for the customer to tip, but aim to follow a consistent productID naming.
Follow these steps below to setup the products:
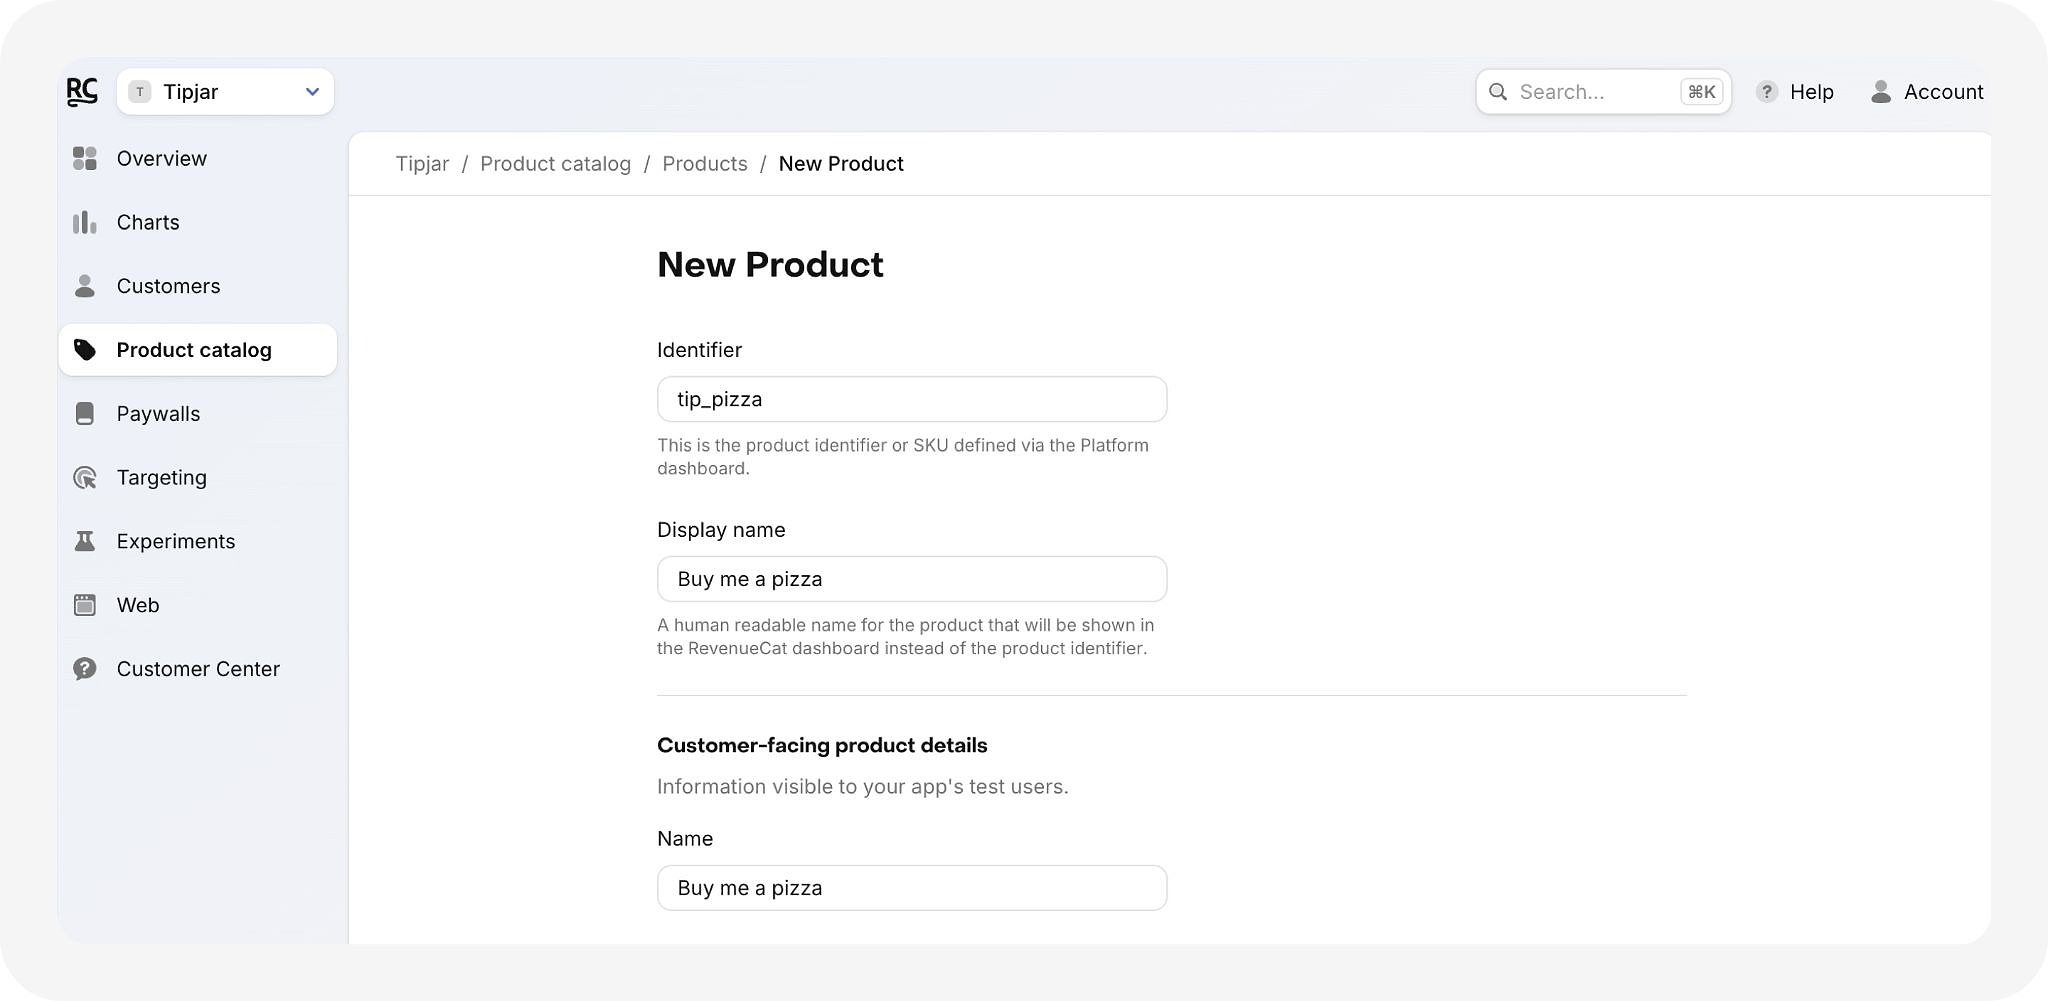
- Go to RevenueCat → Product catalog → Products → + New Product
- Choose store: Test Store
- Enter a Product Identifier (e.g. com.yourapp.tip.small)
- Set a test price ($1.99, $4.99, $9.99 — whatever you plan to launch with)
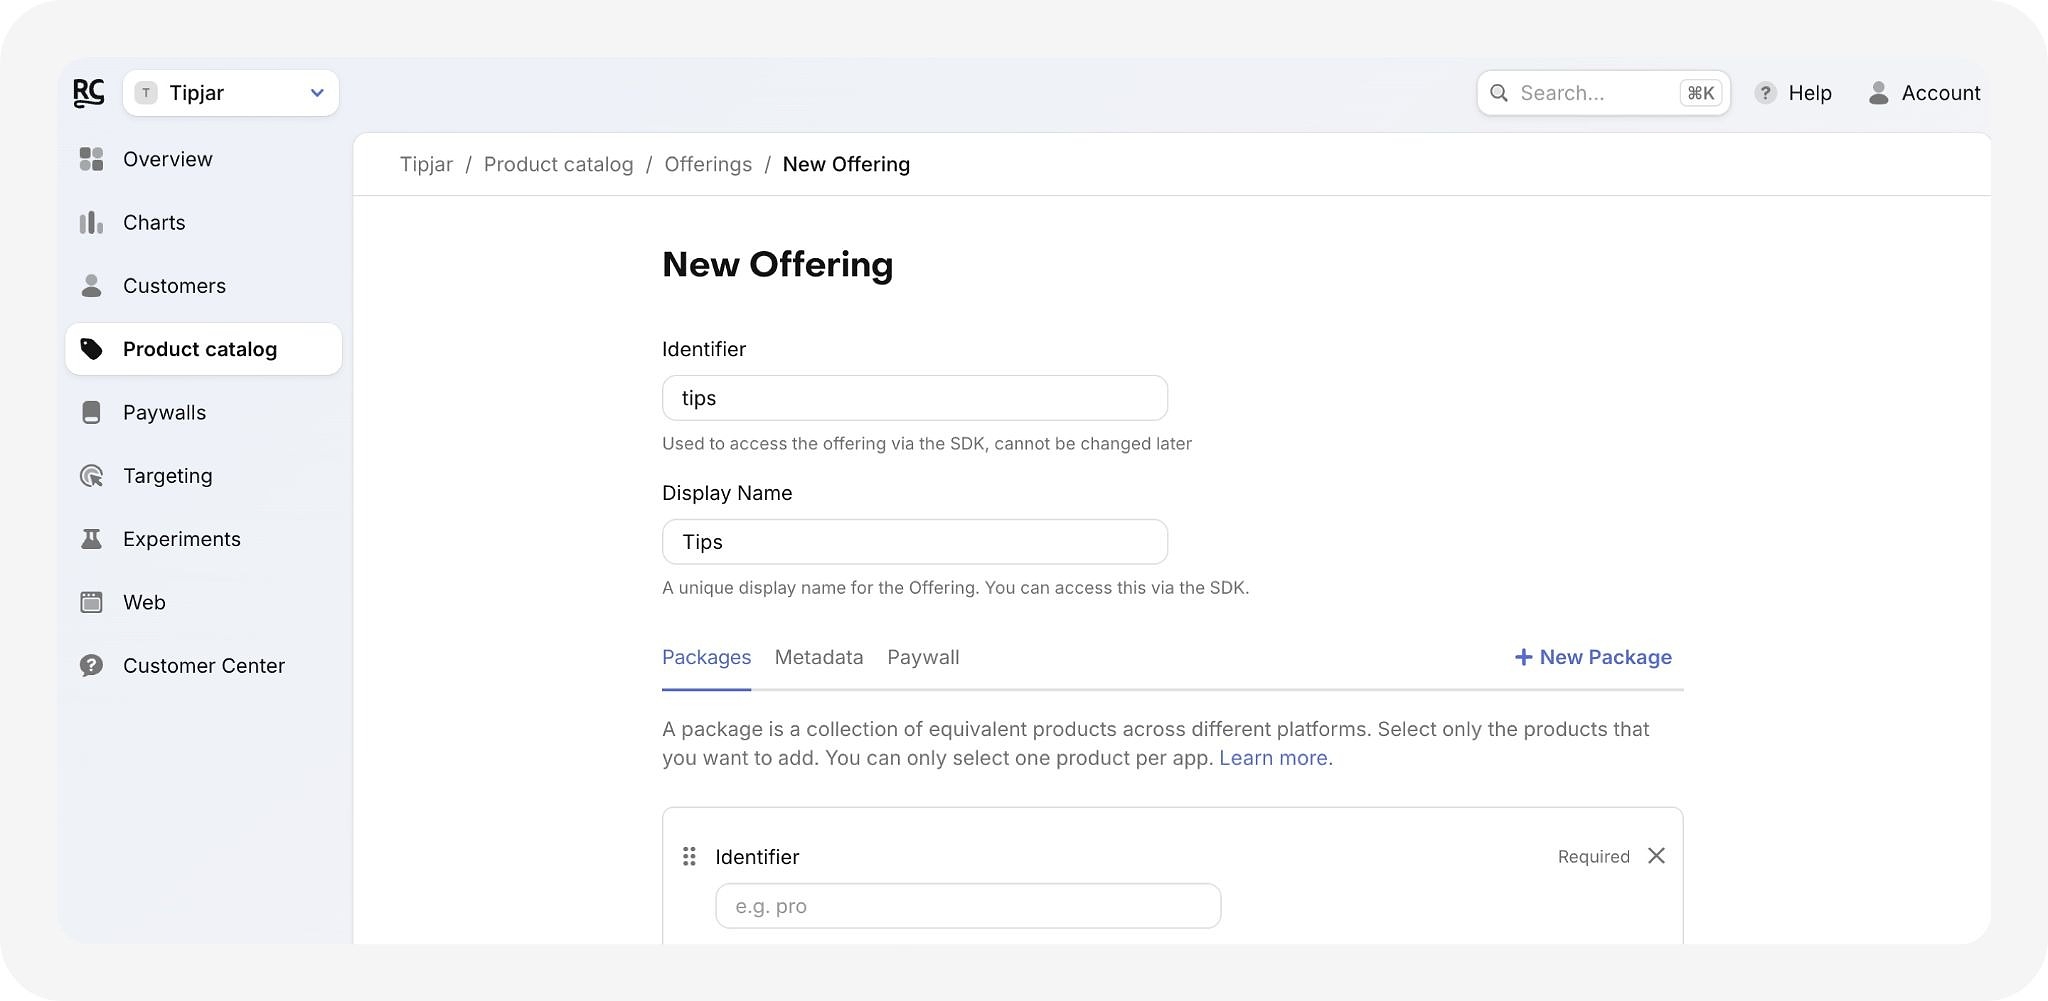
Repeat for each tip amount. You also need to group these tip amounts to an offering, so we can easily show them in a paywall. Follow the steps below to add the created products into a new offering,
- Go to RevenueCat → Offerings
- Create a new offering (e.g. tips)
- Add your Test Store products to it
Step 2: Build a Paywall in the RevenueCat Dashboard
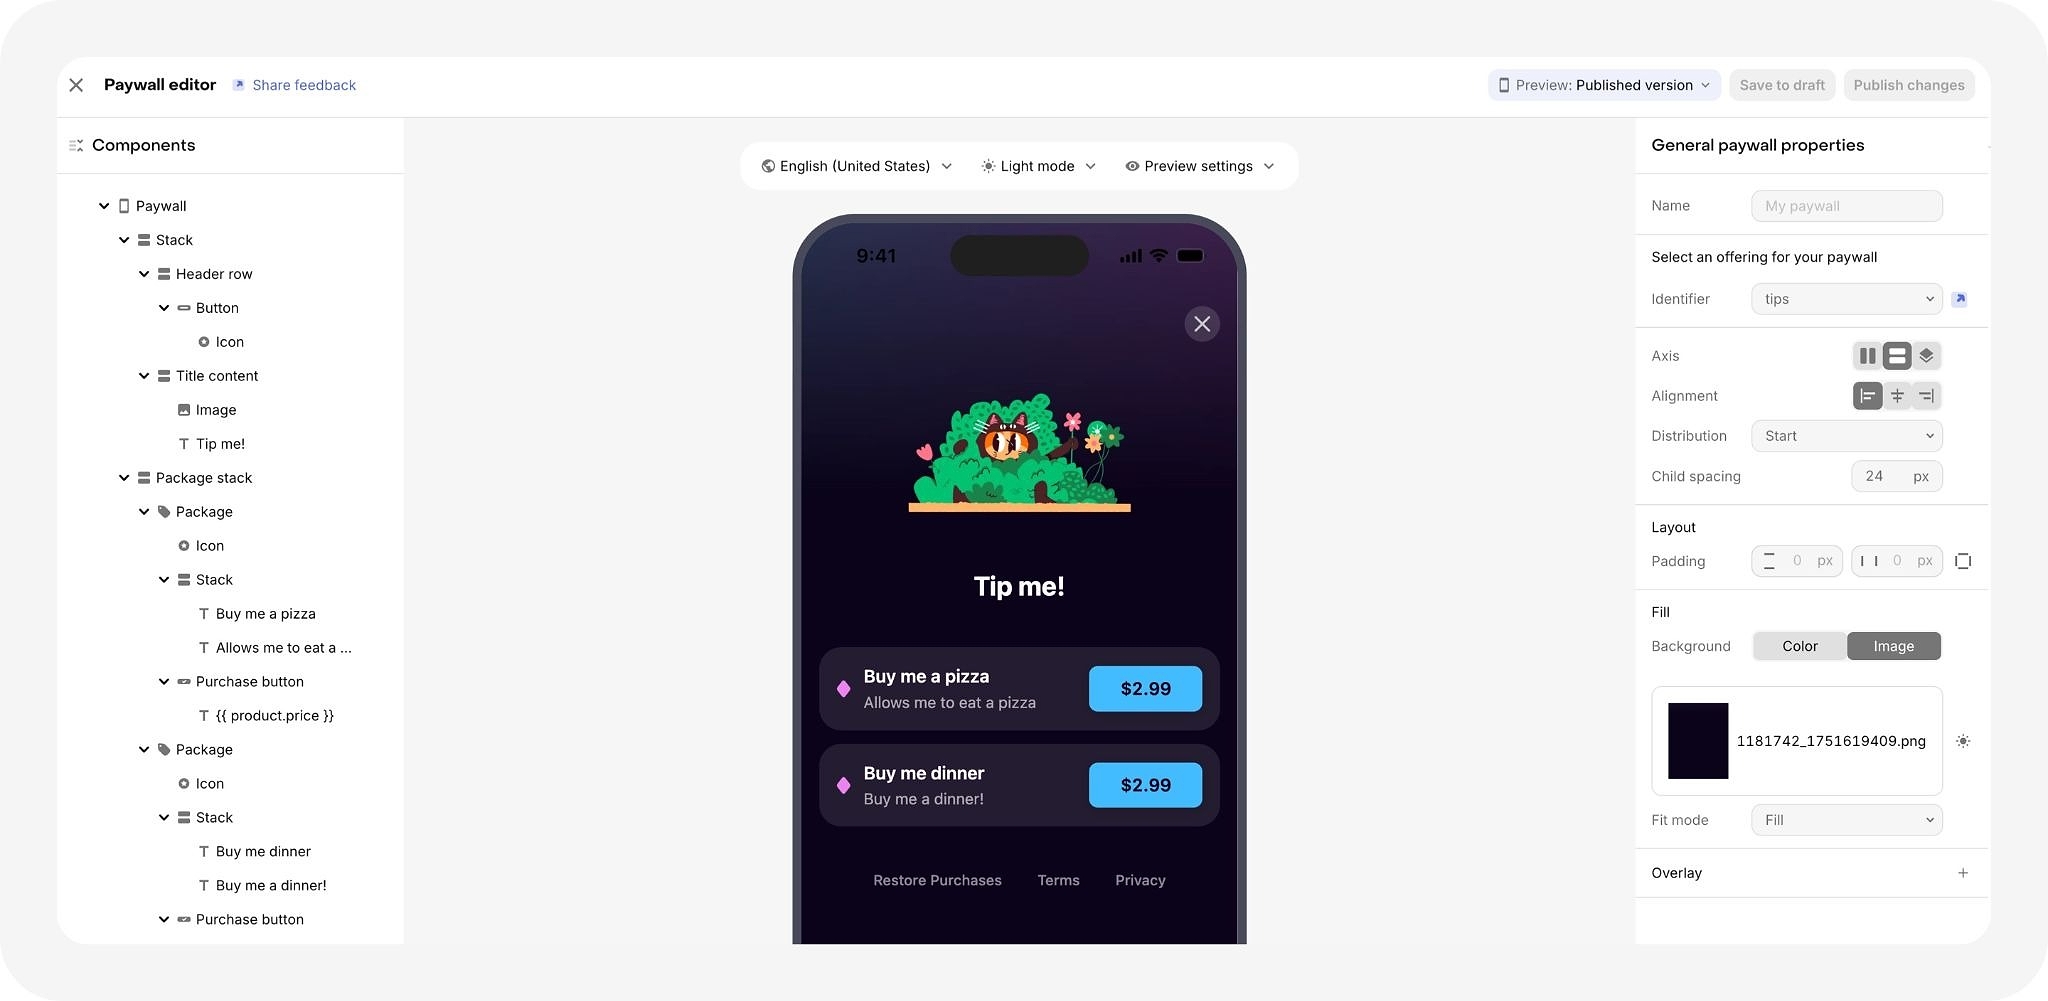
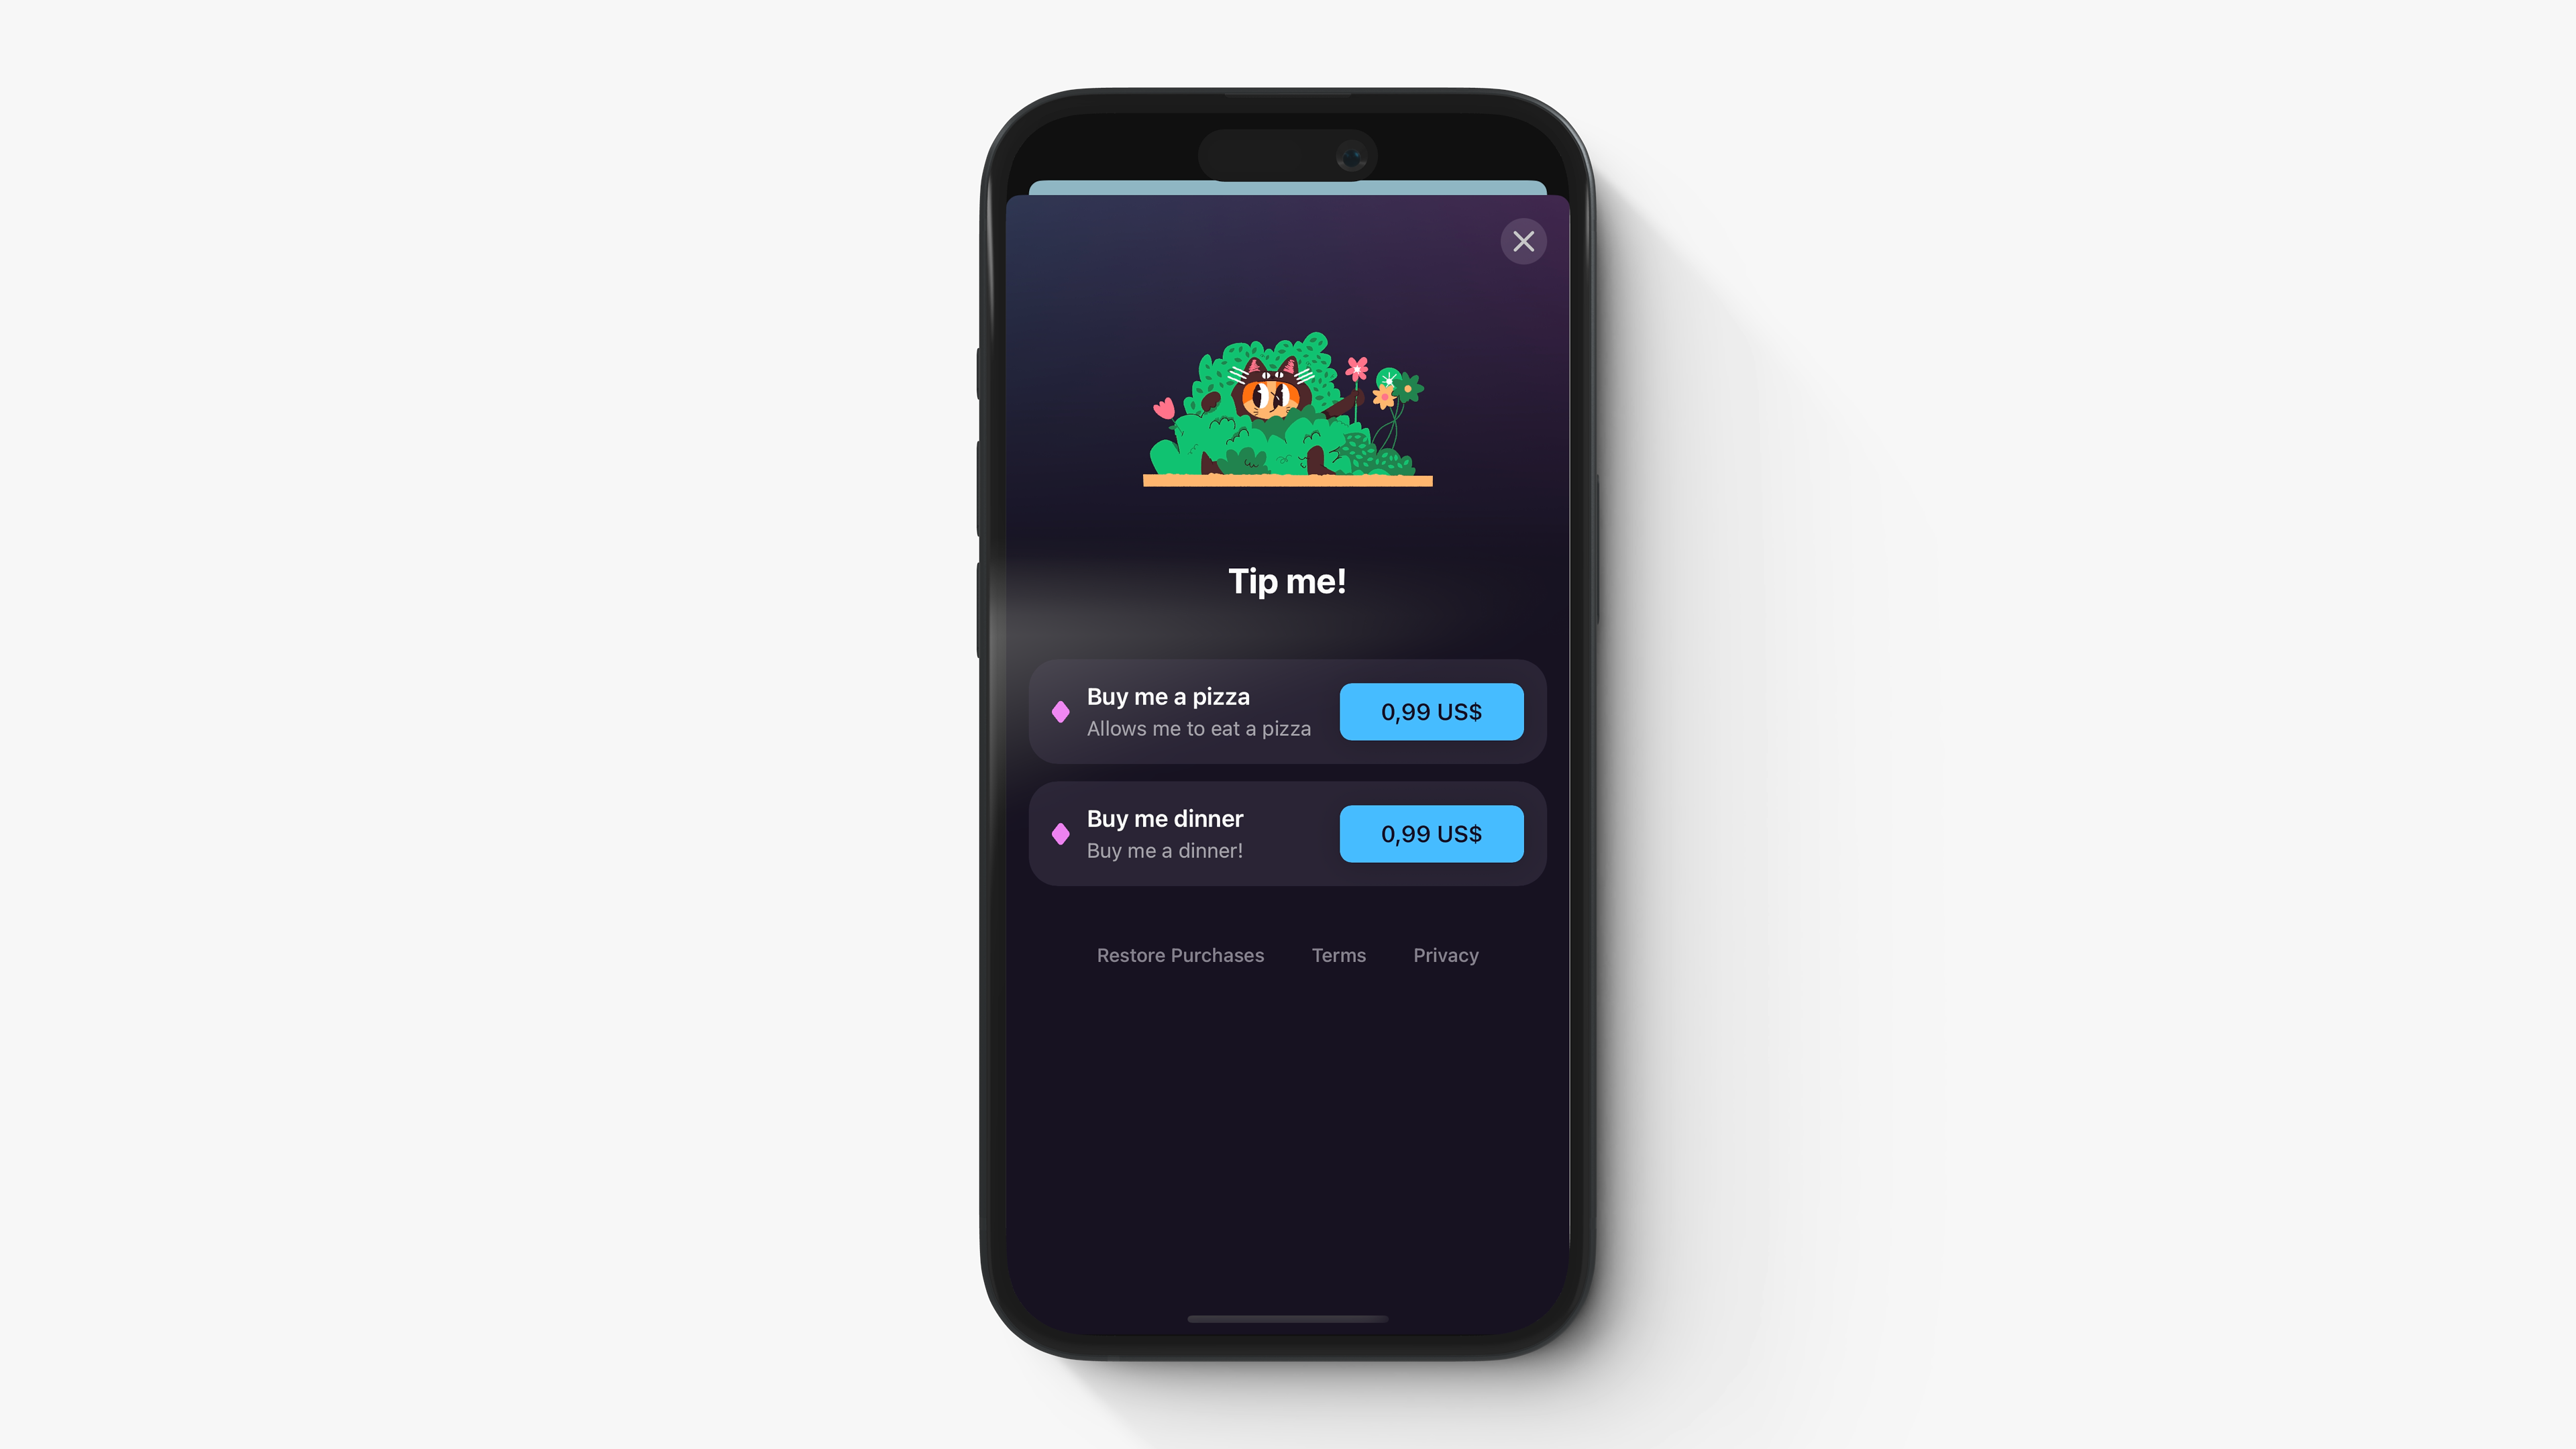
Rather than manually coding a paywall UI, we’ll use RevenueCat Paywalls, which let you design and deploy the entire purchase screen from the dashboard — including layout, copy, and products.
- Go to RevenueCat → Tools → Paywalls → + New Paywall
- Choose one of the ready-made templates or build a fully custom paywall
- Select your Test Store products as paywall packages
- Save and publish the Paywall
For this guide I repurposed our Virtual Currencies sample paywall for tips, since it’s originally used for buying consumable products as well. You now have a fully-hosted paywall definition that the SDK can use in your app, without having to write any UI code.
Next step is to connect everything we’ve built in the dashboard to our app.
Step 3: Install and configure the SDK
Using RevenueCat with React Native/Expo app requires you to install two SDKs, one for payment logic, and another for all the UI components such as paywalls and Customer Center. In your React Native app, install the core SDK and Paywall UI package:
Now run your project and add the following code to the root level. Meaning either _layout.tsx file or index.tsx.
After doing that your app should initialize RevenueCat successfully. You will start to see the following type of logs in your console. If you’re working with Expo Go, you can go ahead and reload the project and RevenueCat should work. You will get logs that tell you RevenueCat is working in Browser Mode — this means that you can’t for example make real purchases or display the native paywalls.
With the Test Store we could already buy products, but since we want to use RevenueCat Paywalls, we need to switch to a development build in Expo, in order to install the native code parts. From the command line run npx expo run:ios
After this you’ll start seeing new type of logs:
This means you’ve successfully initialized the RevenueCat SDK. The next step is to add the code for displaying the paywall. For that we are going to use the RevenueCatUI.presentPaywall call that will show a paywall modal, and we’ll connect it to a simple button that says “Tip me”.
In your editor add the following code:
Now when you click the button you should be presented with the same paywall you built in RevenueCat dashboard:
Pressing on the buttons to purchase will show you a native modal asking if you want to test a failed or successful purchase. Play around with this — if you feel like it, you can also tie actions to the purchase results, for example to navigate to a separate thank you screen after a user has tipped you successfully.
Step 4: Setting up your products in App Store Connect and Google Play Console
Everything looks good now on the simulator and emulator. The Test Store is great for this kind of local testing, helping you verify your in-app purchases and entitlements without needing to publish your app.
However, before going live, you should also test using your App Store Connect and Google Play Console setups. Real store testing ensures your product identifiers, pricing, and configurations all work as expected in production. You should use the Test Store for quick local testing, but always confirm everything functions correctly in the actual store environments before release.
App Store Connect
To connect your app to real stores such as the App Store and Google Play, navigate back to the Apps & Providers page and select the stores you want to integrate. Let’s start with the App Store.
First, your app must exist in App Store Connect. Register your bundle ID and create the app in App Store Connect. Also enable communication between RevenueCat and App Store Connect.
After your app is set up in App Store Connect, you can actually create products directly from the RevenueCat dashboard and have them synced automatically to App Store Connect. To do this, go to Product catalog, create a new product, and select App Store as the store. RevenueCat will then prompt you to authorize the creation of the corresponding product in App Store Connect.
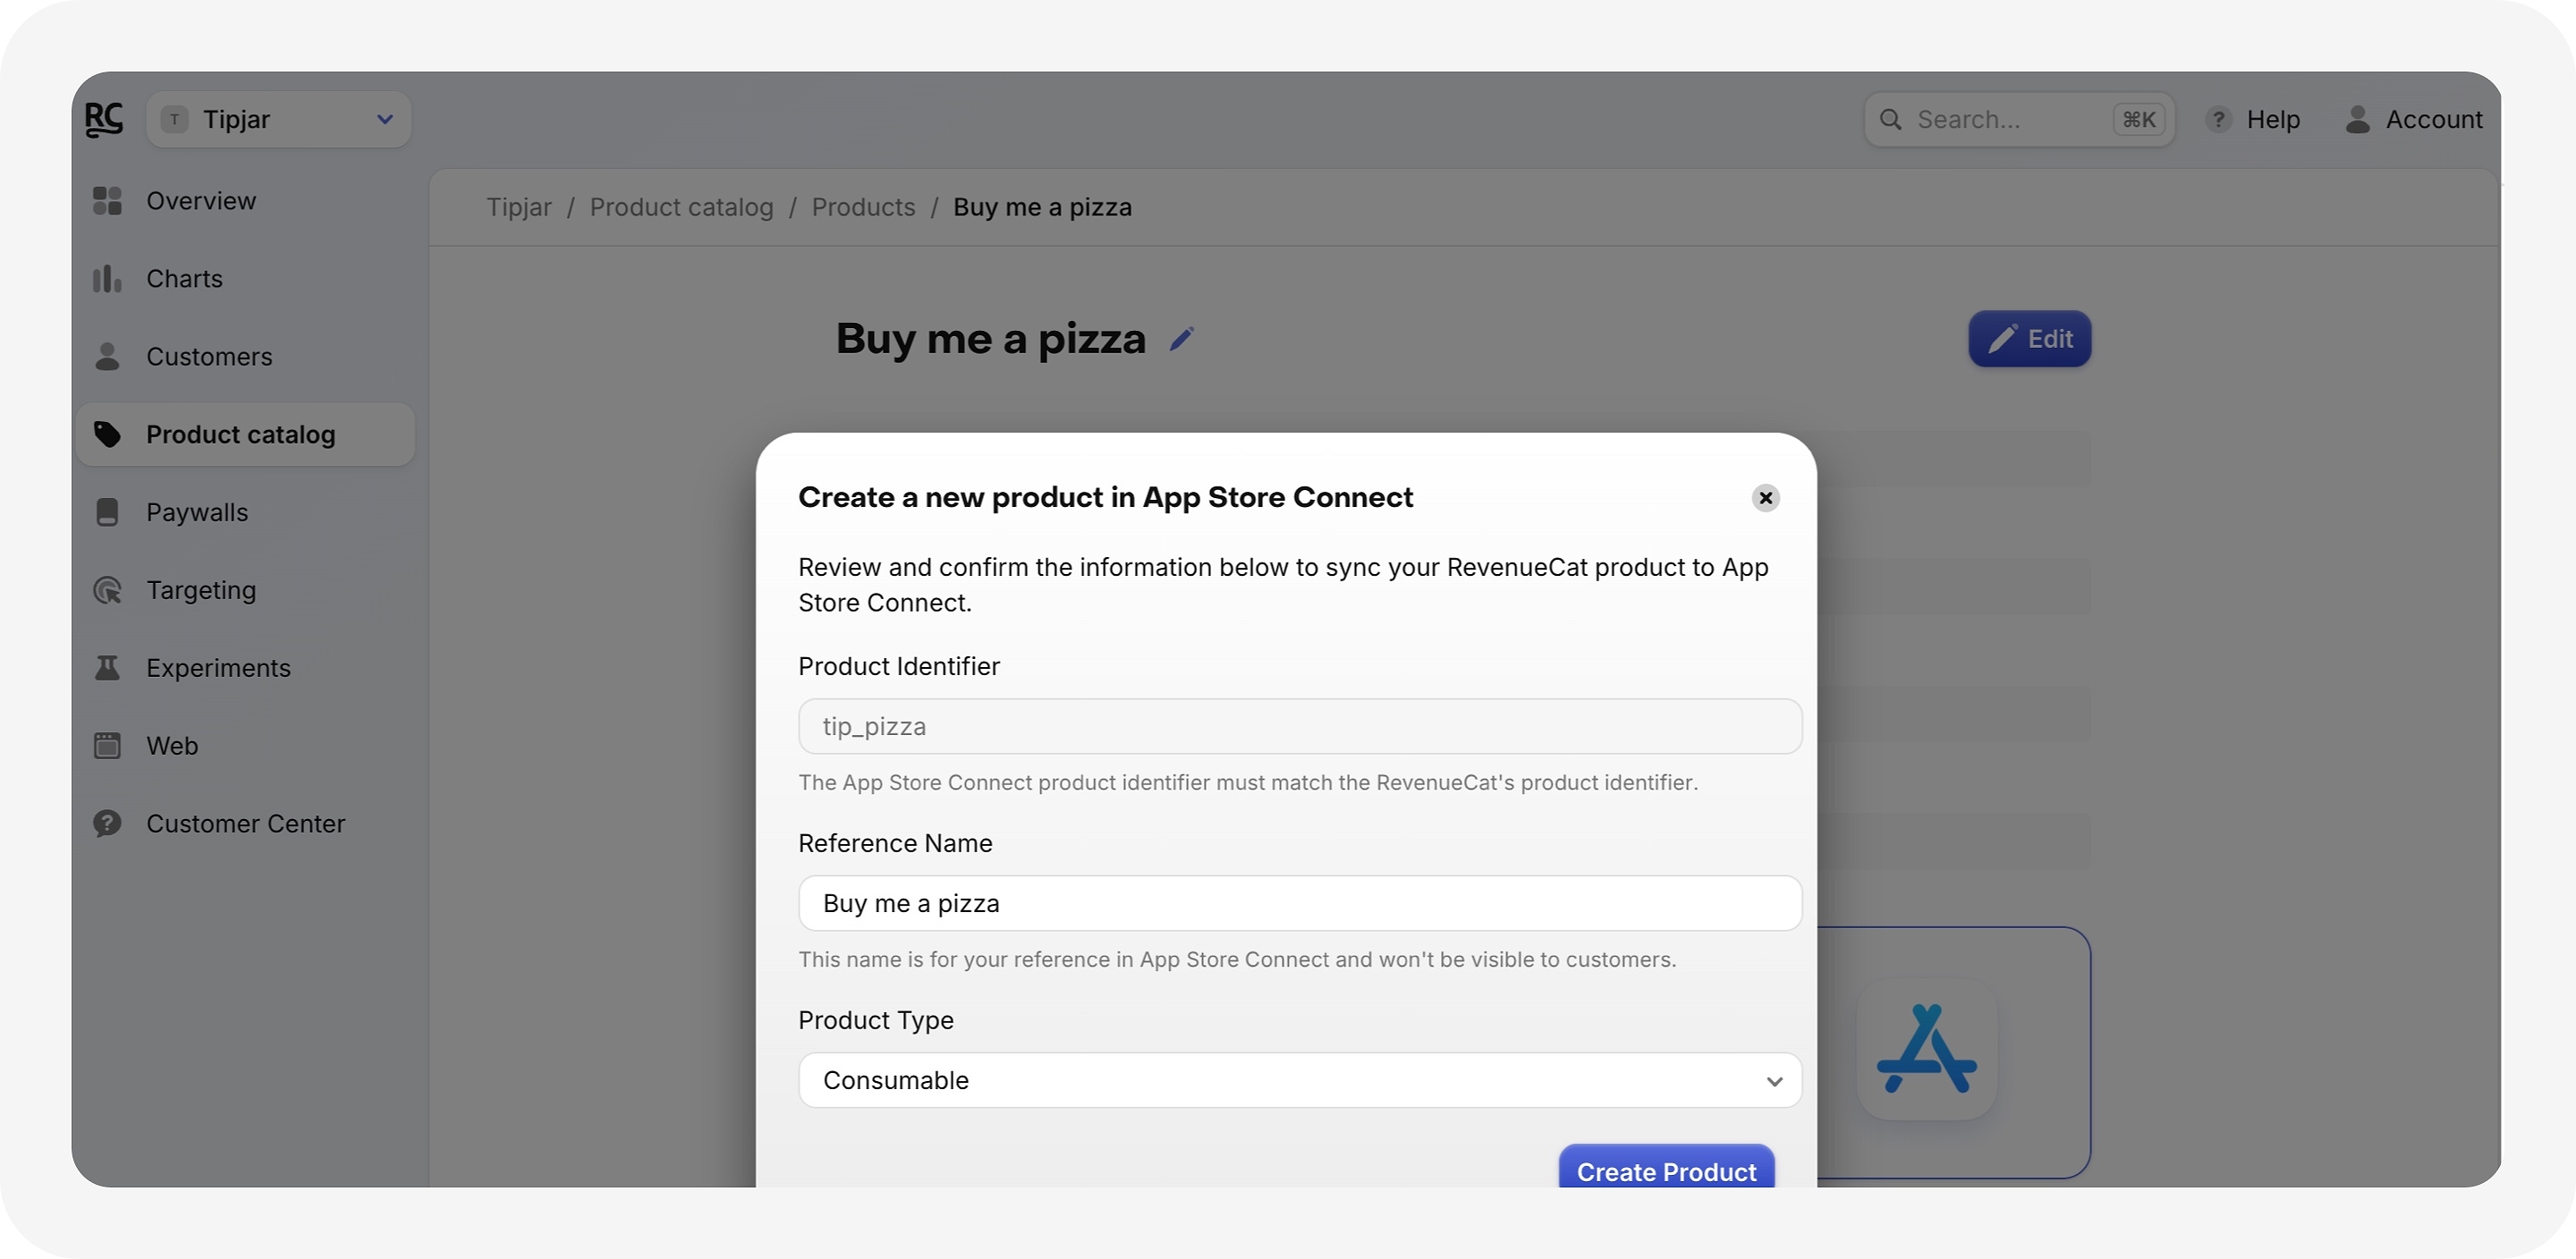
You’ll still need to fill in certain product details in App Store Connect, such as pricing, availability, and screenshots. Open App Store Connect and complete these fields to finalize your setup. Our App Store Connect product setup guide can help you verify that your products are set up correctly.
As the last step, replace your Test Store API key with the App Store API key, which you can find in the RevenueCat dashboard under API Keys. Finally, build your app for a physical device instead of the simulator to complete the integration.
Google Play Console
Next, let’s connect your products to Google Play Console. Make sure your app is already created in the Play Console with the correct package name.
To enable this connection, you’ll need to set up Google Play Service Credentials. These allow RevenueCat to securely communicate with your Play Developer account to manage products and validate purchases. You can follow our full step-by-step guide here: Creating Google Play Service Credentials.
After correctly setting up your Service Credentials, it can take up to 36 hours to be activated. Once that happens you can create products in the RevenueCat Dashboard. Follow our Google Play product setup guide for next steps.
Your tip jar is ready!
Implementing a tip jar using RevenueCat with consumable in-app purchases is a straightforward way to offer your users a means to support your app without committing to a subscription. This approach allows users to express their appreciation at their convenience, providing a flexible monetization strategy for simple yet valuable applications. By following these steps, you can quickly integrate this feature into your React Native with only few lines of code.
If you run in to any problems, or you want to chat more about using tip jars for monetizing, please let me know!