
Redemption links let customers buy on the web and unlock access in your app with a single tap. RevenueCat generates a one-time-use deep link after checkout; when the user opens it on their device the purchase is tied to their App User ID and the app can grant entitlements immediately. Because the checkout can be anonymous, you don’t need to pass an App User ID at purchase time — users can buy on the web and ‘claim’ the purchase on mobile via the link.
In this tutorial you’ll wire up deep links in an Expo app two ways: first with Expo Linking, then with Expo Router; so redemption links open your app, you verify entitlements, and the premium features unlock for your user.
This guide assumes you have already created products and enabled Web Billing in RevenueCat, which is done from the RevenueCat dashboard.
Understand how Redemption Links work
When a customer completes the Web Billing checkout, either through RevenueCat Web SDK or a hosted Web Purchase Link, they receive a redemption link. This redemption link will act as a deep link into the app, so when a customer taps the link on a mobile device, they are automatically redirected to your app. In the app, RevenueCat’s mobile SDK will then associate the purchase with the customer, based on the URL parameters of the deep link.
To make this all work we need to implement deep linking functionality in our React Native app. Depending on the navigation framework (Expo Router or React Navigation) we’re using, there are two different ways to accomplish this.
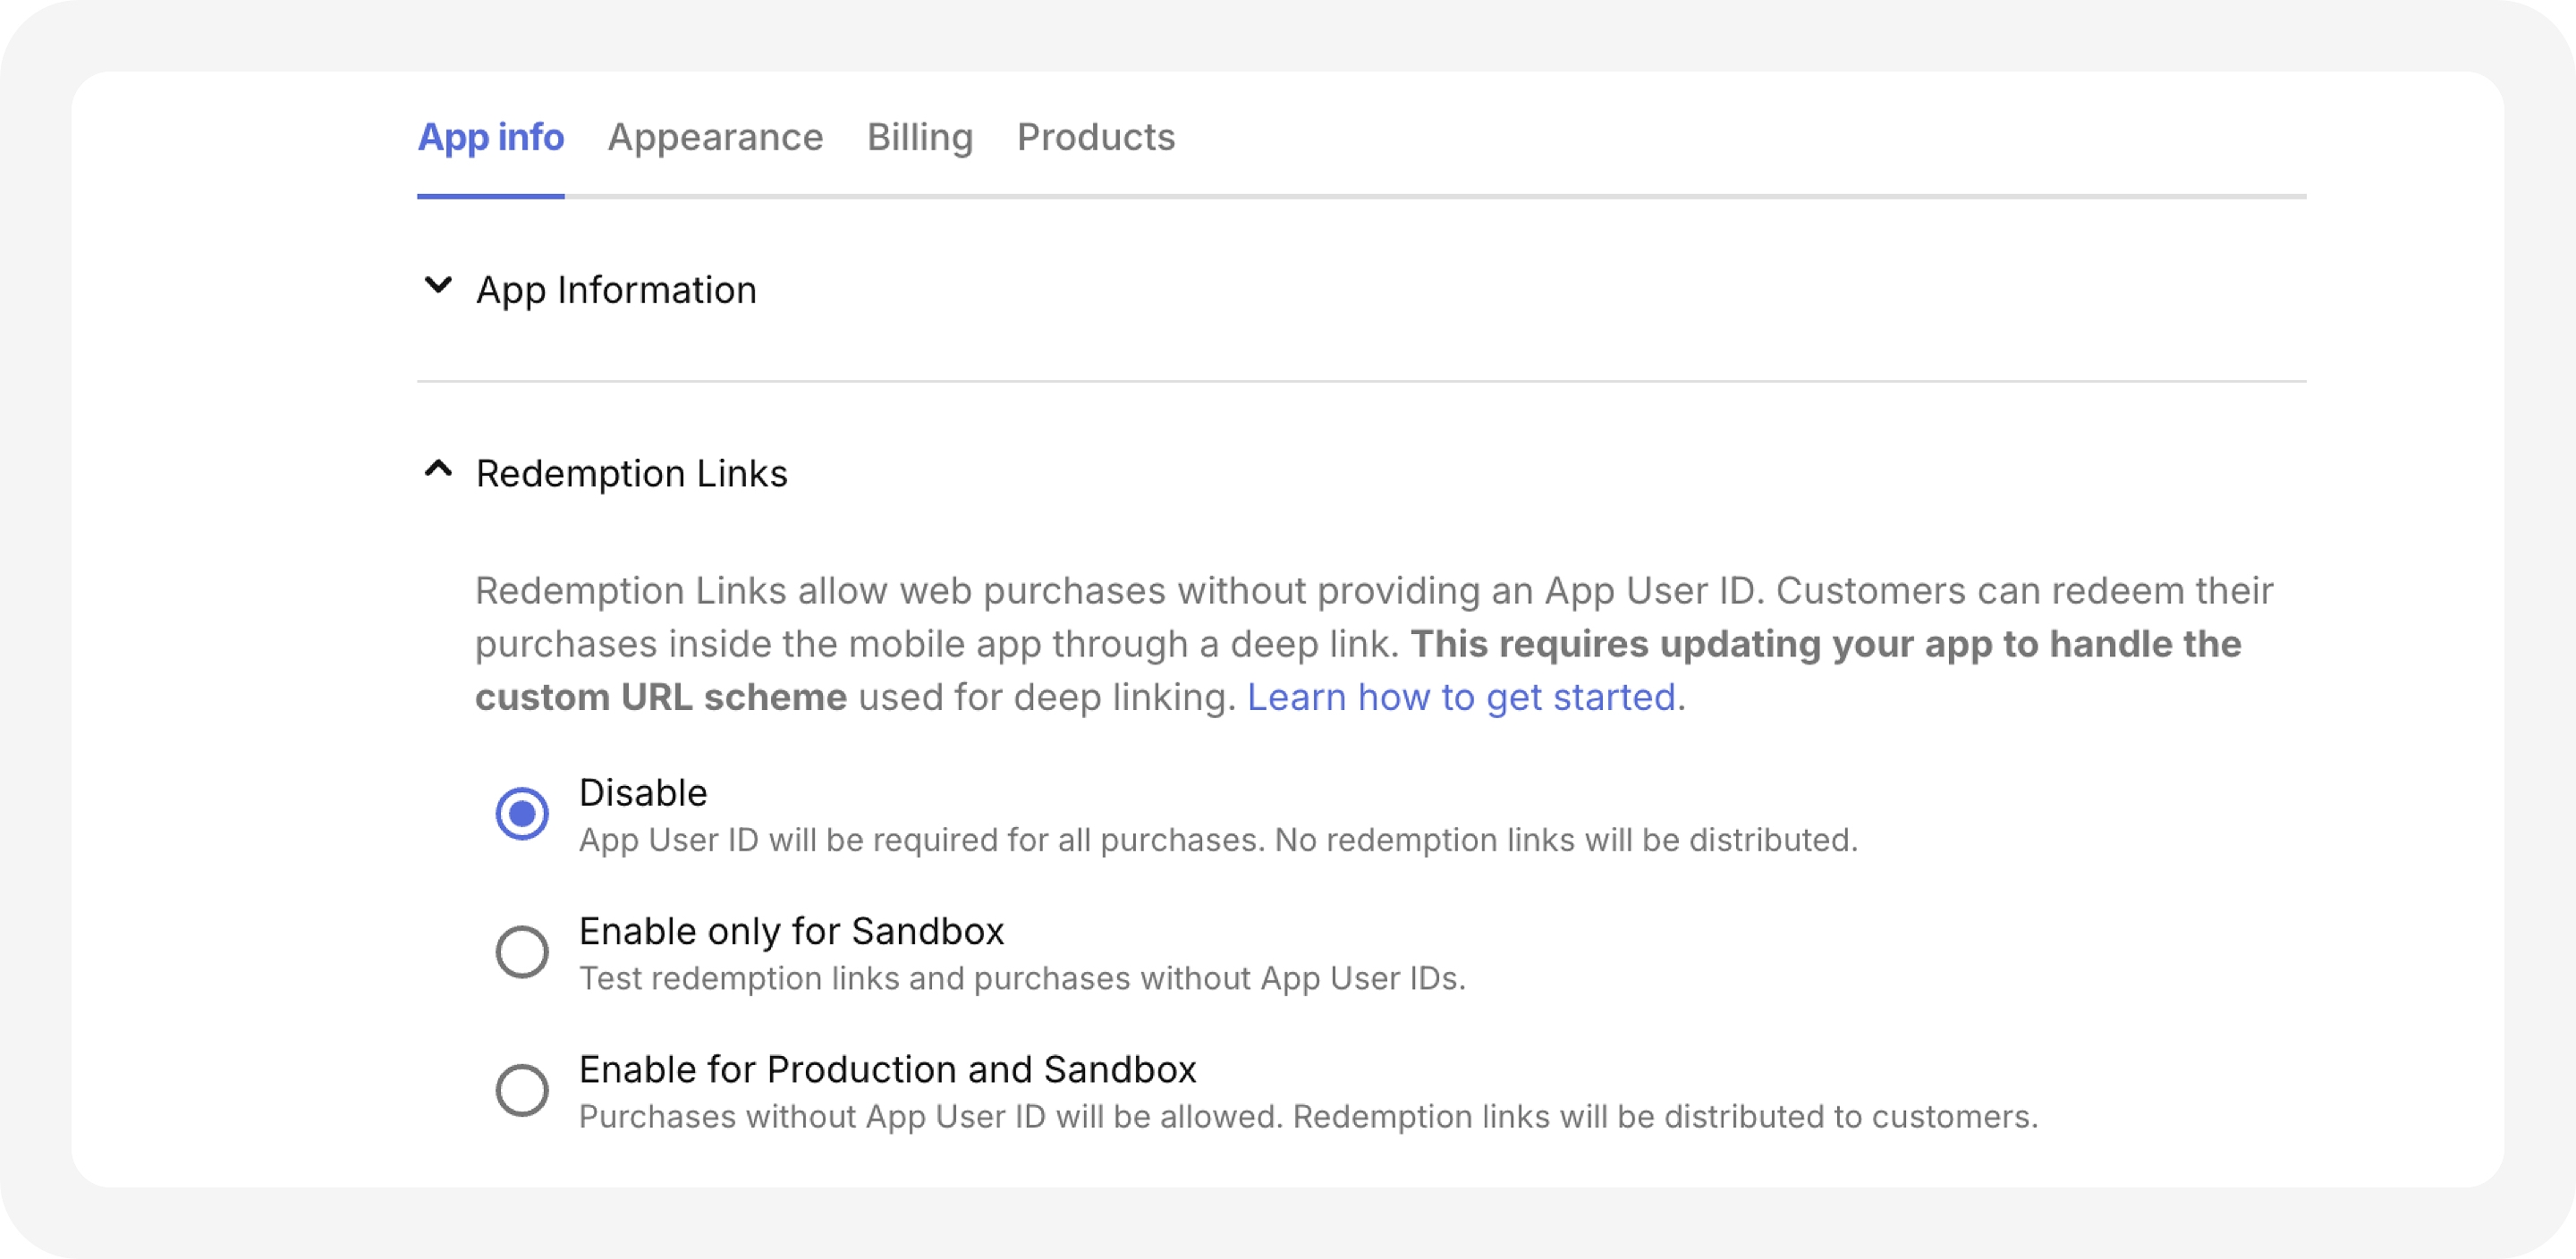
Step 1: Configure web redemption links in RevenueCat dashboard
To enable redemption links, navigate to your project in the RevenueCat dashboard, then the Web tab. In the Web configuration section, open the configuration and open the Redemption links section. Click to enable Redemption Links for either the environments you need. After that, copy the Custom URL Scheme, we are going to need it later.
Step 2: Handle redemption links in your React Native app
As mentioned there are two different ways to handle deep linking in your React Native. You should go with option A if your app uses React Navigation (or a similar navigation library); and option B if your app is using Expo Router.
Option A: Handle redemption links with Expo Linking
Expo’s Linking API lets your app respond to incoming URLs and route to a specific screen. The Expo docs cover custom schemes as well as Universal Links/App Links. We’ll show a custom scheme for clarity.
Add a URL scheme you copied earlier to your app.json
We could use the scheme field to add the earlier copied URL scheme to our app. However you might already be using another url scheme, in which case you want the RevenueCat URL Scheme to exist separately. To do this with Expo you need to add the following fields in app.json:
Run npx expo prebuild to generate the ios folder and contents. You can validate that schemes are configured correctly by opening Xcode and going to: Target → Info → URL Types. You should see your existing URL scheme and the RevenueCat URL scheme listed there.
For Android, the field to use is intentFilters:
If you’re not using Expo you can configure the Android and iOS deep links with React Navigation following this guide.
Listen for incoming URLs
Once your URL schemes are configured you need to implement the code for observing links that launch your app. The code below is a simple implementation for handling Redemption links.
Option B: Handle redemption links with Expo Router
If your app uses Expo Router, you don’t need a custom listener or route for handling redemption links. Instead, you can use Expo Router’s +native-intent.tsx and redirectSystemPath to intercept incoming native intents globally.
Alternatively, you can also redirect users to a custom route that informs users when their redemption link was redeemed successfully, or if it failed for any reason.
Step 3: Test the full flow end-to-end
You can then test that the deep linking works with the following command:
If the previous steps have been done correctly, your app should open, and you should see logs indicating whether the redemption succeeded or failed, depending whether you used a real redemption link or not. All that’s left to do is to improve the UX of this feature by, for example, building a custom screen that congratulates the user for starting their premium subscription.
Before going to production you can test Redemption links by doing a sandbox web purchase and testing with that link. After sending yourself the redemption link, and opening it on a device with your app installed, you should see the app open, and the subscription get redeemed.
For web checkout itself, you can either embed RevenueCat’s Web SDK or use Web Purchase Links to spin up a hosted paywall with minimal code. Both approaches feed into the same redemption link pattern you wired above.
Further resources
Once your deep links are working reliably, redemption links become a powerful tool for marketing and support — from win-back emails that auto-unlock on tap, to gifting or upgrade flows that work seamlessly across iOS, Android, and web.
For more info, check out out Docs:
- Redemption Links (behavior, one-time use, anonymous checkout + association on open).
- Web Billing Overview & Config (products, pricing, localization, tax, Stripe).