Implementing in-app purchases and monetizing your Roku app: A step-by-step guide
A comprehensive guide to implementing and monetizing your Roku channel, from choosing the right strategy to technical tips and integration best practices.

With over 80 million active accounts and a 51.7% share of the connected TV device market in the U.S., Roku is a platform that app developers can’t afford to ignore — especially for streaming apps and those optimized for the TV experience.
Over the past few months, we’ve worked closely with Roku to integrate Roku Pay support into our SDK, and we’re excited to share everything we’ve learned. This guide will walk you through monetization strategies, technical implementation, and best practices to help you make the most of Roku’s capabilities.
While this guide will show you how to implement subscriptions without a backend, be sure to check out our Roku SDK for added support of more complex use cases and advanced features.
Why should you care about monetizing your Roku channel?
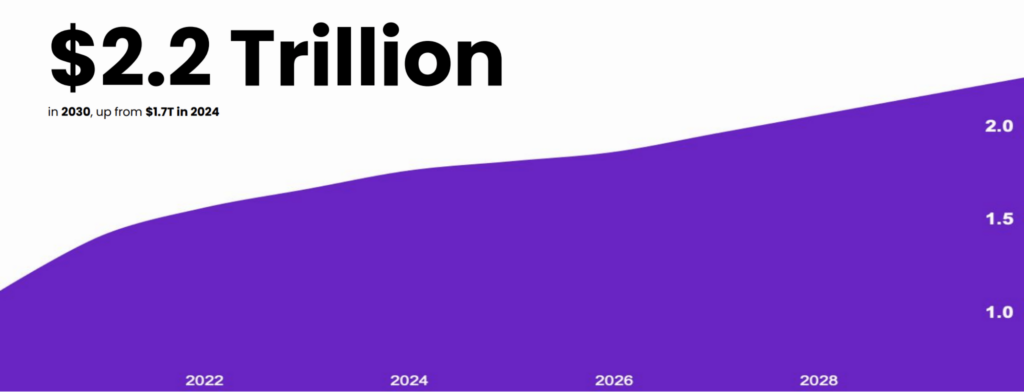
The market for digital goods and services is booming. Consumer spending on ‘bits and bytes’ is projected to reach $2.2 trillion in 2030, up from $1.7 trillion in 2024. This growth encompasses everything from streaming entertainment and gaming to virtual learning and digital health apps.

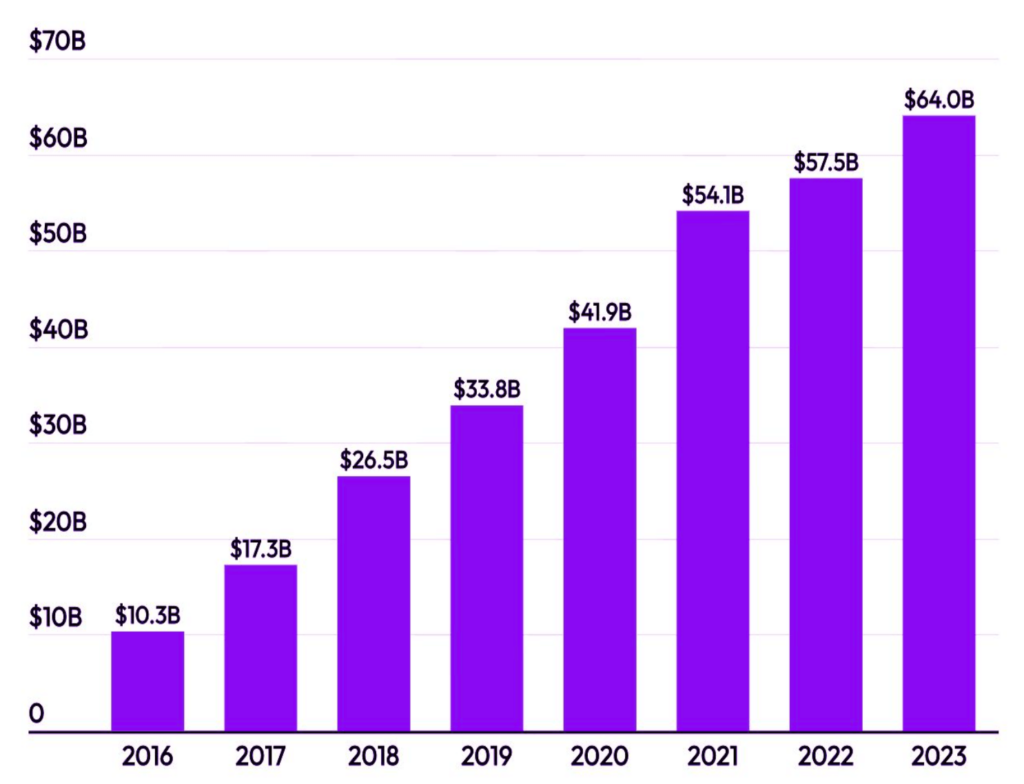
If we zoom in on in-app subscriptions specifically, according to data.ai, revenue is projected to grow at a compound annual rate of 20% between 2022 and 2030, making it one of the fastest-growing segments within digital services.

Consumer spend on in-app subscriptions. Source: data.ai State of Mobile 2024.
So, if you’re building a Roku channel, it’s essential to capitalize on this trend and implement a robust monetization strategy.
Understanding the app monetization landscape
There are three primary app monetization strategies you can use for your Roku app. Each has its pros and cons, and they’re not mutually exclusive — you can mix and match these strategies based on your channel’s content and audience.
1. Pay-to-install channels:
- Users pay a one-time fee to download and install your channel. Developers keep 80% of the revenue, while Roku takes 20%.
- Pros: You get immediate revenue, typically in one lump sum, and it’s a straightforward business model where Roku handles all payment processing.
- Cons: Limited reach, as users might hesitate to pay upfront without trying the content first. This model also comes with high expectations — users expect premium content and continued value for their purchase.
2. Video advertisements:
- Ads are a great way to monetize free or freemium apps. With Roku’s Advertising Framework built into the Roku SDK, you manage your own ad server, but 30% of your ad inventory must be allocated to Roku.
- Pros: Wider reach since the app is free to download, and ads can generate a steady revenue stream if your app has high user engagement.
- Cons: Ads can negatively impact user experience if not managed carefully. Additionally, managing your own ad server is resource-intensive, and you lose control over 30% of your inventory.
3. In-app purchases using Roku Pay:
- Include both subscriptions and one-time purchases. Payments are handled by Roku, which retains a 20% fee.
- Pros: Flexible monetization options and recurring revenue from subscriptions. Roku handles all credit card processing, currency conversions, and taxes, making it easier for you to focus on content.
- Cons: Conversion can be challenging, especially for new users unfamiliar with your content. The process of navigating paywalls and making purchases must be seamless to reduce friction.
Choosing the right monetization strategy for your Roku channel
Your monetization strategy should align with your content and target audience:
- Pay-to-install: Best for premium content where users see upfront value. This strategy can provide an immediate revenue boost but may limit reach.
- Advertisements: Ideal for free or freemium apps with high engagement, generating revenue from views and clicks.
- Roku Pay subscriptions: The preferred option for apps offering ongoing value through content or features. Subscriptions provide a reliable, recurring revenue stream, but success depends on maintaining strong engagement to reduce churn. Subscriptions also allow you to experiment with pricing, trials, and hybrid models (e.g., subscriptions combined with one-time purchases) to find the best fit for your audience.
Subscriptions unlock long-term monetization potential, provide flexibility in pricing, and can foster a loyal user base — making them a powerful choice for many developers.
How to implement subscriptions with Roku Pay
Roku offers several built-in tools and components for developers to manage in-app purchases and subscriptions effectively:
- Roku Channel: Your application’s main entry point where content is served to users.
- Roku Developer Dashboard: Web-based platform to configure products, pricing, trials, and billing settings.
- SceneGraph ChannelStore Node: Built-in support for Roku Pay within the SDK, enabling API access for managing purchases and displaying paywalls.
- Roku Web Service APIs: Programmatic control over transactions, refunds, and user management.
- Real-time Push Notifications: Webhook notifications for updates on purchase events, renewals, and cancellations.
For a basic integration that handles subscriptions without needing a backend, only the Roku Channel, Developer Dashboard, and ChannelStore Node are required.
Now, let’s dive into the details of how to implement subscriptions using Roku Pay. This section will guide you through each step required to build a basic Roku Pay integration that doesn’t require a backend.
Step 1: Setup the ChannelStore Node
Initialize the essential Roku Pay components, including the ChannelStore SceneGraph node, and add it to your MainScene component.
1<component name="MainScene" extends="Scene">
2
3    <script type="text/brightscript" uri="pkg:/components/MainScene.brs" />
4
5    <children>
6
7        <ChannelStore id="store" />
8
9    </children>
10
11</component>
It’s important to only initialize one ChannelStore per application, so we recommend giving it a descriptive ID and accessing it where necessary.
Step 2: Get previous purchases
Retrieve the user’s purchase history by observing the response to the getAllPurchases command. Store all previous purchases in the context using an associative array indexed by the product code.
1sub init()
2
3    m.store = m.top.findNode("store")
4
5    ···
6
7    m.store.ObserveField("purchases", "onGetPurchases")
8
9    m.store.command = "getAllPurchases"
10
11    ···
12
13end sub
14
15sub onGetPurchases()
16
17    m.purchases = {}
18
19    for i = 0 to m.store.purchases.GetChildCount() - 1
20
21        item = m.store.purchases.getChild(i)
22
23        m.purchases[item.code] = item
24
25    end for
26
27end sub
Step 3: Fetch available products from the catalog
Retrieve all available products, including subscriptions, using the getCatalog command.
1sub init()
2
3    m.store = m.top.findNode("store")
4
5    ···
6
7    m.store.ObserveField("catalog", "onGetCatalog")
8
9    m.store.command = "getCatalog"
10
11    ···
12
13end sub
14
15sub onGetCatalog()
16
17    m.catalog = {}
18
19    for i = 0 to m.store.catalog.GetChildCount() - 1
20
21        item = m.store.catalog.getChild(i)
22
23        m.catalog[item.code] = item
24
25    end for
26
27end sub
Step 4: Check entitlements
Check if the user is already entitled to any products based on their previous purchases. If so, grant access to the content.
1sub isEntitled(product) as boolean
2
3    if m.purchases <> invalid and m.purchases[product.code] <> invalid
4
5        if m.purchases[product.code].status = "Valid"
6
7            return true
8
9        else
10
11            return false
12
13        end if
14
15    end if
16
17end sub
Step 5: Display the paywall
Show the user a paywall with available products. Make sure your paywall is clear and concise, minimizing confusion about what’s being offered.
Step 6: Make an order
If the user initiates a purchase, create an order to confirm the transaction and update the user’s entitlements.
1sub orderProduct(code)
2
3    order = CreateObject("roSGNode", "ContentNode")
4
5    item = order.createChild("ContentNode")
6
7    item.addFields({ "code": code, "qty": 1})
8
9    m.store.order = order
10
11    m.store.command = "doOrder"
12
13end sub
Because we had already started observing changes to the orderStatus field, we get notified when an order happens.
If the status of the order is successful, we can reload the previous purchases and the catalog and potentially grant access to the user.
1sub init()
2
3    m.store = m.top.findNode("store")
4
5    ···
6
7    m.store.ObserveField("orderStatus", "onOrderStatus")
8
9    ···
10
11end sub
12
13sub onOrderStatus()
14
15    if m.store.orderStatus.status = 1
16
17        m.store.command = "getAllPurchases"
18
19        m.store.command = "getCatalog"
20
21    end if
22
23end sub
Adding a backend: When and why you need it
While you can handle basic integration without a backend, adding one provides both technical and business benefits. Here’s why:
- Technical reasons
- Perform operations not supported on the device, e.g. issuing refunds
- Track the life cycle of your users and react in real-time, e.g. offering credit for a churned customer
- Essential if your app is cross-platform
- Business reasons
- Understand what your customers want so you can create valuable content.
- Track your revenue – past, present and predict future revenue (RLTV)
- Gather insights into KPIs like trial conversion, renewal, retention and reactivation rates.
- Experiment to optimize your pricing, UI design, offered features, etc
- Integrate with third-parties like Google Analytics
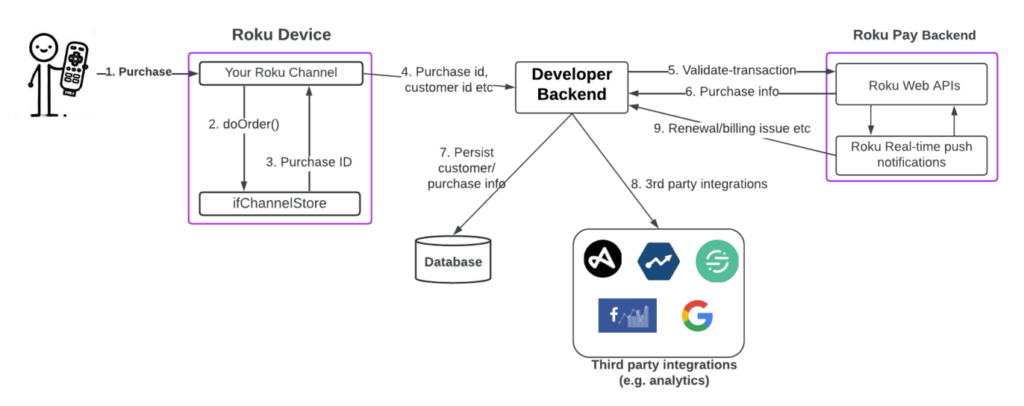
Here’s what the backend architecture could look like:

As the diagram shows, the Roku channel communicates with the channel store to handle purchases. Then, your backend validates the purchase via Roku’s Web APIs. Once validated, the backend can send the data to your chosen integrations and trigger real-time push notifications for renewal, billing issues, and churn events.
By adding a backend, you’re streamlining the subscription process as well as building a foundation for data-driven growth and monetization on Roku.
Best practices for monetizing Roku channels
Here are some best practices to keep in mind while implementing monetization strategies:
- Add free trials and offers to existing products: Don’t create separate products for discounts or trials. This complicates product management and eligibility checks.
- Simplify your paywall: Make it easy for users to understand the benefits and pricing of each product at a glance.
- Sync daily with Roku web APIs: Use the validate-transaction endpoint daily to ensure your subscription statuses are up-to-date. Be mindful of rate limits and schedule updates during off-peak times.
Roku’s recommendations are pretty straightforward. First, if you want to offer trials or discounts, add these to existing products rather than creating new ones to avoid complicating your product management. Next, keep your paywall clear and concise so users can understand the value of what they’re buying at a glance. Finally, use the Roku API’s validate-transaction endpoint to sync daily and ensure subscription statuses stay up-to-date, but keep an eye on rate limits.
Here’s our take:
- Always have a backend: A backend gives you visibility into your users’ behavior and the flexibility to optimize pricing and content. You can track metrics, manage refunds, and even respond to subscription lifecycle events in real-time.
- Experiment early and often: Don’t assume a single strategy will work. Test different paywall designs, pricing tiers, and even hybrid monetization models (e.g., a mix of subscriptions and one-time purchases).
- Define KPIs and revisit them regularly: Identify key metrics like conversion rates, churn, and revenue per user early on. Revisit these often to ensure your strategies are working and make adjustments as needed.
- Leverage third-party integrations: Tools like Google Analytics, Amplitude, or Segment help deepen your understanding of user behavior and ROI. And if you want to streamline it all, using a platform like RevenueCat can save you time and effort by consolidating everything in one place.
Conclusion
Implementing Roku Pay without RevenueCat is a viable path, but it requires a significant investment in backend development. By contrast, the RevenueCat SDK simplifies handling in-app purchases, offers robust analytics, and easily syncs entitlements across platforms.
Explore the RevenueCat Roku SDK to see how it can save you time and reduce complexity.
Helpful resources
You might also like
- Blog post
How we built the RevenueCat SDK for Kotlin Multiplatform
Explore the architecture and key decisions behind building the RevenueCat Kotlin Multiplatform SDK, designed to streamline in-app purchases across platforms.
- Blog post
Inside RevenueCat’s engineering strategy: Scaling beyond 32,000+ apps
The strategies and principles that guide our global team to build reliable, developer-loved software
- Blog post
RevenueCat Ship-a-ton
The hackathon that’s all about shipping… a ton.


