
Chapter 8: Set up your products in App Store Connect
So far, you’ve tested subscriptions using RevenueCat’s Test Store. Now you need to create the real subscription products that Apple will use when someone pays through the App Store.
You’ll do this through App Store Connect.
App Store Connect is where you manage your app before and after it goes live. You’ll use it to:
- Manage TestFlight builds
- Configure your App Store subscription products
- Complete your App Store listing
- Submit your app and subscriptions for review
Open App Store Connect and sign in with the Apple account you used to join the Apple Developer Program.
Check your Paid Apps Agreement
Before you can sell subscriptions or in-app purchases, Apple’s Paid Apps Agreement needs to be active.
You should already have started this setup in the first section of this guide.
To check:
- Open App Store Connect
- Select Business
- Open Agreements
- Find the Paid Apps Agreement and check its status

The Account Holder must accept the agreement. You’ll also need to provide the banking and tax information Apple requires before it can pay you.
If the agreement is Active, you can continue.
If Apple shows that something is missing, follow the instructions to:
- Accept the latest agreement
- Add or confirm your bank account
- Complete the required tax forms
You can continue working on other parts of your app while Apple processes this information, but the required agreements and financial setup need to be in place before you can sell your subscriptions.
Start the RevenueCat sync in Replit
Now we’ll connect the RevenueCat products Replit created earlier to App Store Connect.
After your first iOS build has been uploaded, return to your project in Replit.
- Open Tools
- Select Publishing
- Open Overview
- Find the App Store section
You should see a warning telling you that RevenueCat isn’t yet connected to App Store Connect and that in-app purchases won’t work.
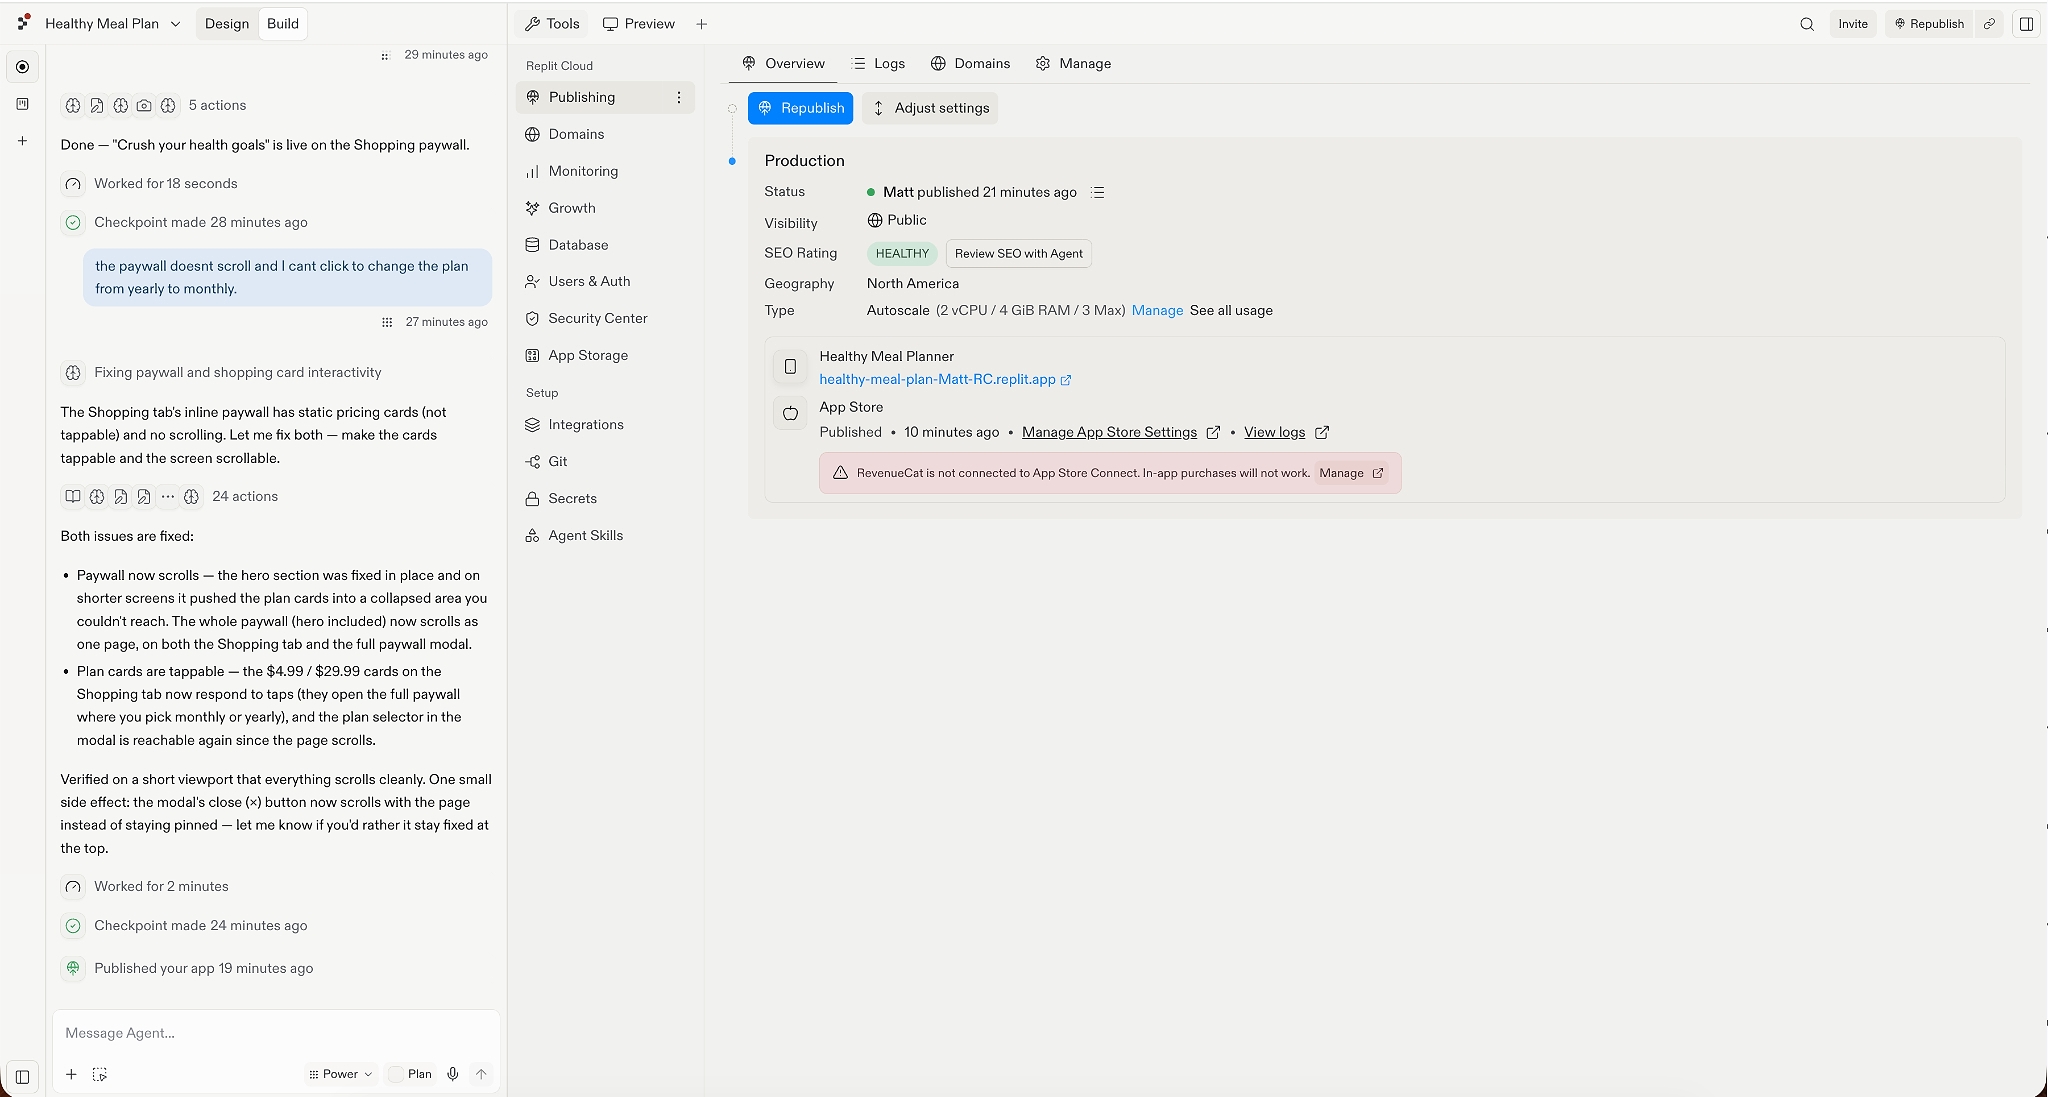
Select Manage, then select Sync RevenueCat to App Store Connect.
Replit only shows this sync flow after your app has been uploaded to TestFlight.
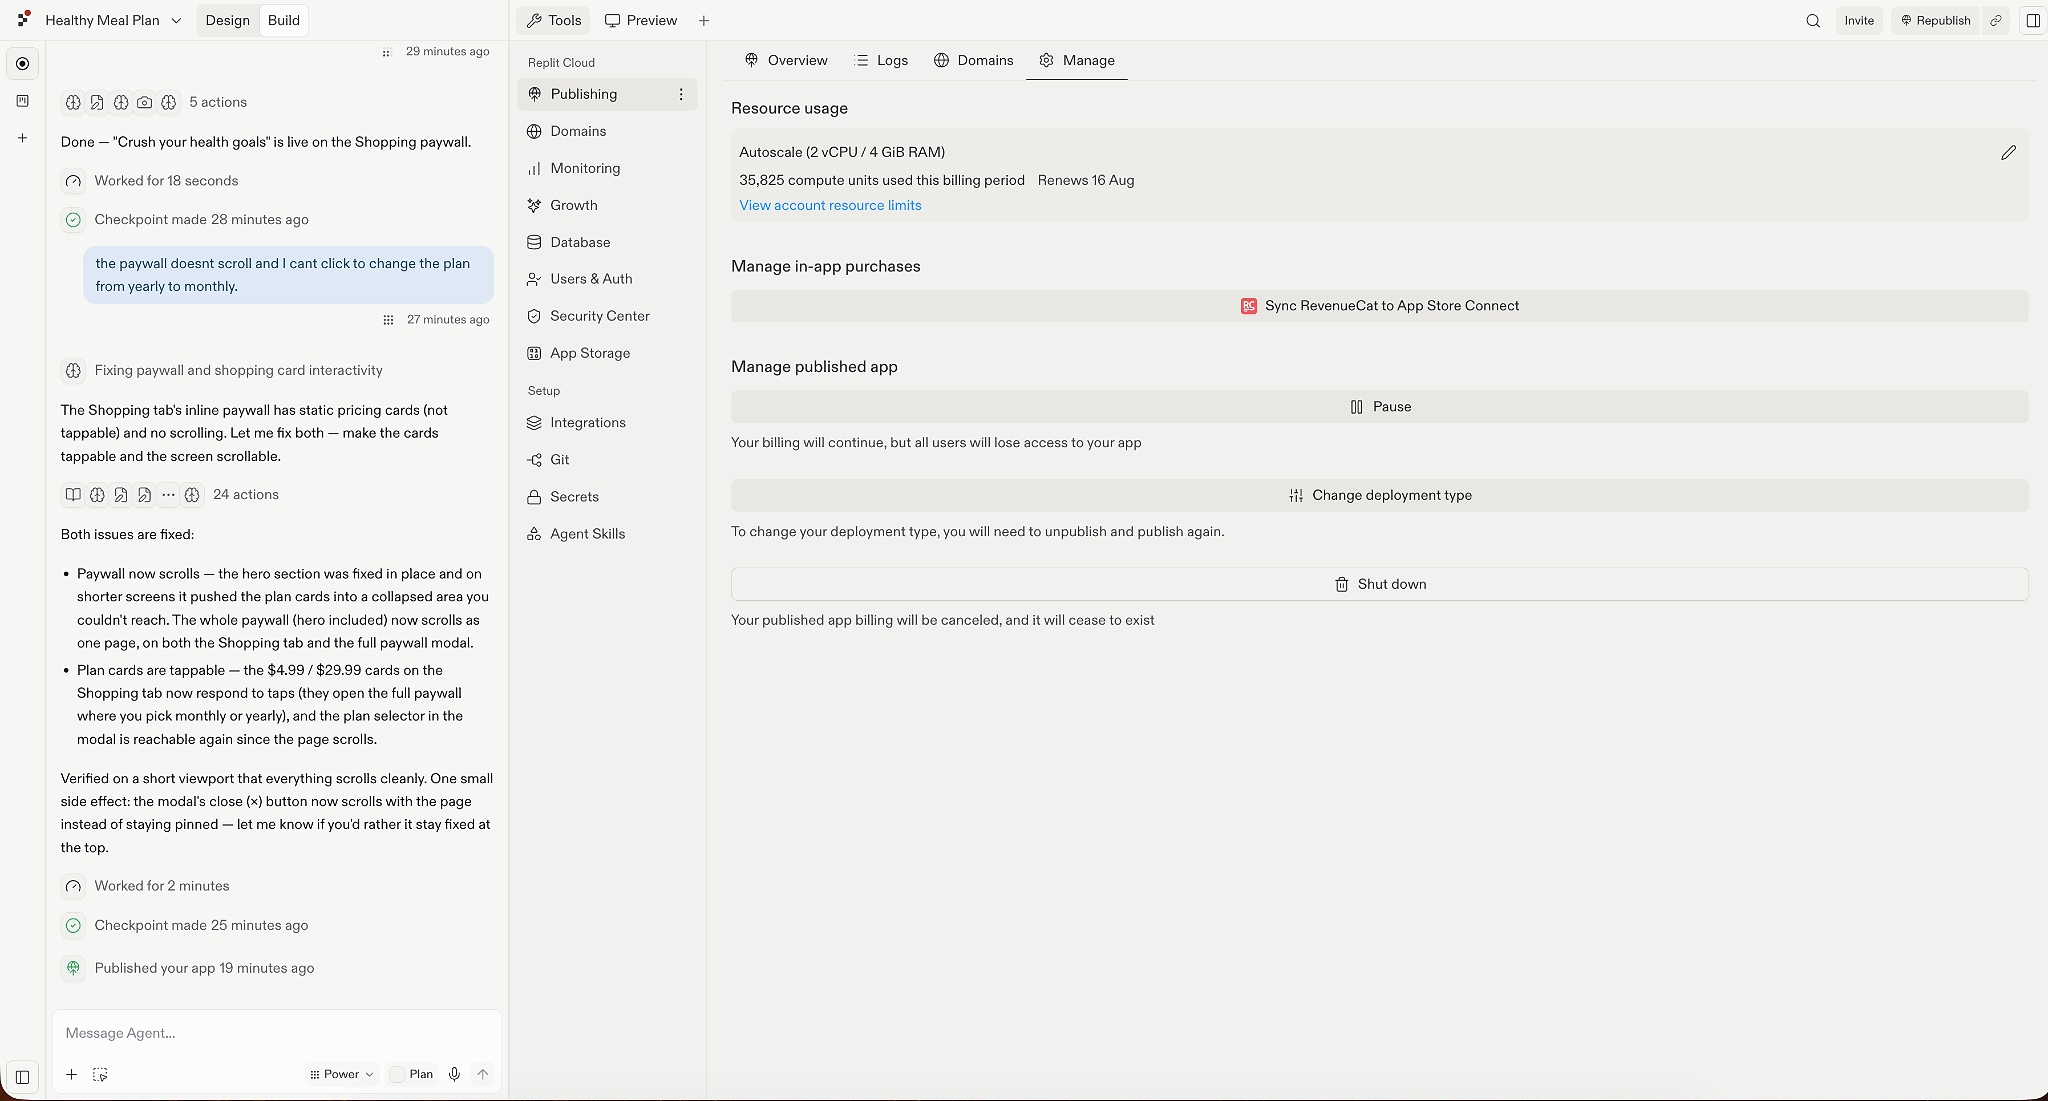
The setup requires two different Apple credentials:
- An App Store Connect API key
- An In-App Purchase API key
They look similar, but they serve different purposes. Make sure you create and upload the correct key at each step.
Connect your App Store Connect API key
First, Replit will ask for an App Store Connect API key. This gives the integration the access it needs to sync product information with your App Store Connect account.
In App Store Connect:
- Select Users and Access
- Select Integrations
- Select App Store Connect API
- Open Team Keys
- Select the plus button to create a new API key
- Give the key a clear name, such as RevenueCat
- Set its access to App Manager
- Generate the key
- Download the .p8 key file
Apple only lets you download the private key once, so save it somewhere secure. Replit’s integration requires an App Store Connect API key with App Manager access.
If you don’t see the option to create an API key, the Account Holder may first need to request access to the App Store Connect API.
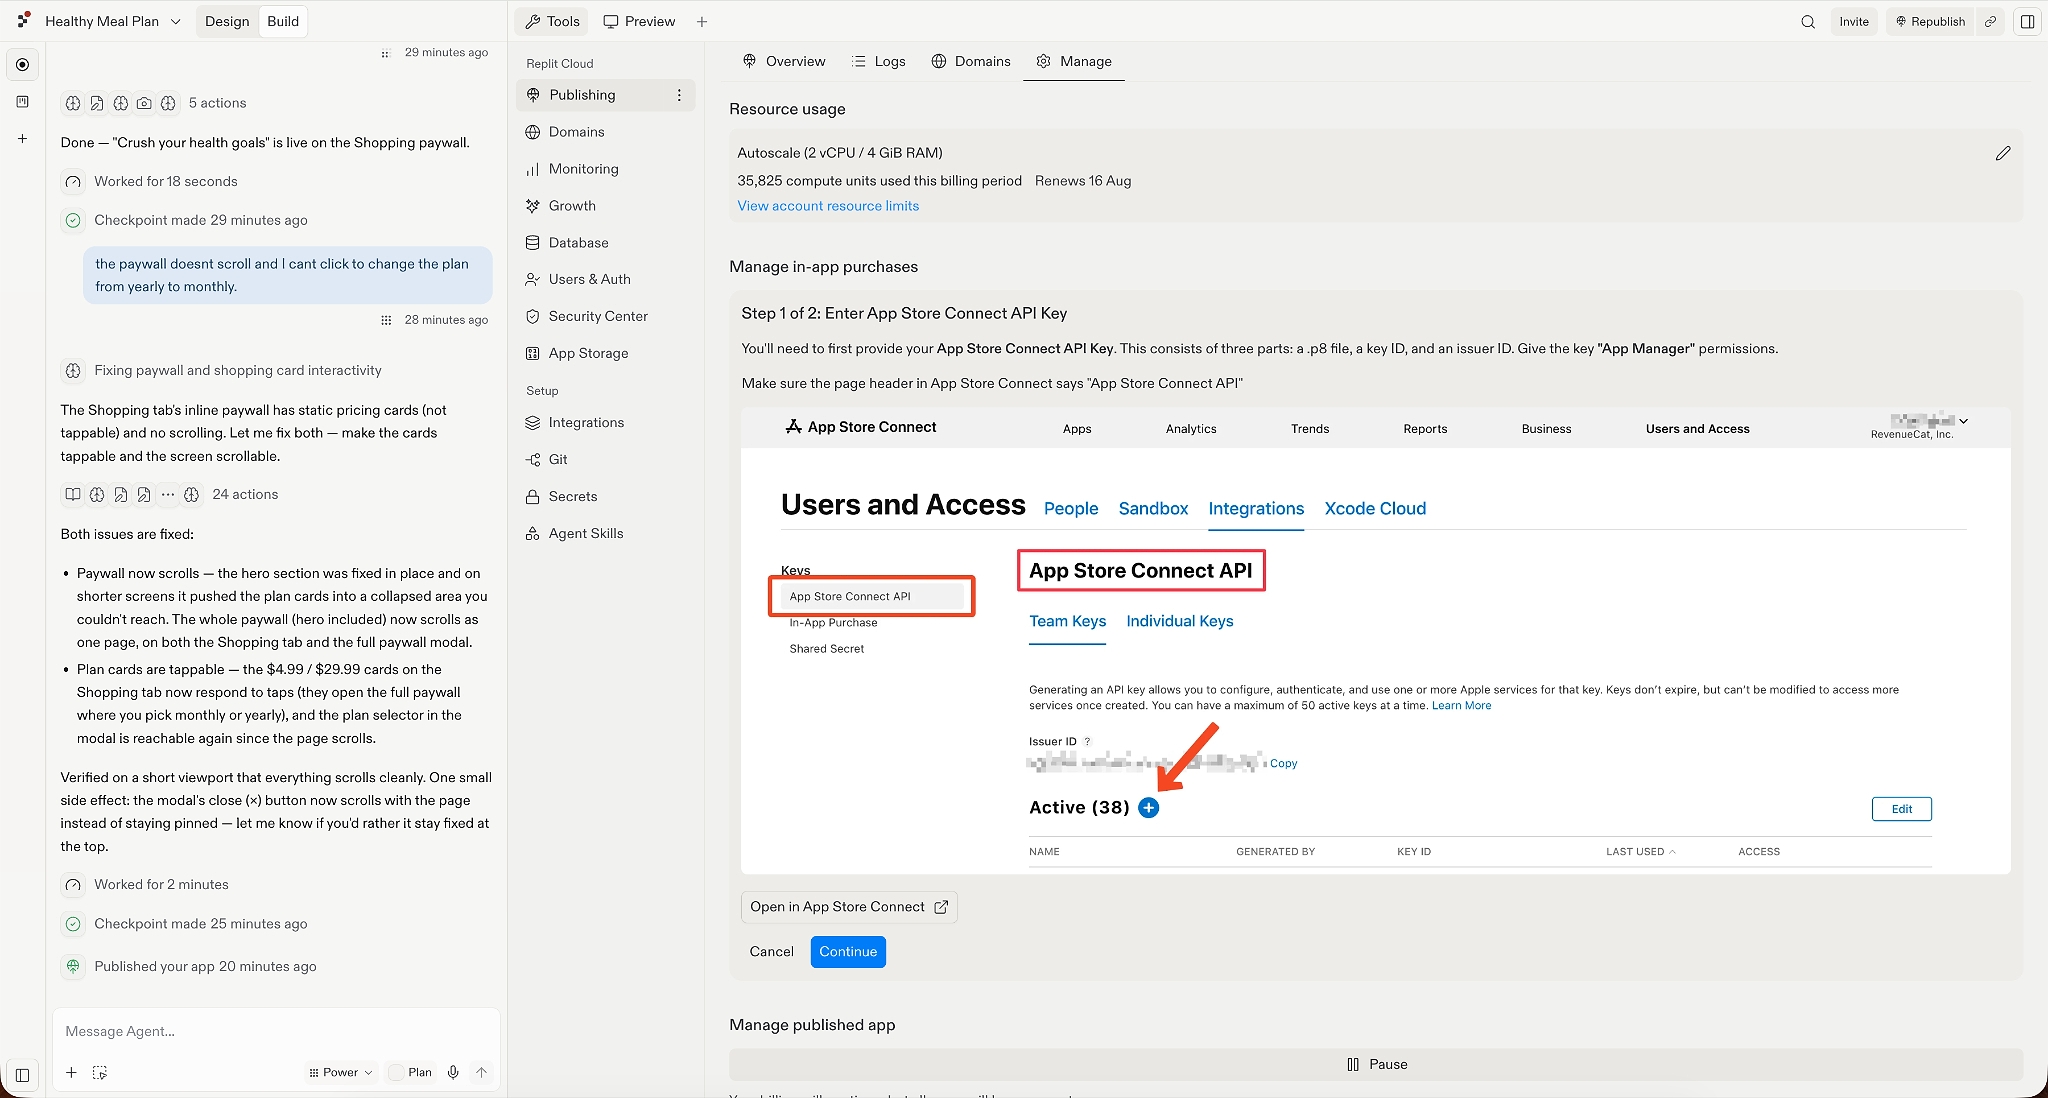
Return to Replit and provide:
- The .p8 key file
- The Key ID
- The Issuer ID
Then continue to the next step.
Treat the .p8 file like a password. Don’t add it to your app’s code or share it publicly.
Connect your In-App Purchase Key
Next, Replit will ask for a separate In-App Purchase API key.
This is not the same key you just created.
In App Store Connect:
- Stay in Users and Access
- Select Integrations
- Select In-App Purchase
- Select the option to generate a new key
- Give the key a clear name
- Generate and download the .p8 file
Apple only lets you download this key once too, so store it securely.
Return to Replit and provide:
- The In-App Purchase .p8 key file
- The Key ID
- The Issuer ID
The Issuer ID is the same for your App Store Connect API key and In-App Purchase key.
Double-check that you upload the correct .p8 file at each stage. The App Store Connect API key and In-App Purchase API key are separate credentials.
Check the connection in RevenueCat
You can also confirm that the credentials reached RevenueCat correctly.
In the RevenueCat dashboard:
- Open your project
- Select Apps
- Select your iOS app
- Find the In-app purchase key configuration and App Store Connect API sections
- Check that the credentials show as valid
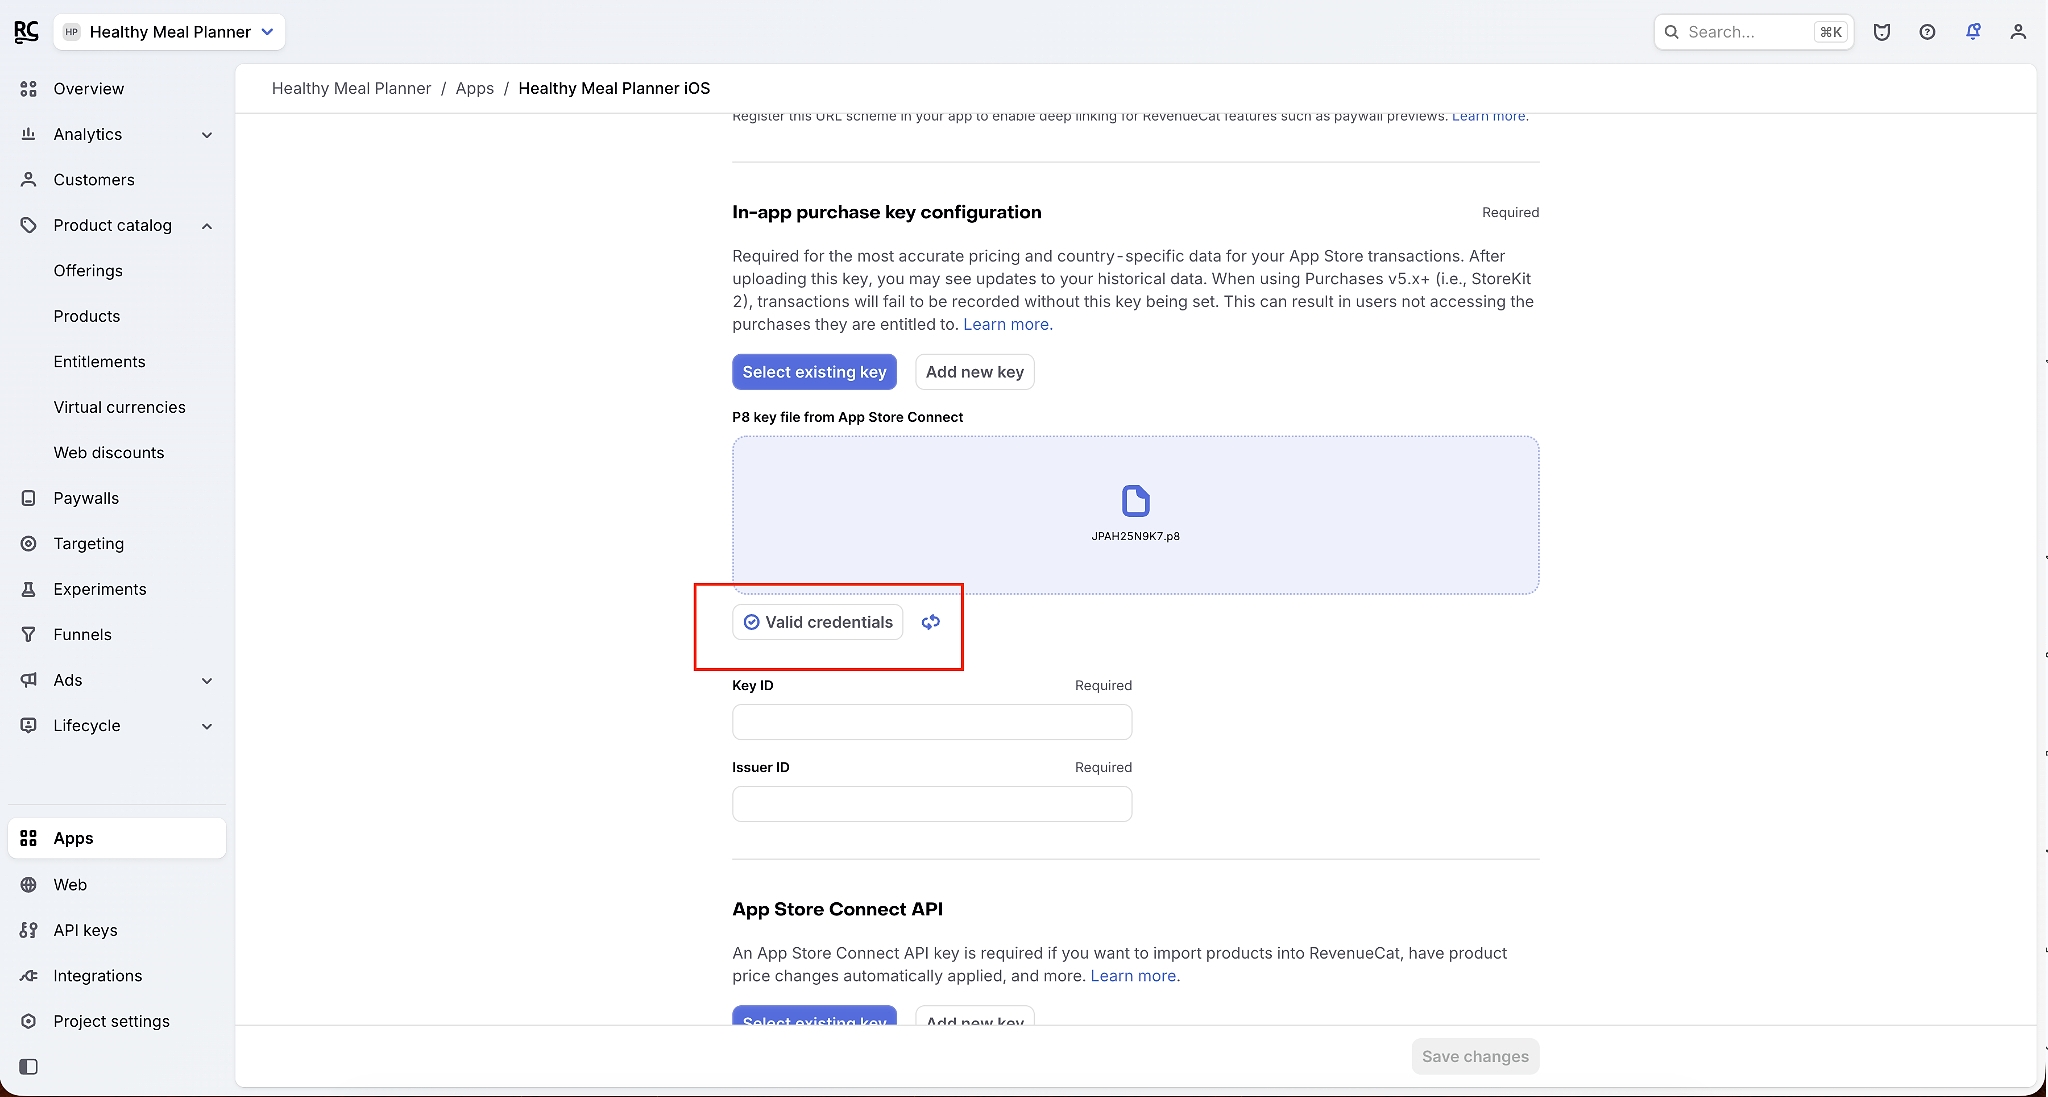
If either configuration shows an error, return to Replit and check the .p8 file, Key ID, and Issuer ID you provided.
Review the products before you sync
Once both keys have been added, Replit displays the subscription products that are ready to sync to App Store Connect.
For each product, check:
- The product name
- The Product ID
- The price
- The subscription duration
- The initial territory
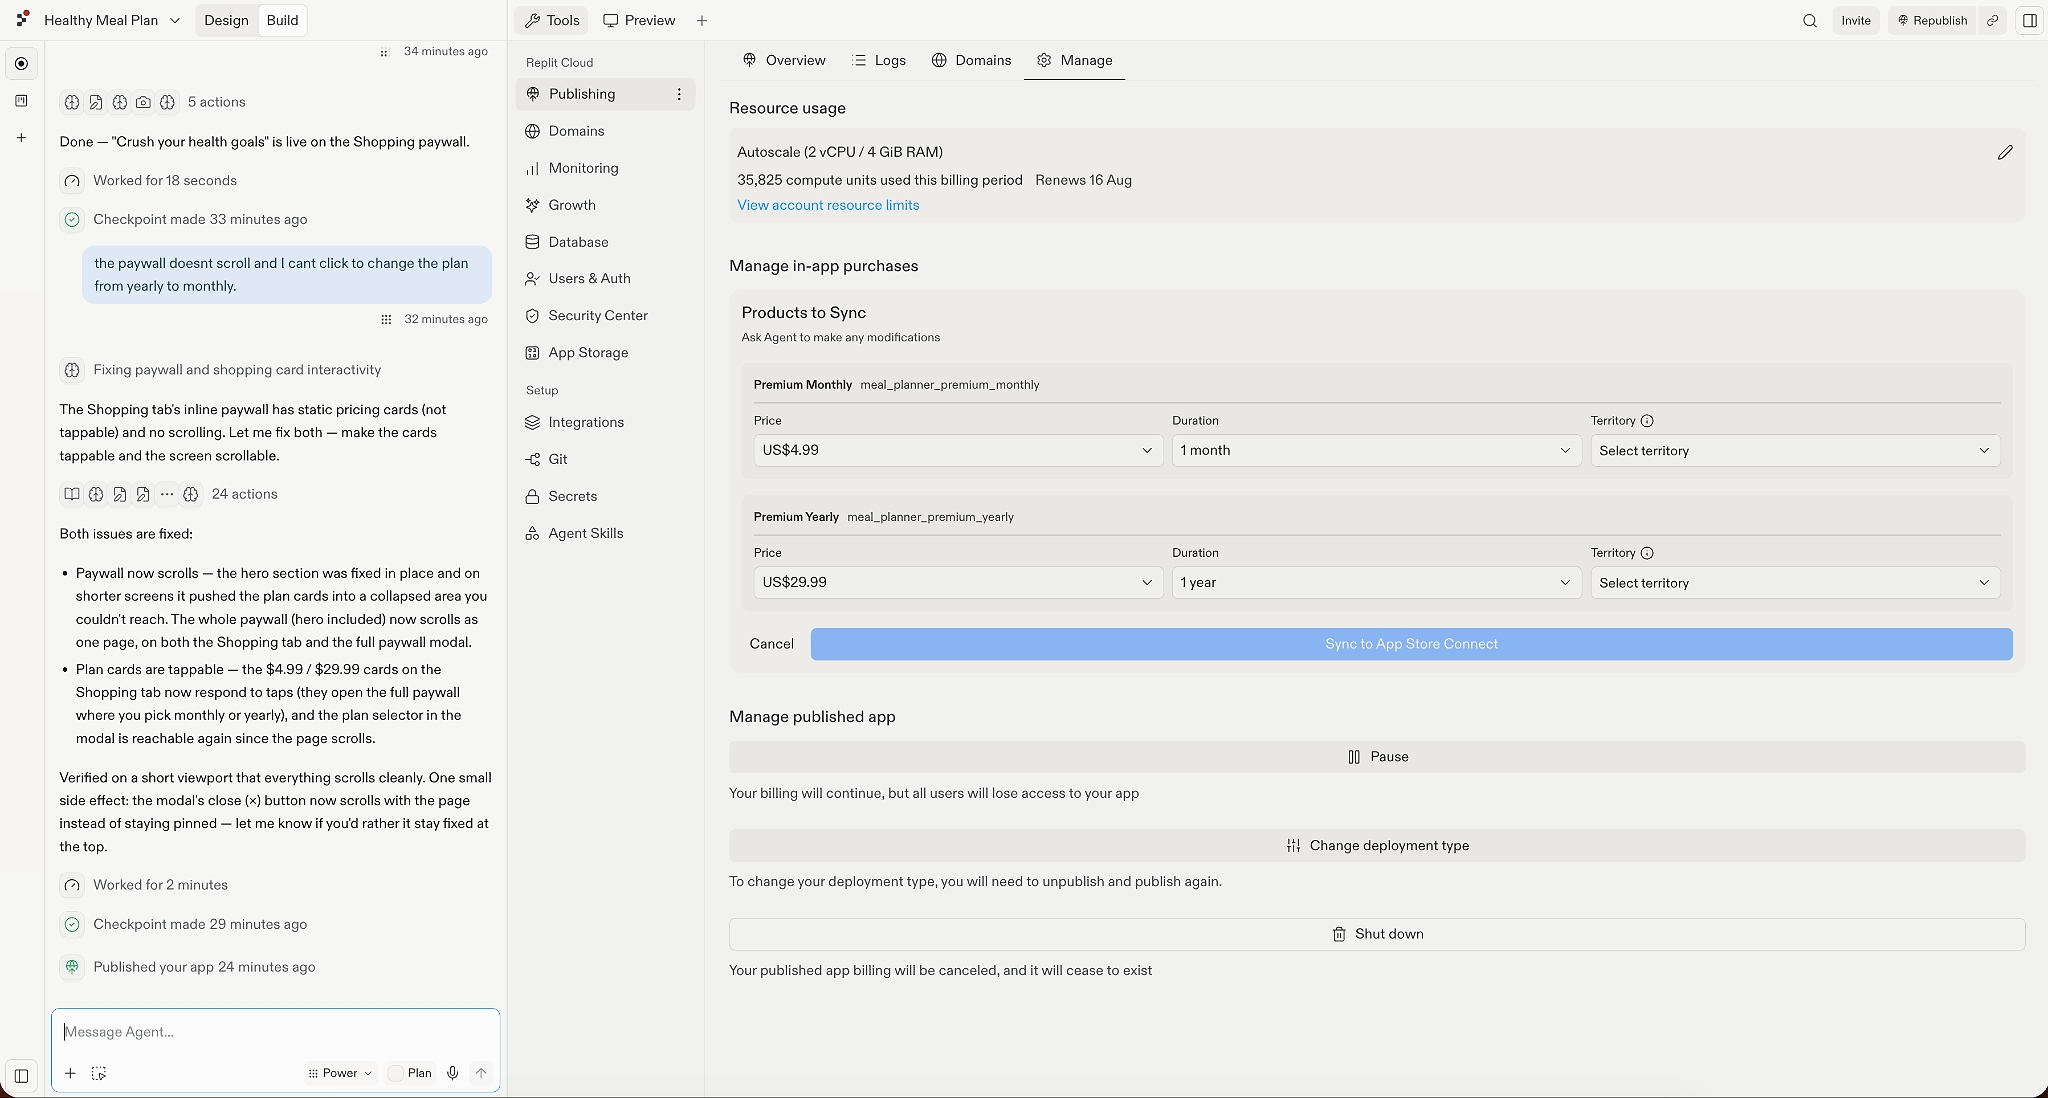
Take a moment to check these carefully before continuing.
In particular, make sure the Product ID is correct. Apple uses this identifier to connect the product in your app, RevenueCat, and App Store Connect, and a Product ID can’t be edited after the product has been saved in App Store Connect.
You’ll be able to review and expand each subscription’s availability and regional pricing in App Store Connect after the sync.
Sync the products to App Store Connect
Once everything looks right, select Sync to App Store Connect.
Replit will create the corresponding subscription products in App Store Connect. Replit’s current integration supports syncing the product configuration from RevenueCat into App Store Connect directly from the Publishing flow.
To confirm that it worked:
- Open App Store Connect
- Select Apps
- Select your app
- Under Monetization, select Subscriptions
You should see a subscription group created by Replit, containing the subscription products you synced.
For our example app, that means:
- Premium Monthly
- Premium Yearly
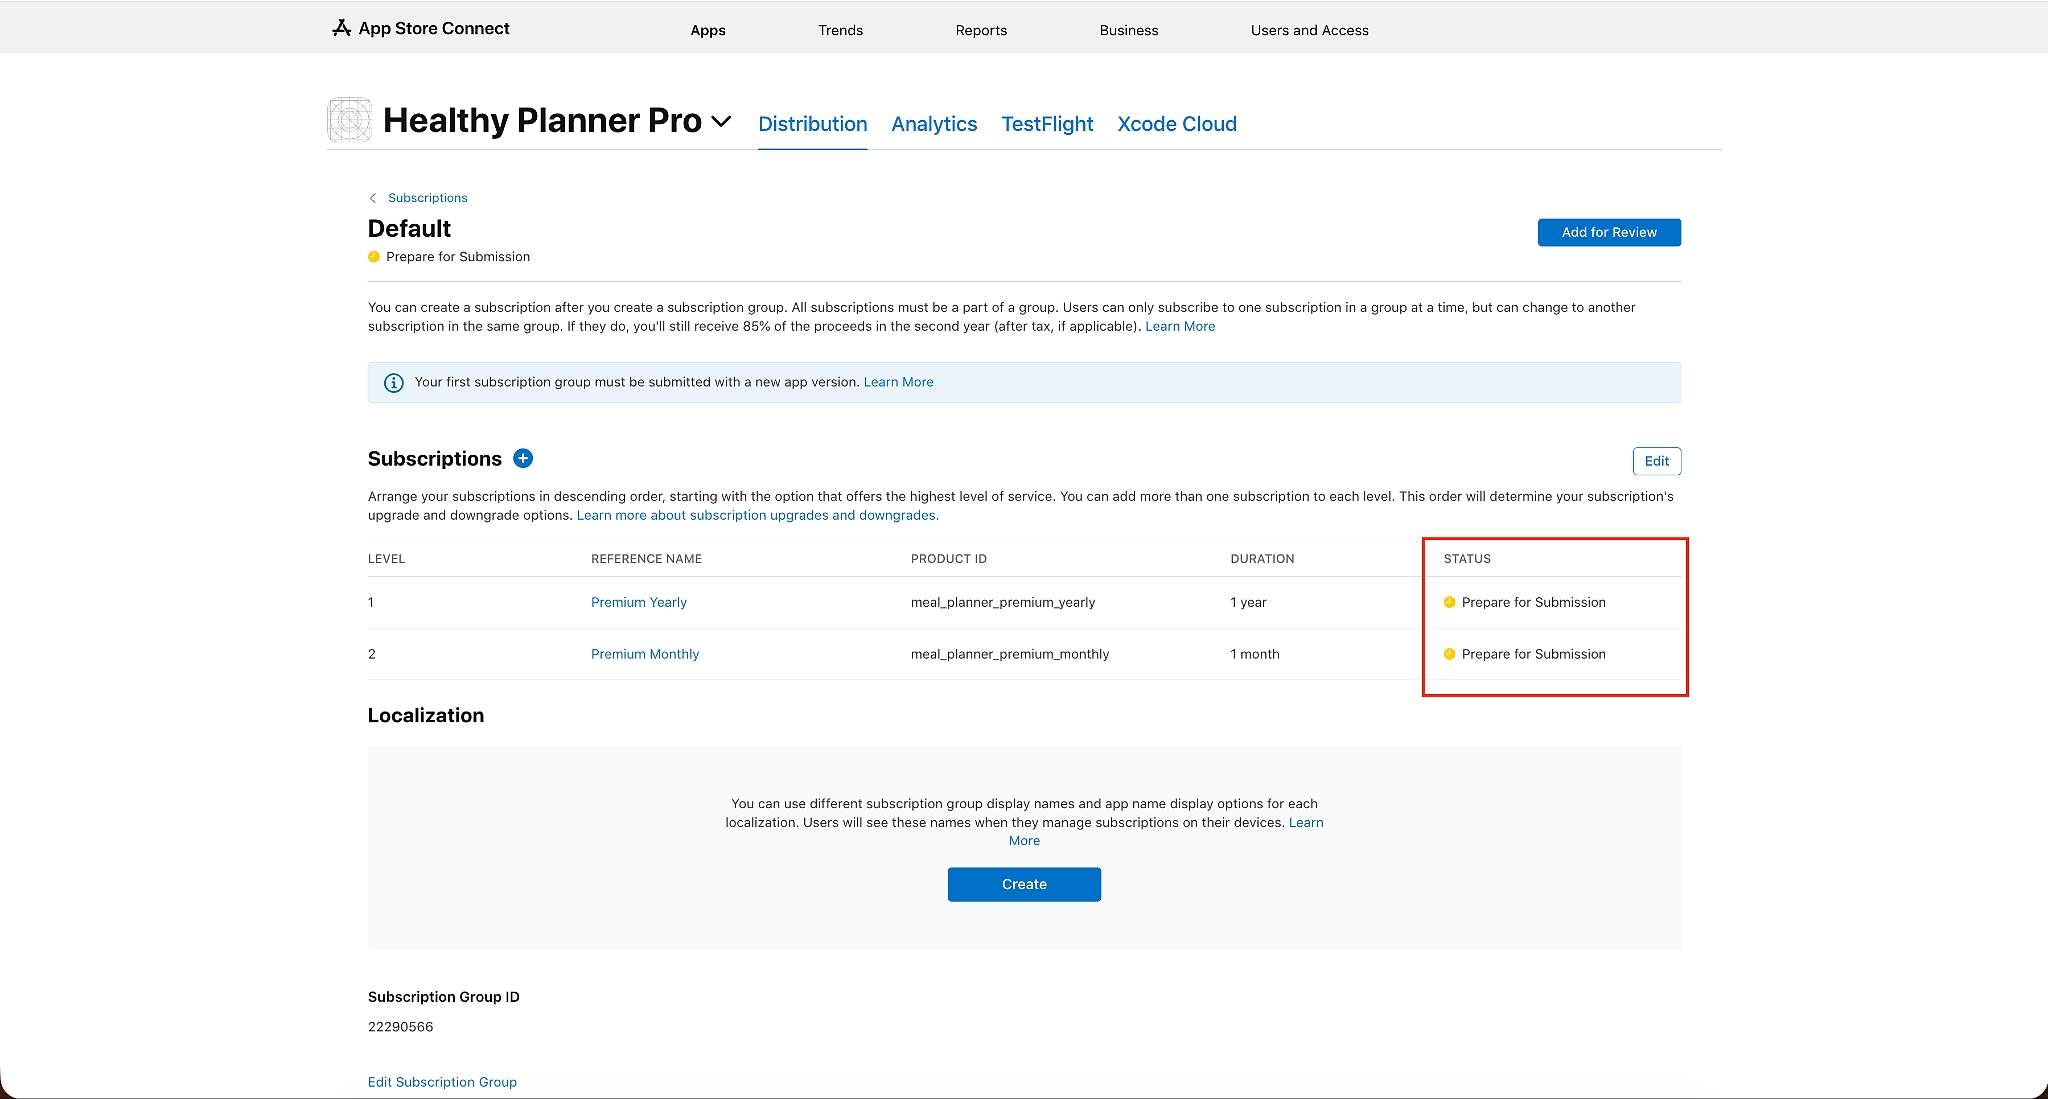
At this stage, the products may show Prepare for Submission. That means they exist in App Store Connect, but Apple still needs some additional information before you can submit them for review.
If you check Product Catalog → Products in RevenueCat now, the iOS products will show Missing Metadata.
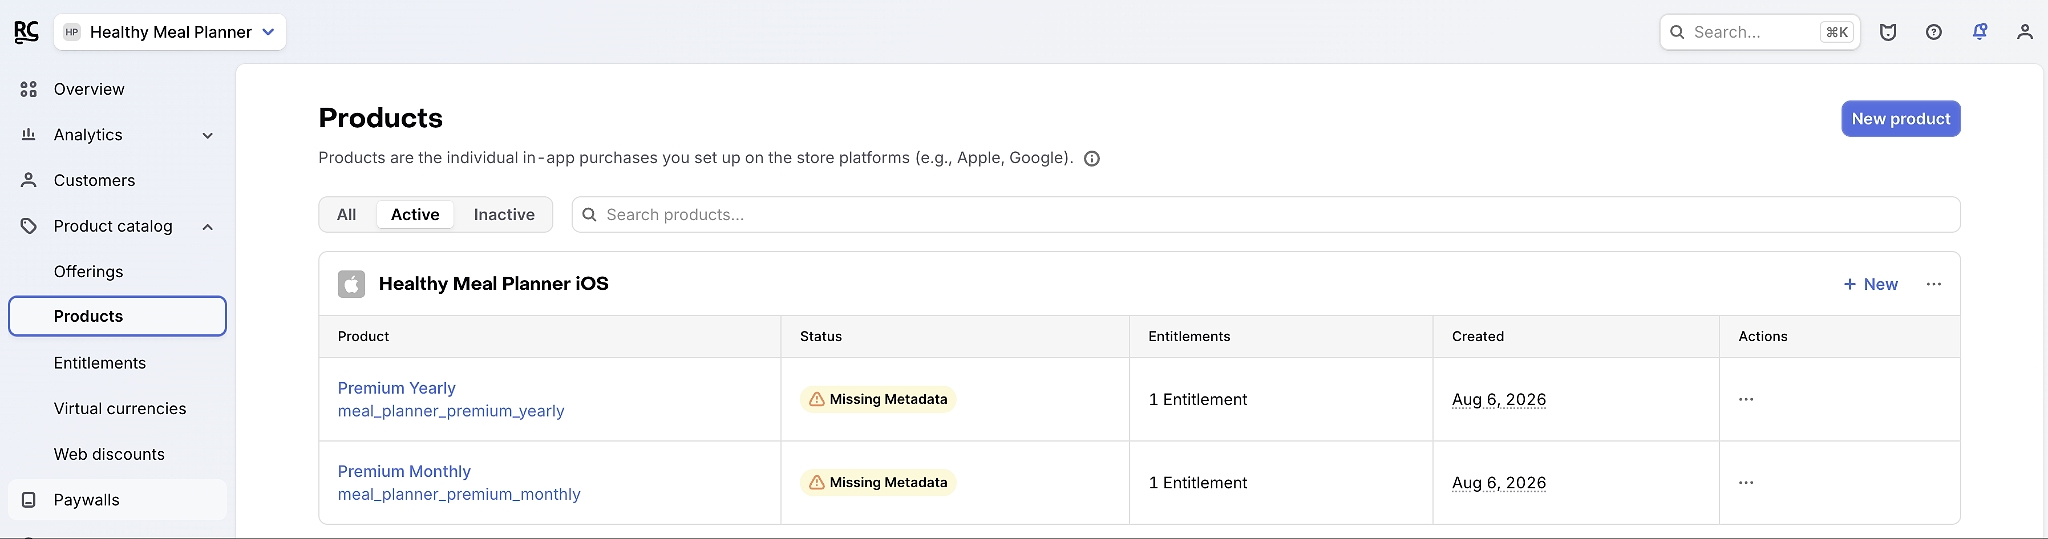
That’s expected. The connection has worked; we just need to finish the Apple setup.
Finish each subscription in App Store Connect
For the rest of this section, we’ll use auto-renewable subscriptions as the example.
If you’re selling a one-time purchase such as lifetime access, you’ll configure that under In-App Purchases instead:
In App Store Connect:
- Select Apps
- Select your app
- Under Monetization, select Subscriptions
- Open the subscription group Replit created
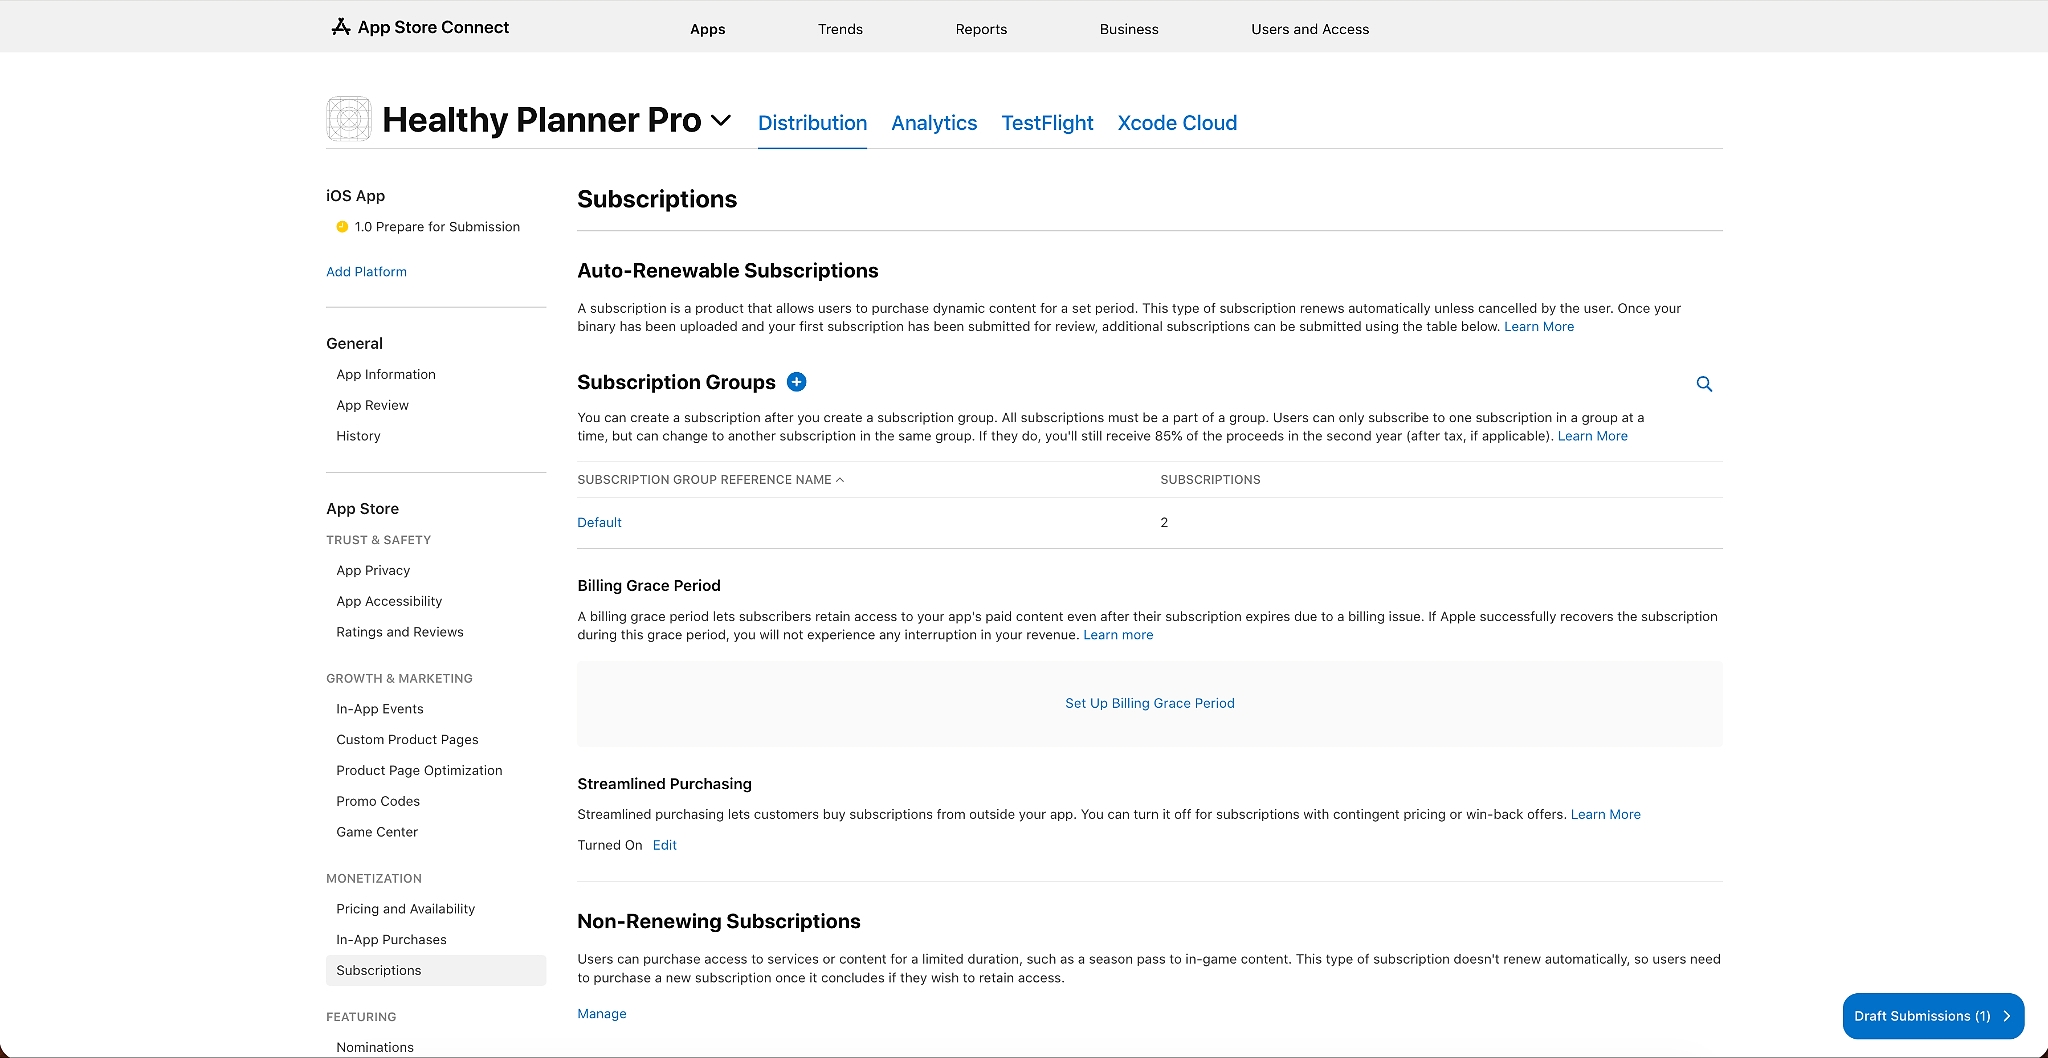
Repeat the following steps for each subscription product in the group.
1. Check the product details
Open the subscription and confirm:
- Reference name
- Product ID
- Subscription duration
These should match the products you created through Replit and RevenueCat.
The Product ID can’t be edited after the product has been created, and the subscription duration can’t be changed after the subscription has been submitted for review.
2. Decide whether to enable family sharing
Family Sharing lets a subscriber share an eligible subscription with up to five additional family members.
You can leave this turned off for your first launch if you’re unsure, particularly if every additional user creates ongoing costs for your app.
Once Family Sharing is enabled for an In-App Purchase in App Store Connect, it can’t be turned off for that product.
3. Set the availability
Replit initially uses the territory you selected during the product sync.
To make the subscription available in additional countries and regions:
- Find Availability
- Select Edit or Set Up Availability
- Choose the countries and regions where you want to offer the subscription
- Confirm your selection
Apple currently supports subscription availability across 175 App Store countries and regions.

For a worldwide launch, you can select all available storefronts.
4. Check the subscription price
Make sure the price matches the decision you made earlier in the guide.
App Store Connect lets you set subscription pricing by country or region. You can use the corresponding storefront prices Apple presents or customize pricing for particular countries later.
For your first launch, you don’t need to build an elaborate localization strategy. The important thing is to check that the primary price is correct before continuing.
5. Add the subscription localization
Each subscription needs customer-facing information.
Under the subscription’s App Store Localizations section:
- Add a localization
- Choose a language, such as English (U.S.)
- Add a clear Display Name
- Add a short Description
- Save your change
These are the names and descriptions Apple can show to customers for the subscription.
For example:
Display Name: Premium Monthly
Description: Unlimited meal plans and shopping lists
Keep this copy straightforward. This isn’t the place for a long marketing description.
6. Skip the promotional image unless you need it
App Store Connect may give you the option to add a promotional image for the subscription.
You don’t need this simply to launch your subscription. Promotional imagery is used for cases where the In-App Purchase is surfaced or promoted separately through App Store features.
For a first launch, you can usually leave this blank.
7. Check the tax category
Your subscription can use the same tax category as the parent app unless it needs a different classification.
If Match to parent app is appropriate for your product, you can leave that selected.
8. Add an App Review screenshot
Under Review Information, upload a screenshot that clearly shows where the subscription appears inside your app.
For this guide, use a screenshot of the paywall from your TestFlight build. You can ask Replit Agent to help you capture or prepare this.
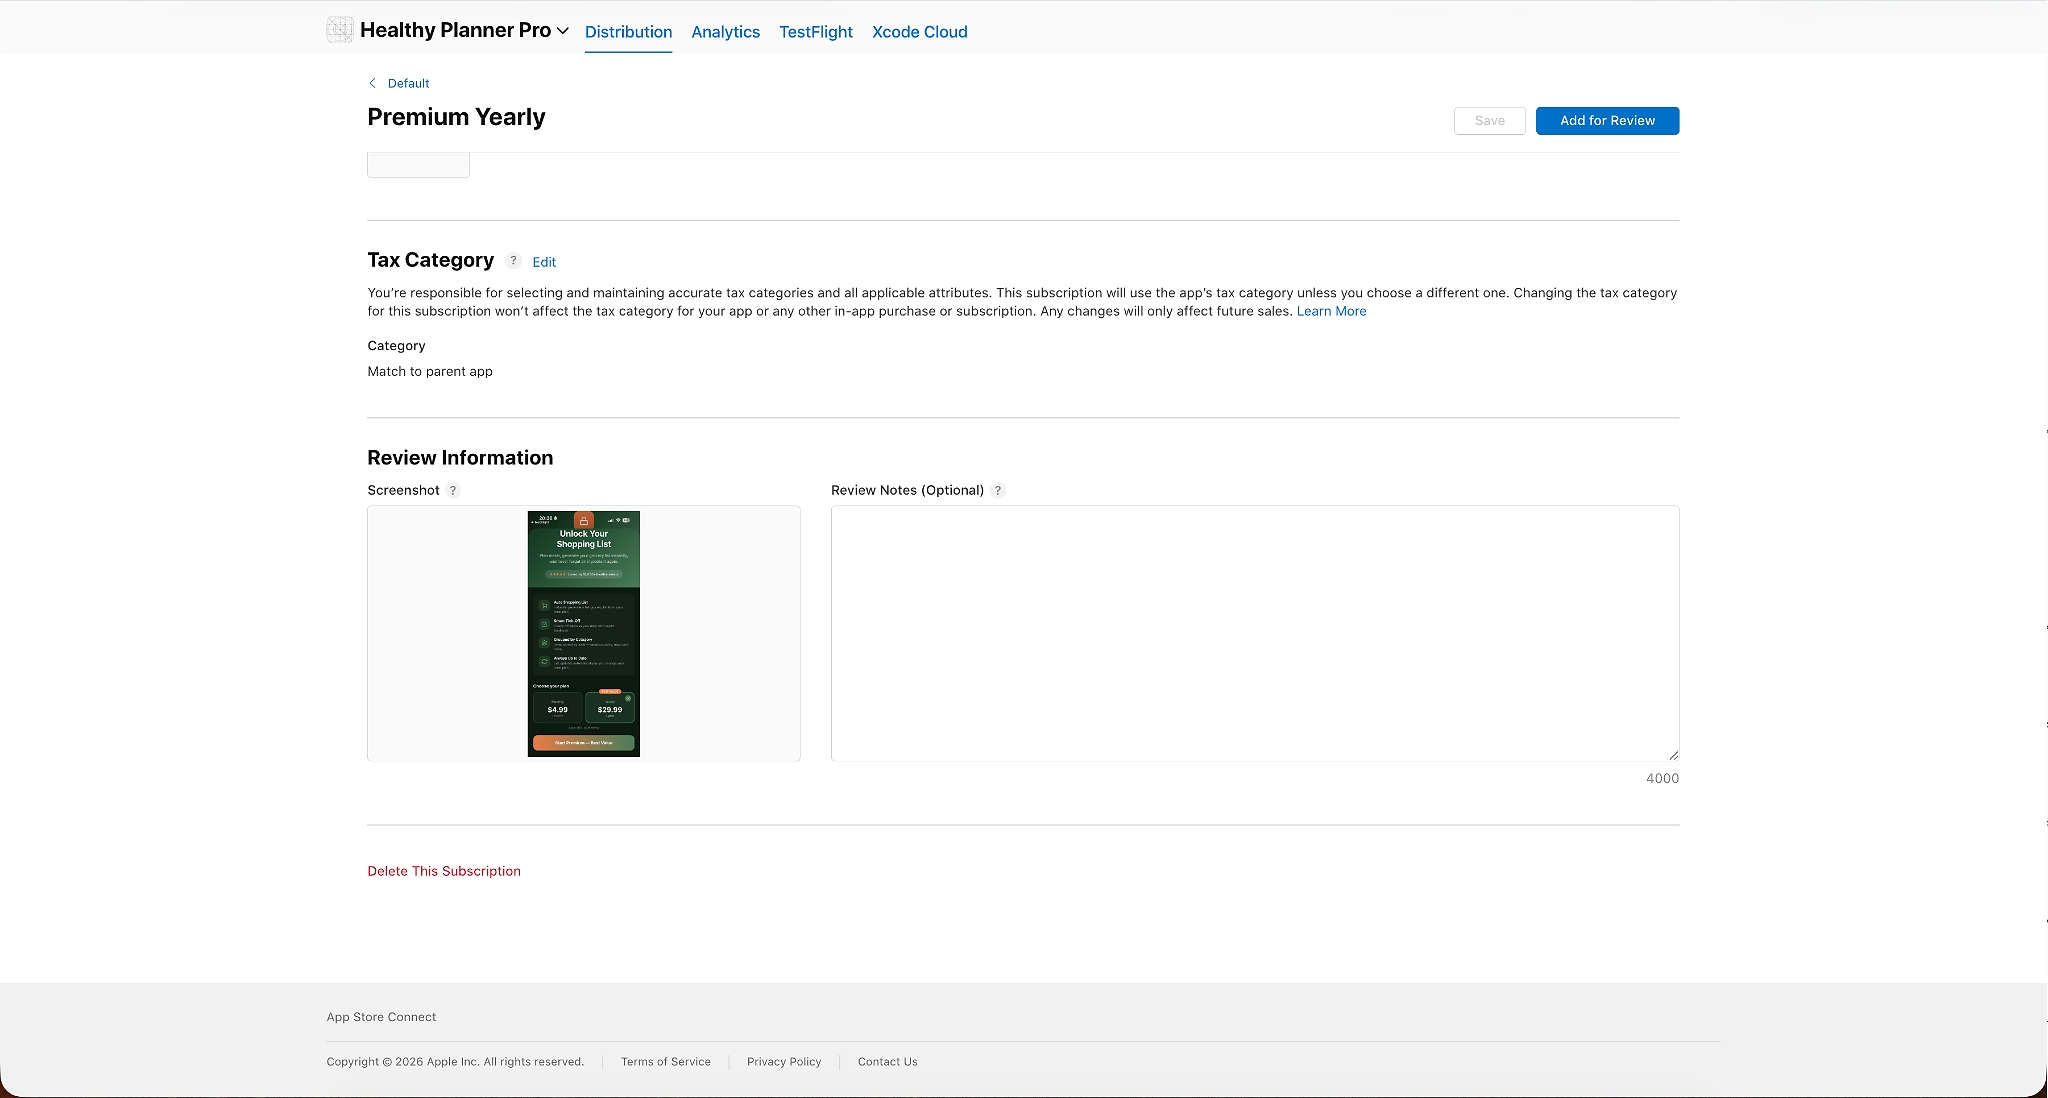
This screenshot is for Apple’s App Review team. It isn’t displayed publicly on your App Store product page.
If Replit Agent has already added an image here, check it carefully. Replace it if it doesn’t clearly show the subscription or paywall that Apple needs to review.
You can also use Review Notes to explain anything that might help the reviewer find or test the subscription.
9. Add the subscription for review
Once the required information is complete, select Add for Review.
The subscription should move from Prepare for Submission to Ready for Review.
Ready for Review does not mean Apple has reviewed or approved the subscription. It means you’ve added the item to your upcoming App Review submission, but haven’t submitted that package to Apple yet.
Repeat these steps for every subscription product in the group.
Complete the Subscription Group Setup
There’s one more piece of metadata to complete: the subscription group itself.
Return to the subscription group page and find App Store Localizations.
Add a localization and provide the customer-facing name for the group.
For example:
Subscription group display name: Monthly and annual plans
Apple treats the group localization separately from each individual subscription’s localization.
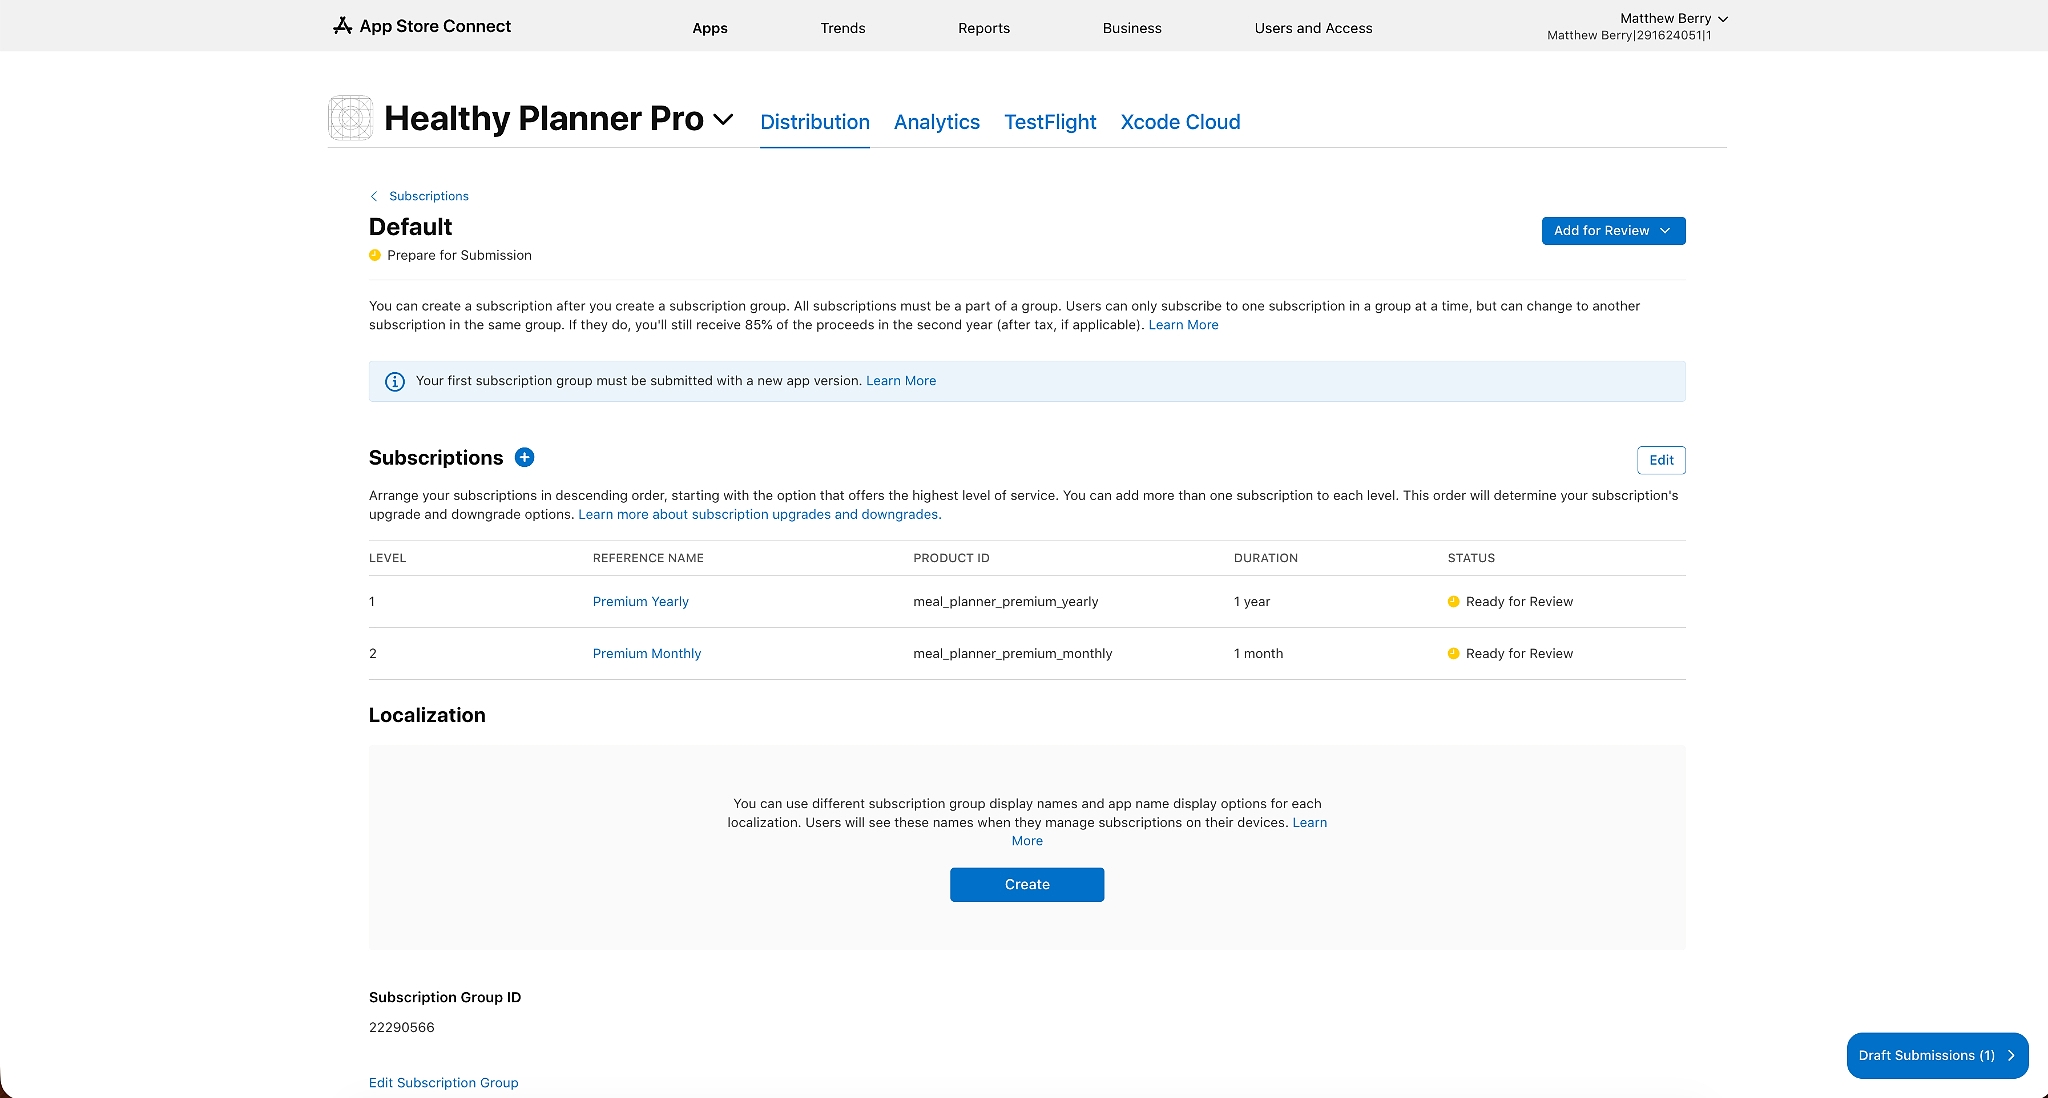
Once the group information is complete, add the subscription group for review too.
The group and the products inside it should now show Ready for Review.
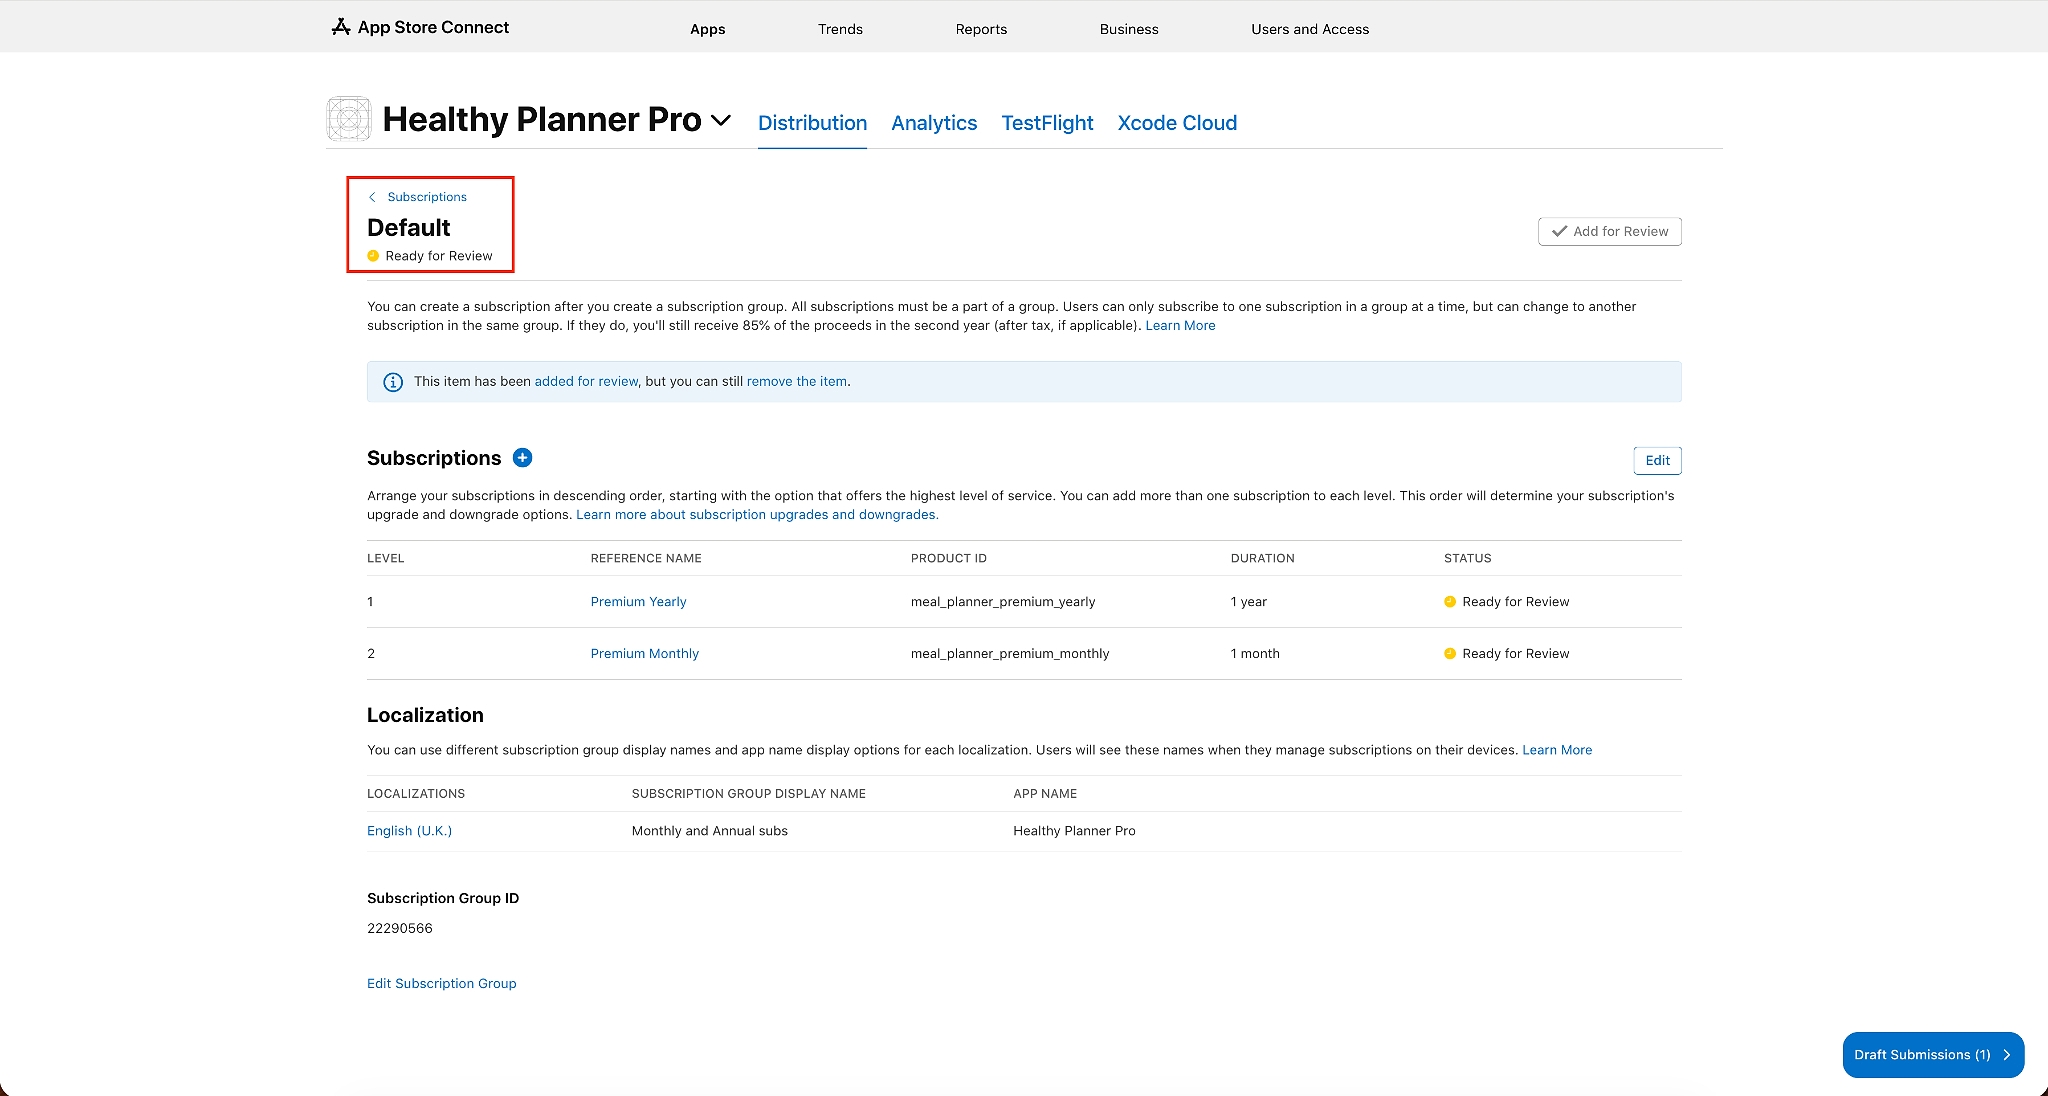
There’s one important thing to know for a new app: Apple requires your first auto-renewable subscription and first subscription group to be submitted alongside a new app version. We’ll do that when we submit the app later in the guide.
So don’t submit anything separately yet.
Check the final status in RevenueCat
Return to the RevenueCat dashboard:
- Open your project
- Select Product Catalog
- Select Products
- Find your iOS products
Once the required product metadata has been completed in App Store Connect, RevenueCat should be able to recognize that the products are ready for submission.
Their status should have changed from Missing Metadata to Ready to Submit.
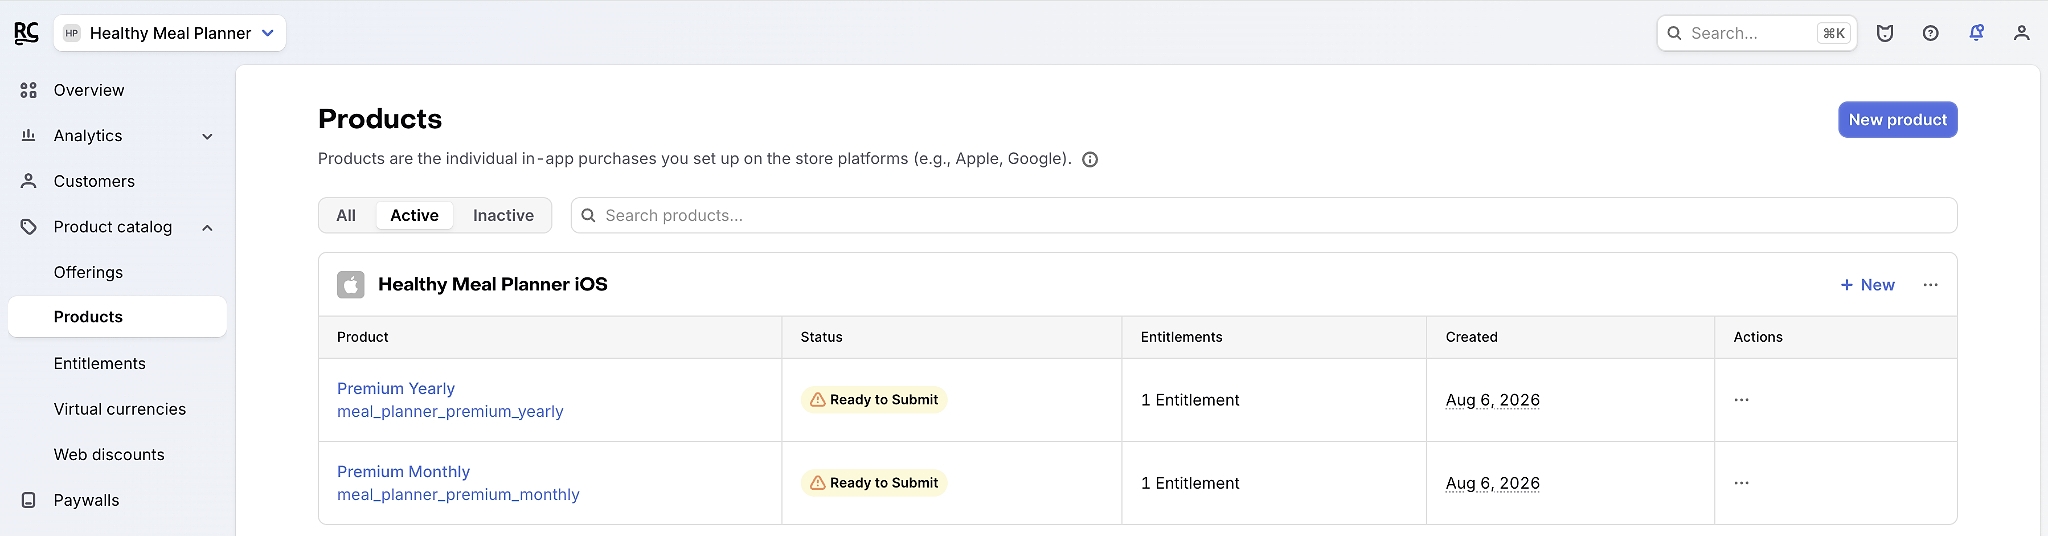
You may need to refresh the page or allow time for the latest App Store Connect information to propagate.
At this point:
- Your RevenueCat project is connected to App Store Connect
- Your real iOS subscription products exist
- The products are connected to your RevenueCat configuration
- The required subscription metadata is complete
- Your subscriptions are ready to be included with your first App Review submission