Chapter 3: One Time Products
One time products are the simplest form of monetization on Google Play. A user pays once, and you deliver something: a bag of coins, a premium feature unlock, or access to a content pack. Despite that simplicity, the implementation has real depth. You need to understand the purchase lifecycle, handle edge cases like pending transactions, manage consumption correctly, and work with newer features like multi quantity purchases and pre orders.
This chapter covers everything you need to build a complete one time product integration with the Play Billing Library 8.x.
Consumable vs. Non Consumable Products
One time products fall into two categories based on whether the user can purchase them again.
Consumable products are items the user "uses up." Once consumed, the product is no longer in the user's purchase history, and they can buy it again. Virtual currency, extra lives, temporary boosts, and limited use items are all consumables. When a user buys 100 coins, you add those coins to their balance and then consume the purchase. The next time they want coins, they can buy the same product again.
Non consumable products are items the user buys once and keeps permanently. Removing ads, unlocking a level pack, or enabling a premium theme are typical examples. You do not consume these purchases. They remain in the user's purchase history indefinitely, and the user cannot repurchase them (unless you revoke or refund the purchase).
The distinction matters because it determines which API call you make after granting the entitlement. For consumable products, you call consumePurchase(). For non consumable products, you call acknowledgePurchase(). Both calls satisfy Google's requirement that you process every purchase within 3 days, but they have different outcomes. You will see the details of each later in this chapter.
One practical note: Google Play does not enforce the consumable vs. non consumable distinction at the product configuration level. You decide how to treat each product in your code. A product becomes consumable because your app calls consumePurchase() on it, not because of a flag in the Play Console. That said, PBL 8.x does introduce product configuration options in the Console that help you signal your intent, which you will see next.
Creating One Time Products in the Play Console
To sell a one time product, you first need to create it in the Google Play Console. You did this briefly in Chapter 2. Here is the full process with all the details.
- Open the Play Console and navigate to your app.
- Go to Monetize > Products > In-app products.
- Click Create product.
- Enter a Product ID. This is a permanent identifier. Once you create a product with a given ID, you cannot reuse that ID even if you delete the product later. Use a clear naming convention like
coins_100,remove_ads, orlevel_pack_desert. - Enter the product Name and Description. These appear in the Google Play purchase dialog that users see, so write them clearly.
- Configure pricing (covered in the next section).
- Set the tax category and regional availability.
- Save and Activate the product.
A product must be in the Active state before your app can query it or sell it. After activation, it can take a few minutes for the product to propagate through Google's systems.
Naming Conventions
Choose a naming scheme and stick with it across your entire product catalog. Some approaches that work well:
- Category prefix:
consumable_coins_100,permanent_remove_ads - Feature based:
coins_100,coins_500,unlock_themes,remove_ads - Versioned:
coins_100_v2(useful if you need to retire and replace a product)
Avoid overly generic IDs like product_1 or item_a. When you are debugging a purchase issue six months from now, a descriptive ID saves you time.
Product Configuration: Pricing, Availability, Tax Categories
Pricing
When you create a one time product, you set a default price in your primary currency. Google automatically converts this price to all supported currencies using its own exchange rates and rounding rules. You can override individual country prices if you want more control.
A few things to keep in mind:
- Google adjusts converted prices to "pretty" price points (e.g., $0.99, $1.49) rather than exact exchange rate conversions.
- You can set country specific prices manually for any market where you want precise control.
- Price changes take effect immediately for new purchases. Existing pending transactions retain the old price.
- The minimum price varies by country. In the US, it is $0.49 for one time products.
Regional Availability
By default, a product is available in all countries where your app is published. You can restrict availability to specific countries if needed. This is useful when a product only makes sense in certain markets or when legal restrictions apply.
Tax Categories
Google handles tax collection and remittance in most countries. You need to assign each product a tax category that matches its content type. The available categories include:
- Digital content: Games, apps, music, video, books
- Software as a service: Cloud storage, productivity tools
- Digital newspapers/periodicals: News subscriptions, magazines
The tax category affects which tax rates Google applies in different jurisdictions. Choosing the wrong category can lead to incorrect tax collection, so pick the one that most accurately describes your product.
The One Time Product Purchase Lifecycle
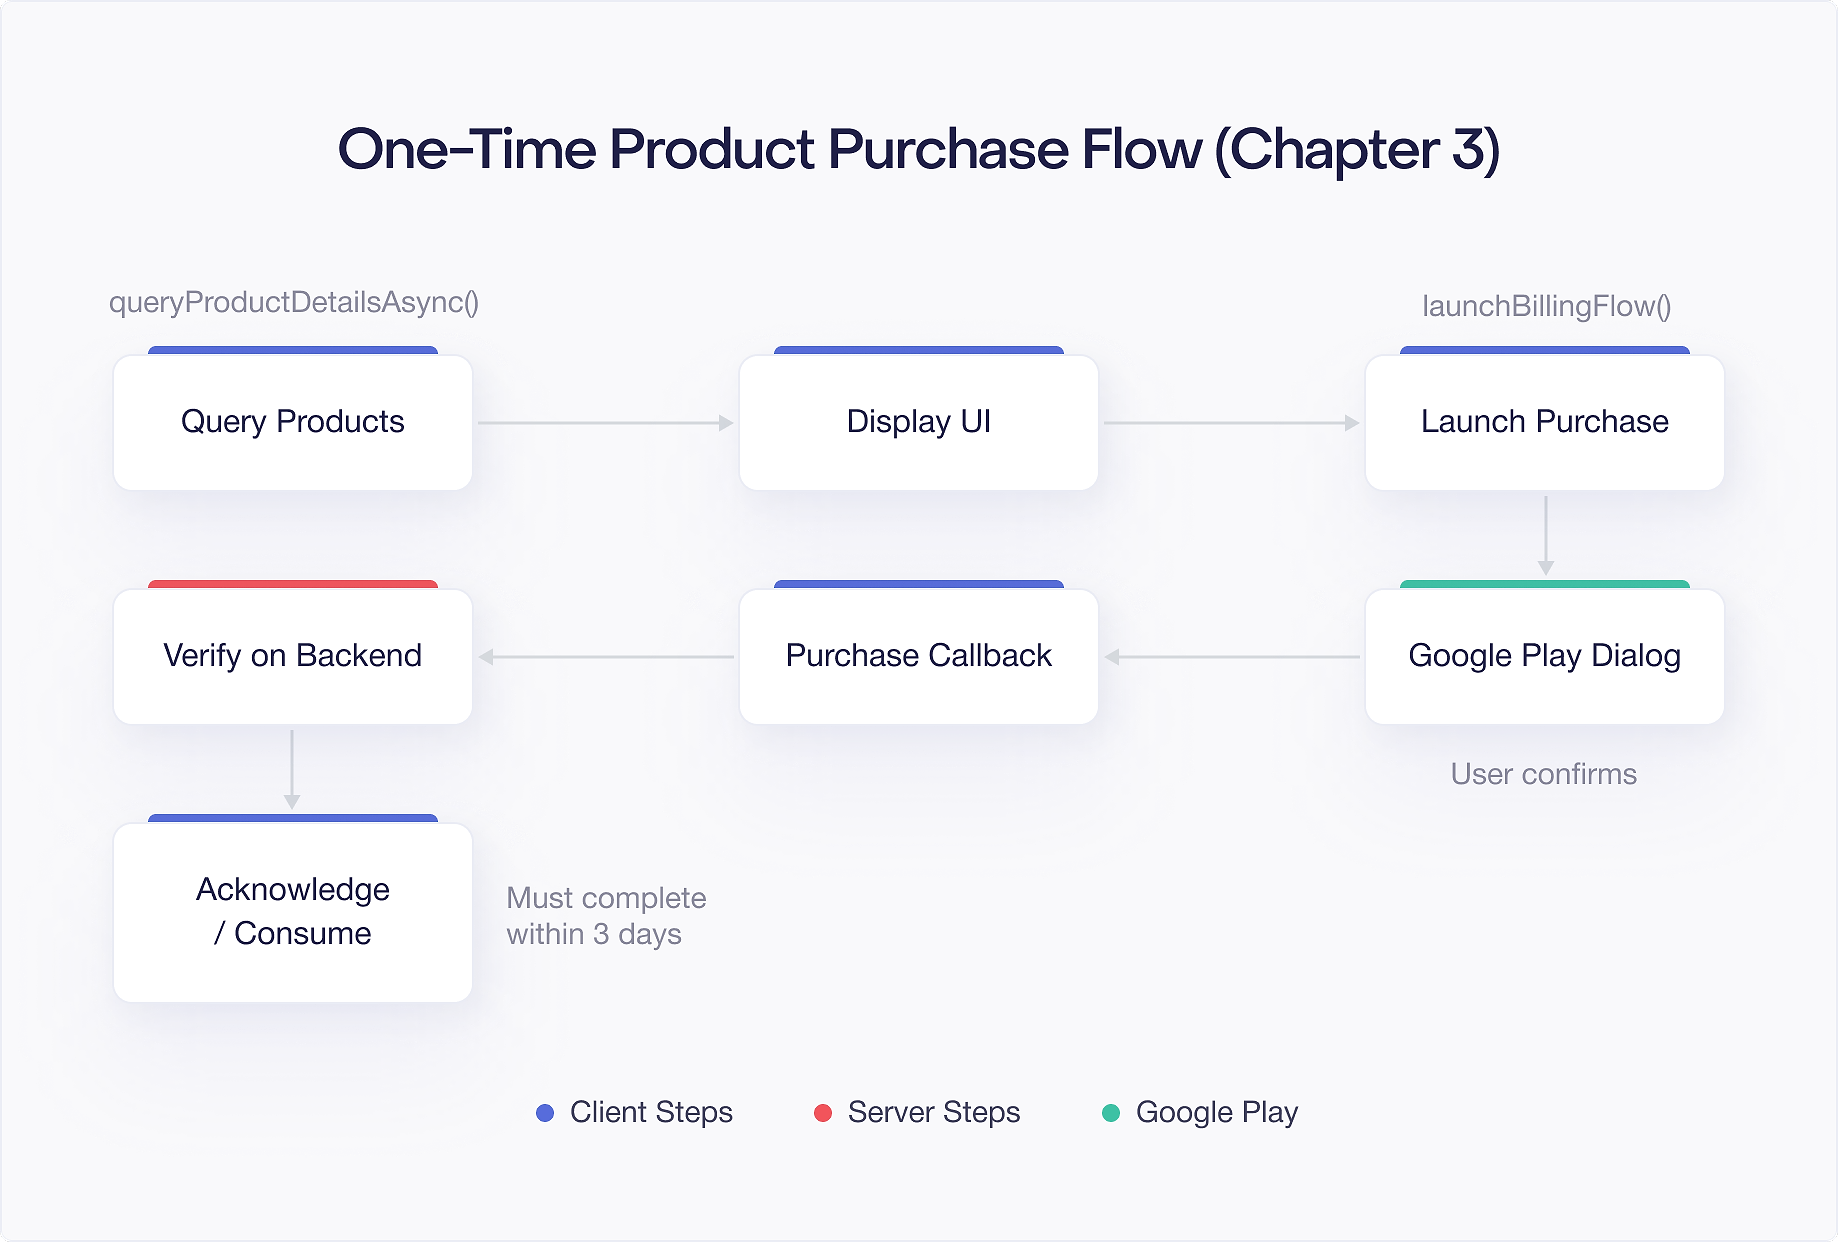
Every one time product purchase moves through a predictable lifecycle. Understanding this flow is important because your code needs to handle each stage correctly.
- Query products: Your app calls
queryProductDetailsAsync()to fetch product information (name, price, description) from Google Play. - Display products: You show the product information to the user in your UI.
- Launch purchase flow: When the user taps "Buy," your app calls
launchBillingFlow()to start the Google Play purchase dialog. - Purchase result: Google Play returns the result through your
PurchasesUpdatedListener. The purchase state is eitherPURCHASEDorPENDING. - Verify on server: Your backend verifies the purchase token with the Google Play Developer API.
- Grant entitlement: After verification, you give the user what they paid for.
- Consume or acknowledge: You call
consumePurchase()for consumable products oracknowledgePurchase()for non consumable products. This must happen within 3 days or Google refunds the purchase.
If a purchase enters the PENDING state (common for payment methods like cash or delayed payment in certain regions), your app must wait for the purchase to transition to PURCHASED before granting the entitlement. You will find coverage of pending transactions in detail later in this chapter.
Querying Product Details with queryProductDetailsAsync()
Before you can show products to the user or launch a purchase, you need to fetch product details from Google Play. This gives you the localized product name, description, and price.
A few things to note about this code:
- One time products use
ProductType.INAPP. Subscriptions useProductType.SUBS. - The
queryProductDetails()function is the coroutine extension from thebilling-ktxartifact. The callback version isqueryProductDetailsAsync(). - Always check the
BillingResultresponse code. If it is notBillingResponseCode.OK, the product list may be empty or null. - Product IDs must match exactly what you configured in the Play Console, and those products must be in the Active state.
Using ProductDetails
The ProductDetails object contains everything you need to display the product to the user:
The formattedPrice string is already localized with the correct currency symbol and formatting for the user's locale. Use it directly in your UI instead of formatting the price yourself.
Launching the Purchase Flow
Once the user decides to buy, you launch the purchase flow with launchBillingFlow(). This opens the familiar Google Play purchase dialog.
Key points about launchBillingFlow():
- It requires an
Activityreference, not aContext. The purchase dialog is presented as a bottom sheet overlay on your activity. - The method is synchronous and returns a
BillingResultimmediately, but this only tells you whether the purchase flow launched successfully. The actual purchase result arrives asynchronously through yourPurchasesUpdatedListener. - You can only have one purchase flow active at a time. Launching a second flow while one is already active returns
BillingResponseCode.DEVELOPER_ERROR. - The user can cancel the purchase dialog at any time. Your listener will receive
BillingResponseCode.USER_CANCELEDin that case.
Obfuscated Account and Profile IDs
You can attach identifiers to the purchase for fraud detection and backend correlation:
These values appear in the purchase record and in your RTDN notifications. Use hashed or obfuscated values, never raw user IDs. Google may use these for fraud detection signals. Setting them also helps your backend correlate purchases to users, especially in cases where the client cannot report the purchase result back to your server.
Detecting Purchases: PurchasesUpdatedListener and queryPurchasesAsync()
There are two ways your app learns about purchases: the real time listener and on demand queries.
PurchasesUpdatedListener
When you build your BillingClient, you provide a PurchasesUpdatedListener. This listener fires whenever a purchase flow completes, whether the user bought something, canceled, or hit an error.
The listener is your primary mechanism for handling purchases in real time. When the response code is OK, you receive a list of Purchase objects to process.
queryPurchasesAsync()
The listener only fires during active purchase flows. To catch purchases that happened while your app was closed, or purchases that were completed on another device, you need to query for them. Call queryPurchasesAsync() whenever your app starts or resumes:
This returns all purchases for the given product type that have not been consumed or acknowledged. You should call this method in the following situations:
- On app launch: To process any purchases made while the app was not running.
- On
BillingClientreconnection: If the billing connection drops and you reconnect, query purchases again. - On
onResume(): The user might have completed a purchase through a notification or system dialog while your app was in the background.
The combination of the listener and periodic queries ensures you never miss a purchase.
Consuming vs. Acknowledging: When to Use Each
After verifying a purchase and granting the entitlement, you must tell Google you have processed it. The mechanism depends on whether the product is consumable.
Consuming a Purchase
For consumable products, call consumePurchase(). This does two things: it acknowledges the purchase (satisfying the 3 day requirement), and it removes the product from the user's purchase history so they can buy it again.
Always consume on your server side if possible. If you consume on the client but the server never recorded the entitlement (due to a network issue), the user loses their purchase. Server side consumption through the Google Play Developer API is safer because your server can verify, record, and consume in a single transaction.
Acknowledging a Purchase
For non consumable products, call acknowledgePurchase(). This tells Google you have fulfilled the purchase, but the product stays in the user's purchase history. They cannot buy it again.
Check purchase.isAcknowledged before calling acknowledge. If the purchase was already acknowledged (perhaps by your server), calling it again returns an error.
The 3 Day Window
Google gives you 3 days to consume or acknowledge a purchase. If you fail to do so, Google automatically refunds the purchase to the user. This protects users from paying for something that was never delivered.
In practice, you should process purchases within seconds, not days. The 3 day window is a safety net, not a target. If you are consistently relying on the 3 day window, something is wrong with your purchase processing flow.
Handling Pending Transactions (PENDING vs. PURCHASED)
Not all purchases complete immediately. In some markets, users can pay with cash at a convenience store, bank transfer, or other delayed payment methods. When a user chooses one of these options, the purchase enters the PENDING state.
Detecting Pending Purchases
Check the purchase state to determine how to handle each purchase:
Rules for Pending Transactions
When a purchase is in the PENDING state:
- Do not grant the entitlement. The user has not paid yet.
- Do not consume or acknowledge. You cannot process a pending purchase.
- Show a clear message. Let the user know their purchase is being processed and will be fulfilled once payment is confirmed.
- Track the pending purchase. Store the purchase token so you can fulfill it later.
When the payment eventually completes (or fails), Google notifies your app in two ways:
- RTDN: Your backend receives a
ONE_TIME_PRODUCT_PURCHASEDorONE_TIME_PRODUCT_CANCELEDnotification through Cloud Pub/Sub. - queryPurchasesAsync(): The next time your app queries purchases, the purchase state will have changed from
PENDINGtoPURCHASED(or it will be gone if the payment failed).
Your backend should handle the RTDN and update the user's entitlement accordingly. Your app should call queryPurchasesAsync() on launch and resume to pick up any state changes.
Enabling Pending Transactions
Pending transactions are enabled by default in PBL 8.x. In earlier library versions, you had to opt in by calling enablePendingPurchases() on the BillingClient.Builder. With PBL 8.x, all apps must handle the PENDING state correctly.
Multi Quantity Purchases
PBL 8.x supports multi quantity purchases for consumable products. Instead of buying one bag of coins at a time, a user can buy multiple in a single transaction.
Enabling Multi Quantity in the Play Console
To support multi quantity purchases for a product:
- Go to your product in Monetize > Products > In-app products.
- Enable the multi quantity option for the product.
- Set the maximum quantity per purchase.
Not all products are good candidates for multi quantity. It makes sense for consumable items like currency packs or resource bundles where a user might want to stock up. It does not make sense for non consumable products like "remove ads."
Handling Multi Quantity in Code
When a user completes a multi quantity purchase, the Purchase object includes a quantity field:
Always use the quantity field rather than assuming a quantity of 1. If you do not support multi quantity for a given product, the quantity will always be 1, so your code remains backward compatible.
Price Calculation
The total price the user pays is the single item price multiplied by the quantity. The Purchase object does not contain the total price directly. If you need to display or log it, calculate it from the ProductDetails price and the Purchase quantity.
Pre Order for One Time Products (PBL 8.1+)
Starting with PBL 8.1, Google Play supports pre orders for one time products. This lets users commit to buying a product before it becomes available, similar to how pre orders work for games or apps on the Play Store.
How Pre Orders Work
- You create a one time product in the Play Console and configure it with a release date.
- Users can "pre order" the product before the release date. Google does not charge them immediately.
- On the release date, Google charges the user's payment method and completes the purchase.
- Your app receives the purchase as a normal
PURCHASEDstate purchase and fulfills it.
Use Cases
Pre orders work well for:
- Seasonal content packs released on a specific date
- New game levels or expansion packs announced ahead of time
- Limited edition digital items with a scheduled launch
Implementation Considerations
From a code perspective, pre orders do not require much special handling. The purchase flow uses the same launchBillingFlow() API. The difference is in timing:
- Before the release date, the purchase enters a pre order state. The user is committed but not charged.
- On the release date, the purchase transitions to
PURCHASEDand your normal fulfillment flow takes over.
Your app should detect pre ordered products and show appropriate UI, such as "Pre ordered, available on [date]" instead of "Owned." Use queryPurchasesAsync() to detect pre ordered items.
You should also handle the case where a pre order charge fails on the release date (expired card, insufficient funds). Google will notify you through RTDNs, and the purchase will not appear as PURCHASED.
Multiple Purchase Options and Offers
PBL 8.x introduces purchase options and offers for one time products, bringing some of the flexibility that subscriptions have had for a while. This feature allows you to create multiple ways to buy the same product at different prices or with different conditions.
Purchase Options
A single one time product can have multiple purchase options. Each option can have:
- A different price
- A different availability window (start and end dates)
- Regional restrictions
- Different offer tags for targeting
For example, you might have a "100 Coins" product with a standard purchase option at $1.99 and a promotional purchase option at $0.99 that is only available during a sale event.
Querying Offers
When you query product details, the ProductDetails object may contain multiple offer details. You can access them through the oneTimePurchaseOfferDetailsList:
Each offer detail includes its own formattedPrice, offerToken, and other metadata. When you display the product to the user, you can show the best available offer or let the user choose between options.
Launching a Purchase with a Specific Offer
To purchase a specific offer, include the offerToken in the billing flow parameters:
If you do not specify an offer token, Google Play uses the default purchase option.
Offer Management Strategy
When working with multiple offers, keep these guidelines in mind:
- Server driven selection: Have your backend decide which offer to show each user. This lets you run A/B tests and personalized promotions without app updates.
- Always validate on server: Verify the purchase price on your backend after the transaction. The user might have received a different offer than you expected.
- Time limited offers: Use start and end dates in the Play Console to manage promotional pricing. The offers become available and expire automatically.
Putting It All Together
Here is a condensed example of a complete one time product purchase flow, from querying products to consuming the purchase:
In production, the sendToServer() call triggers your backend to verify the purchase with the Google Play Developer API, record the entitlement in your database, and then consume or acknowledge the purchase through the server side API. This keeps your purchase processing reliable even if the user closes the app mid flow.
Common Pitfalls
Here are the mistakes that cause the most issues with one time product purchases:
Not querying purchases on launch. If your app only relies on the PurchasesUpdatedListener, you will miss purchases that completed while the app was closed. Always call queryPurchasesAsync() when your app starts.
Consuming before verifying. If you consume a purchase on the client before your server has verified and recorded it, and then the network call to your server fails, the user has paid but received nothing, and you cannot recover the purchase because it has been consumed. Always verify and record before consuming.
Ignoring pending state. Granting entitlements for PENDING purchases means giving away your product for free. The user might never complete payment.
Hardcoding prices. Always use the formattedPrice from ProductDetails. Hardcoding prices means showing incorrect amounts to users in different regions, and showing stale prices after you change them in the Play Console.
Not handling BillingClient disconnections. The connection to Google Play Services can drop at any time. Wrap your billing calls in retry logic and always check isReady before making calls.
Using product IDs that are too generic. Once created, product IDs are permanent. A descriptive ID saves debugging time in the future.
Skipping server side verification. Always verify purchases on your server and prefer server side consumption or acknowledgement for reliability. Client side acknowledgement is convenient during development but a single network failure between consume and server record means the user paid and got nothing.

