Chapter 6: The Purchase Flow
The purchase flow is the core interaction between your app, the user, and Google Play. When a user taps "Buy" in your app, a carefully orchestrated sequence begins: your app builds the purchase parameters, Google Play shows the payment dialog, the user confirms, Google processes the payment, and your app receives the result. Getting this flow right is essential for a reliable billing experience.
Building BillingFlowParams for One Time Products
For a one time product, you build BillingFlowParams from the ProductDetails you queried earlier:
This is the simplest case. You pass the ProductDetails object directly, and Google Play handles pricing, currency, and the purchase dialog.
If the one time product has multiple purchase options (introduced in PBL 8), you can specify which option to present by setting the offer token from the selected purchase option.
Additional BillingFlowParams Options
Beyond the basic product selection, BillingFlowParams.Builder gives you several optional fields that are worth understanding.
obfuscatedAccountId: You can attach a hashed or obfuscated version of your own user account identifier. This helps Google Play detect suspicious activity across devices. If the same account ID attempts rapid purchases from different IP addresses or devices, Google can flag the behavior and reduce fraud. You should never pass a raw email address or plain text identifier here. Use a one way hash of your internal user ID instead.
obfuscatedProfileId: Similar to the account ID, but intended for apps that support multiple profiles under a single account. A family streaming app, for example, might have one Google account with separate profiles for each family member. Passing the profile ID lets you attribute the purchase to the correct profile on your backend.
isOfferPersonalized: Under EU consumer protection regulations, you must disclose when a price shown to the user is personalized based on automated decision making. If you use dynamic pricing or user specific offers, set setIsOfferPersonalized(true). Google Play will display a disclosure notice in the purchase dialog informing the user that the price was personalized. If you do not personalize prices, you can leave this at the default value of false.
Building BillingFlowParams for Subscriptions
Subscriptions require an additional piece: the offer token. Because a subscription can have multiple base plans and offers, you must specify which one the user selected:
The offer token encodes the specific base plan and offer combination. If you present multiple options to the user (monthly vs. annual, with or without a free trial), each option has its own offer token. Pass the token that corresponds to what the user selected.
Offer Token Selection Logic
In practice, selecting the right offer token requires more thought than calling firstOrNull(). A single subscription product can have multiple base plans, and each base plan can have multiple offers attached to it. The subscriptionOfferDetails list returned by ProductDetails contains every valid combination.
You should think about offer selection in two layers. First, determine which base plan the user wants. If your UI shows a toggle between "Monthly" and "Annual," you need to filter subscriptionOfferDetails by the basePlanId that matches the user's choice. Second, within that base plan, determine which offer to apply. Google Play returns offers in priority order, with the most favorable offer (typically a free trial or introductory price) listed first, but only if the user is eligible for it. Google automatically filters out offers the user has already redeemed, so you do not need to track trial eligibility yourself.
A practical pattern is to group the offer details by base plan and then present the best available offer for each:
When you display these options in your UI, show the user what they are getting. If the first pricing phase is a free trial, say "7 day free trial, then $9.99/month." If it is an introductory price, say "$4.99/month for 3 months, then $9.99/month." You can extract these details from the pricingPhases list on each SubscriptionOfferDetails object. Each pricing phase includes the price, billing period, and recurrence mode, giving you everything you need to build an informative purchase screen.
If you want to let users choose between an offer with a free trial and one without (perhaps the no trial option costs less per month), present both tokens and let the user decide. The key rule is that whatever the user taps in your UI must map to the exact offer token you pass to BillingFlowParams.
If you do not set an offer token for a subscription, the purchase flow will fail with a DEVELOPER_ERROR.
Launching the Billing Flow
With your BillingFlowParams built, launch the purchase flow:
You must pass a reference to the current Activity. The billing flow presents a system dialog on top of your activity, and Google Play needs the activity context to do this.
A successful launchBillingFlow() call (returning BillingResponseCode.OK) means the purchase dialog was shown to the user. It does not mean the purchase succeeded. The actual purchase result arrives asynchronously through your PurchasesUpdatedListener.
What Happens Inside Google Play
When launchBillingFlow() returns OK, Google Play takes over and presents a system managed bottom sheet dialog on top of your activity. This dialog is not part of your app. You cannot customize its appearance or intercept its events. It runs in a separate process controlled by the Play Store.
The dialog shows the product name, price, and description you configured in the Play Console. The user sees their default payment method and can tap to change it. Google Play supports credit cards, debit cards, Google Play balance, carrier billing, PayPal, and various regional payment methods depending on the user's country.
If the user selects a credit or debit card, the payment may go through additional verification. For transactions that require Strong Customer Authentication (common in the European Economic Area under PSD2 regulations), Google Play handles the 3D Secure (3DS) challenge flow automatically. The user sees a bank verification screen within the Google Play dialog. You do not need to implement anything for this. Google manages the entire challenge, and your app only receives the final result through PurchasesUpdatedListener.
During this time, your activity is still running in the background. You should not start any timers or assume the purchase will complete within a certain window. The user might spend a minute picking a payment method, or they might need to complete a 3DS challenge that takes thirty seconds. Your app simply waits for the callback.
If the user presses the back button or dismisses the dialog without completing the purchase, your PurchasesUpdatedListener receives USER_CANCELED. If the user completes the purchase, you receive OK along with the Purchase object.
Common Launch Errors
ITEM_ALREADY_OWNED: The user already owns this non consumable product or has an unacknowledged purchase for it. Before showing a purchase button, callqueryPurchasesAsync()to check existing ownership. If you receive this error unexpectedly, it often means a previous purchase was never acknowledged or consumed, so the item is stuck in the user's inventory.DEVELOPER_ERROR: Something is wrong with your parameters. Common causes include: the product ID does not match a product in the Play Console, you forgot the offer token for a subscription, the product has not been activated in the Console, or you are testing with a build whose package name does not match the Console listing. This error also fires if you pass an offer token from a different product than the one inProductDetails.FEATURE_NOT_SUPPORTED: The device or Play Store version does not support the requested product type. This can happen on very old Play Store versions, sideloaded devices without Google Play Services, or certain Android TV and Wear OS devices that lack support for subscriptions.BILLING_UNAVAILABLE: Google Play billing is not available on this device. The user may not be signed into a Google account, or Play Services may be missing entirely. This is common on custom ROMs, Amazon Fire devices running a sideloaded APK, or emulators without Google Play configured.ITEM_UNAVAILABLE: The product exists in the Play Console but is not available for purchase in the user's country, or it has been deactivated. Double check your product's availability settings and ensure it is published in the regions where your users are located.NETWORK_ERROR: The device could not reach Google Play servers. This can happen on flaky connections. You can retry the launch after a short delay, but avoid aggressive retry loops since the user probably knows their connection is poor.
Handling onPurchasesUpdated Results
After the user interacts with the purchase dialog, your PurchasesUpdatedListener fires:
When the response code is OK, you receive a list of Purchase objects. In most cases, this list contains a single purchase. For multi quantity purchases, you still receive a single Purchase object with the quantity set accordingly.
Processing Successful Purchases: The 5 Step Checklist
Every successful purchase should go through these five steps, in order:
Step 1: Verify on Your Backend
Send the purchase token to your backend server. Your backend calls the Google Play Developer API to verify the purchase is legitimate:
- For one time products:
purchases.products.get - For subscriptions:
purchases.subscriptionsv2.get
Never trust the client alone. A modified app could fake a purchase result.
When your backend receives the verification response from Google, you should validate several fields before granting access. Check that the purchaseState is 0 (purchased) and not 1 (canceled) or 2 (pending). Confirm that the productId matches the product you expected the user to buy. Verify that the orderId is not one you have already processed, which protects against replay attacks where someone resubmits the same purchase token. For subscriptions, check the expiryTimeMillis to confirm the subscription is still active. You should also verify that the packageName matches your app's package name, since a purchase token from a different app would be invalid in your context.
Store the purchase token, order ID, and verification timestamp in your database. You will need these for customer support, refund processing, and audit trails.
Step 2: Check Purchase State
The Purchase object has a purchaseState property:
Only grant access when the state is PURCHASED. Pending purchases (covered later) mean the user has initiated payment but has not completed it yet.
The PurchaseState enum has three values. PURCHASED (value 1) means payment is complete and you can safely grant access. PENDING (value 2) means the user selected a delayed payment method and the transaction is not finalized. UNSPECIFIED_STATE (value 0) means something unexpected happened, and you should treat this as an error. Log the full purchase object when you encounter UNSPECIFIED_STATE so you can investigate. It is rare, but it can occur during edge cases like interrupted transactions or Play Store bugs.
On the server side, the purchases.products.get API returns a numeric purchaseState field with the same three values. Your server should independently check this field rather than relying on the state reported by the client.
Step 3: Grant Entitlement
After verification, grant the user access to the content or feature they purchased. Update your backend database and notify your app to update its UI.
Your entitlement grant logic must be idempotent. This means that processing the same purchase token twice should produce the same result without granting duplicate access. There are several scenarios where your server might receive the same purchase more than once: the client retries a failed network call, your Real Time Developer Notification (RTDN) handler fires while the client is also sending the token, or the user opens the app on a second device that triggers queryPurchasesAsync() and sends the same token again.
To implement idempotency, use the purchase token as a unique key in your database. Before granting access, check if you have already processed that token. If you have, return a success response to the client without modifying the user's entitlements. For consumable products where the user receives currency or items, this check is especially important. Granting 100 coins twice because of a retry would be a costly bug.
Step 4: Acknowledge or Consume
For non consumable products and subscriptions, acknowledge the purchase:
For consumable products, consume instead of acknowledging:
You can also acknowledge or consume on your backend using the server API. Each approach has tradeoffs worth considering.
Server side acknowledgement is more reliable because you can tie it directly to your entitlement grant logic. Your server verifies the purchase, writes the entitlement to the database, and acknowledges the purchase in a single transaction. If any step fails, you can retry the entire sequence. This guarantees that you never acknowledge a purchase without also granting access. The downside is that if your server is temporarily unreachable, the purchase sits unacknowledged until the client can reach your backend.
Client side acknowledgement is simpler to implement and works even if your server has an outage. The risk is that you might acknowledge a purchase before your server has verified and recorded it. If the client acknowledges but the server call fails, you have a purchase that Google considers fulfilled but your backend knows nothing about. The user might not receive their entitlement.
The best approach is to acknowledge on the server as your primary path, with client side acknowledgement as a fallback. If the server call fails after multiple retries, have the client acknowledge the purchase and queue a background sync to reconcile with the server later.
The 3 day rule: You must acknowledge or consume every purchase within 3 days. If you fail to do so, Google automatically refunds the purchase. This protects users from paying for purchases that your app never fulfilled. Three days sounds generous, but it can sneak up on you during a server outage or a holiday weekend. Monitor your unacknowledged purchase count and alert on it.
Step 5: Notify the User
Update your UI to reflect the purchase. Show a success message, unlock features, update subscription status, or add the purchased items to the user's inventory.
The post purchase moment is one of the highest engagement points in your app. The user just made a financial commitment, and how you respond shapes their perception. A few UX best practices:
Show confirmation immediately. Do not wait for the server round trip to display a success state. You already know from the client side Purchase object that payment succeeded, so show the user a confirmation dialog or animation while your server verification happens in the background. If the server later rejects the purchase (rare but possible), you can revoke access at that point.
Be specific about what the user received. Instead of a generic "Purchase successful!" message, say "You now have Premium access" or "500 coins added to your balance." This reinforces the value of the purchase and reduces support tickets from confused users.
For subscriptions, show what happens next. Tell the user when their next billing date is and where they can manage their subscription. Linking to the Google Play subscription management page (https://play.google.com/store/account/subscriptions) is a good practice that reduces churn from users who feel trapped.
Avoid navigating the user away from their current context unnecessarily. If they were browsing content and bought a subscription to unlock it, take them right back to that content, now unlocked. Do not redirect them to a settings page or a generic home screen.
Handling Pending Transactions
Pending transactions occur when a user chooses a payment method that does not process immediately. There are several scenarios where this happens.
The most common case is cash based payments at convenience stores, which are popular in Japan, Brazil, Mexico, and other markets. The user receives a payment code, walks to a physical store, and pays in cash. The purchase stays in PENDING state until the store reports the payment to the payment processor, which can take anywhere from a few hours to several days.
Carrier billing is another source of pending transactions. When a user charges a purchase to their mobile phone bill, the carrier may not confirm the charge instantly. This is more common with smaller regional carriers that batch process transactions.
Slow card authorizations can also produce pending states. While most credit card transactions resolve in seconds, some banks in certain regions take longer to authorize. This is uncommon but not impossible, especially for users with prepaid cards or cards from smaller financial institutions.
You must enable pending transactions by calling enablePendingPurchases(PendingPurchasesParams) on your BillingClient.Builder. If you do not enable this, users with delayed payment methods cannot purchase from your app at all, and you lose those potential customers.
When you receive a purchase with PurchaseState.PENDING:
- Do not grant access. The payment has not been processed yet.
- Inform the user that their purchase is pending and they will receive access once payment is confirmed.
- Check again later. The purchase will transition to
PURCHASED(payment successful) orCANCELED(payment failed or expired). YourPurchasesUpdatedListenerfires when the state changes, and you can also detect the change by callingqueryPurchasesAsync().
Your server will also receive an RTDN when the pending purchase completes, so you have both client and server side signals.
When to Call queryPurchasesAsync()
You should call queryPurchasesAsync() in three situations:
On connect: Right after startConnection() succeeds. This is your first opportunity to sync state. It catches purchases made on other devices (the user bought a subscription on their tablet and now opens the app on their phone), purchases restored after a reinstall, and subscription state changes that happened while your app was not running. Without this call, a user who reinstalls your app would see no evidence of their active subscription until they manually restore purchases.
On app launch: Every time your app starts, query for current purchases. This ensures your entitlement state matches the source of truth. Even if you cache entitlements locally, the cache can go stale. A subscription might have expired overnight, or the user might have received a refund through customer support. Querying on launch keeps your local state honest.
On foreground resume: When your activity's onResume() fires, query again. This covers a surprisingly common scenario: the user backgrounded your app, opened the Play Store, canceled their subscription or changed their payment method, and then returned to your app. Without this query, your app would still show the stale subscription state. This also catches pending purchases that completed while your app was in the background. If the user completed a cash payment at a convenience store and then opened your app, the foreground resume query picks up the state transition from PENDING to PURCHASED.
Cart Abandonment Reminders
Google Play can automatically send reminders to users who start but do not complete a purchase. This is the cart abandonment feature and it is enabled by default.
When a user opens the purchase dialog but cancels or does not complete the transaction, Google may send a push notification reminding them about the product. The timing and frequency of these reminders is controlled entirely by Google. You do not configure when or how often they appear. If the user taps the notification, the Play Store opens the purchase flow directly, and if the user completes the purchase, your PurchasesUpdatedListener fires as usual.
According to Google's published data, cart abandonment reminders can recover a meaningful percentage of otherwise lost conversions. Industry benchmarks for mobile subscription apps suggest that between 10% and 15% of users who abandon a purchase flow will convert if reminded within 24 hours. Your actual recovery rate depends on your product, price point, and audience, but the feature is essentially free revenue with no engineering cost.
You can opt out of cart abandonment reminders in the Play Console under your app's monetization settings (Monetization setup > Cart abandonment). You can also control the behavior per product. However, there is rarely a good reason to disable this feature. The only scenario where you might consider opting out is if your pricing changes frequently and you do not want users reminded about a price that is no longer valid. Even then, Google typically handles this gracefully by showing the current price when the user returns.
Note that cart abandonment reminders only work for users who reached the Google Play purchase dialog. If the user tapped a button in your app but you never called launchBillingFlow() (perhaps due to a validation error), Google has no record of the abandoned purchase and cannot send a reminder. This means your own pre purchase validation logic can inadvertently reduce the pool of users eligible for reminders. Keep pre launch checks minimal and fast.
Multi Line Item Purchases
Starting with Play Billing Library 7.0 and expanded in PBL 8.1, Google Play supports purchasing multiple items in a single transaction. You can bundle multiple products into one BillingFlowParams by adding more than one entry to the ProductDetailsParamsList. The user sees a single purchase dialog with all items listed, confirms once, and your app receives one Purchase object that covers everything.
This is particularly useful for subscription bundles. Imagine your app offers a "Music + Video" plan where the user gets both a music streaming subscription and a video streaming subscription in one purchase. Instead of forcing two separate checkout flows, you bundle them:
When the purchase completes, the resulting Purchase object contains multiple product IDs in its products list. Your processing logic needs to handle this. Instead of assuming a single product per purchase, iterate over purchase.products and grant entitlements for each one.
There are a few constraints to keep in mind. All items in a multi line purchase must be of the same product type. You cannot mix a subscription with a one time product in a single transaction. The items must also be compatible in terms of billing periods if they are subscriptions. Google Play enforces these rules at the API level, so you will get a DEVELOPER_ERROR if you violate them.
Multi line item purchases also affect how you handle acknowledgement. You acknowledge the purchase once using the purchase token, and it covers all items in the bundle. You do not need to acknowledge each item separately.
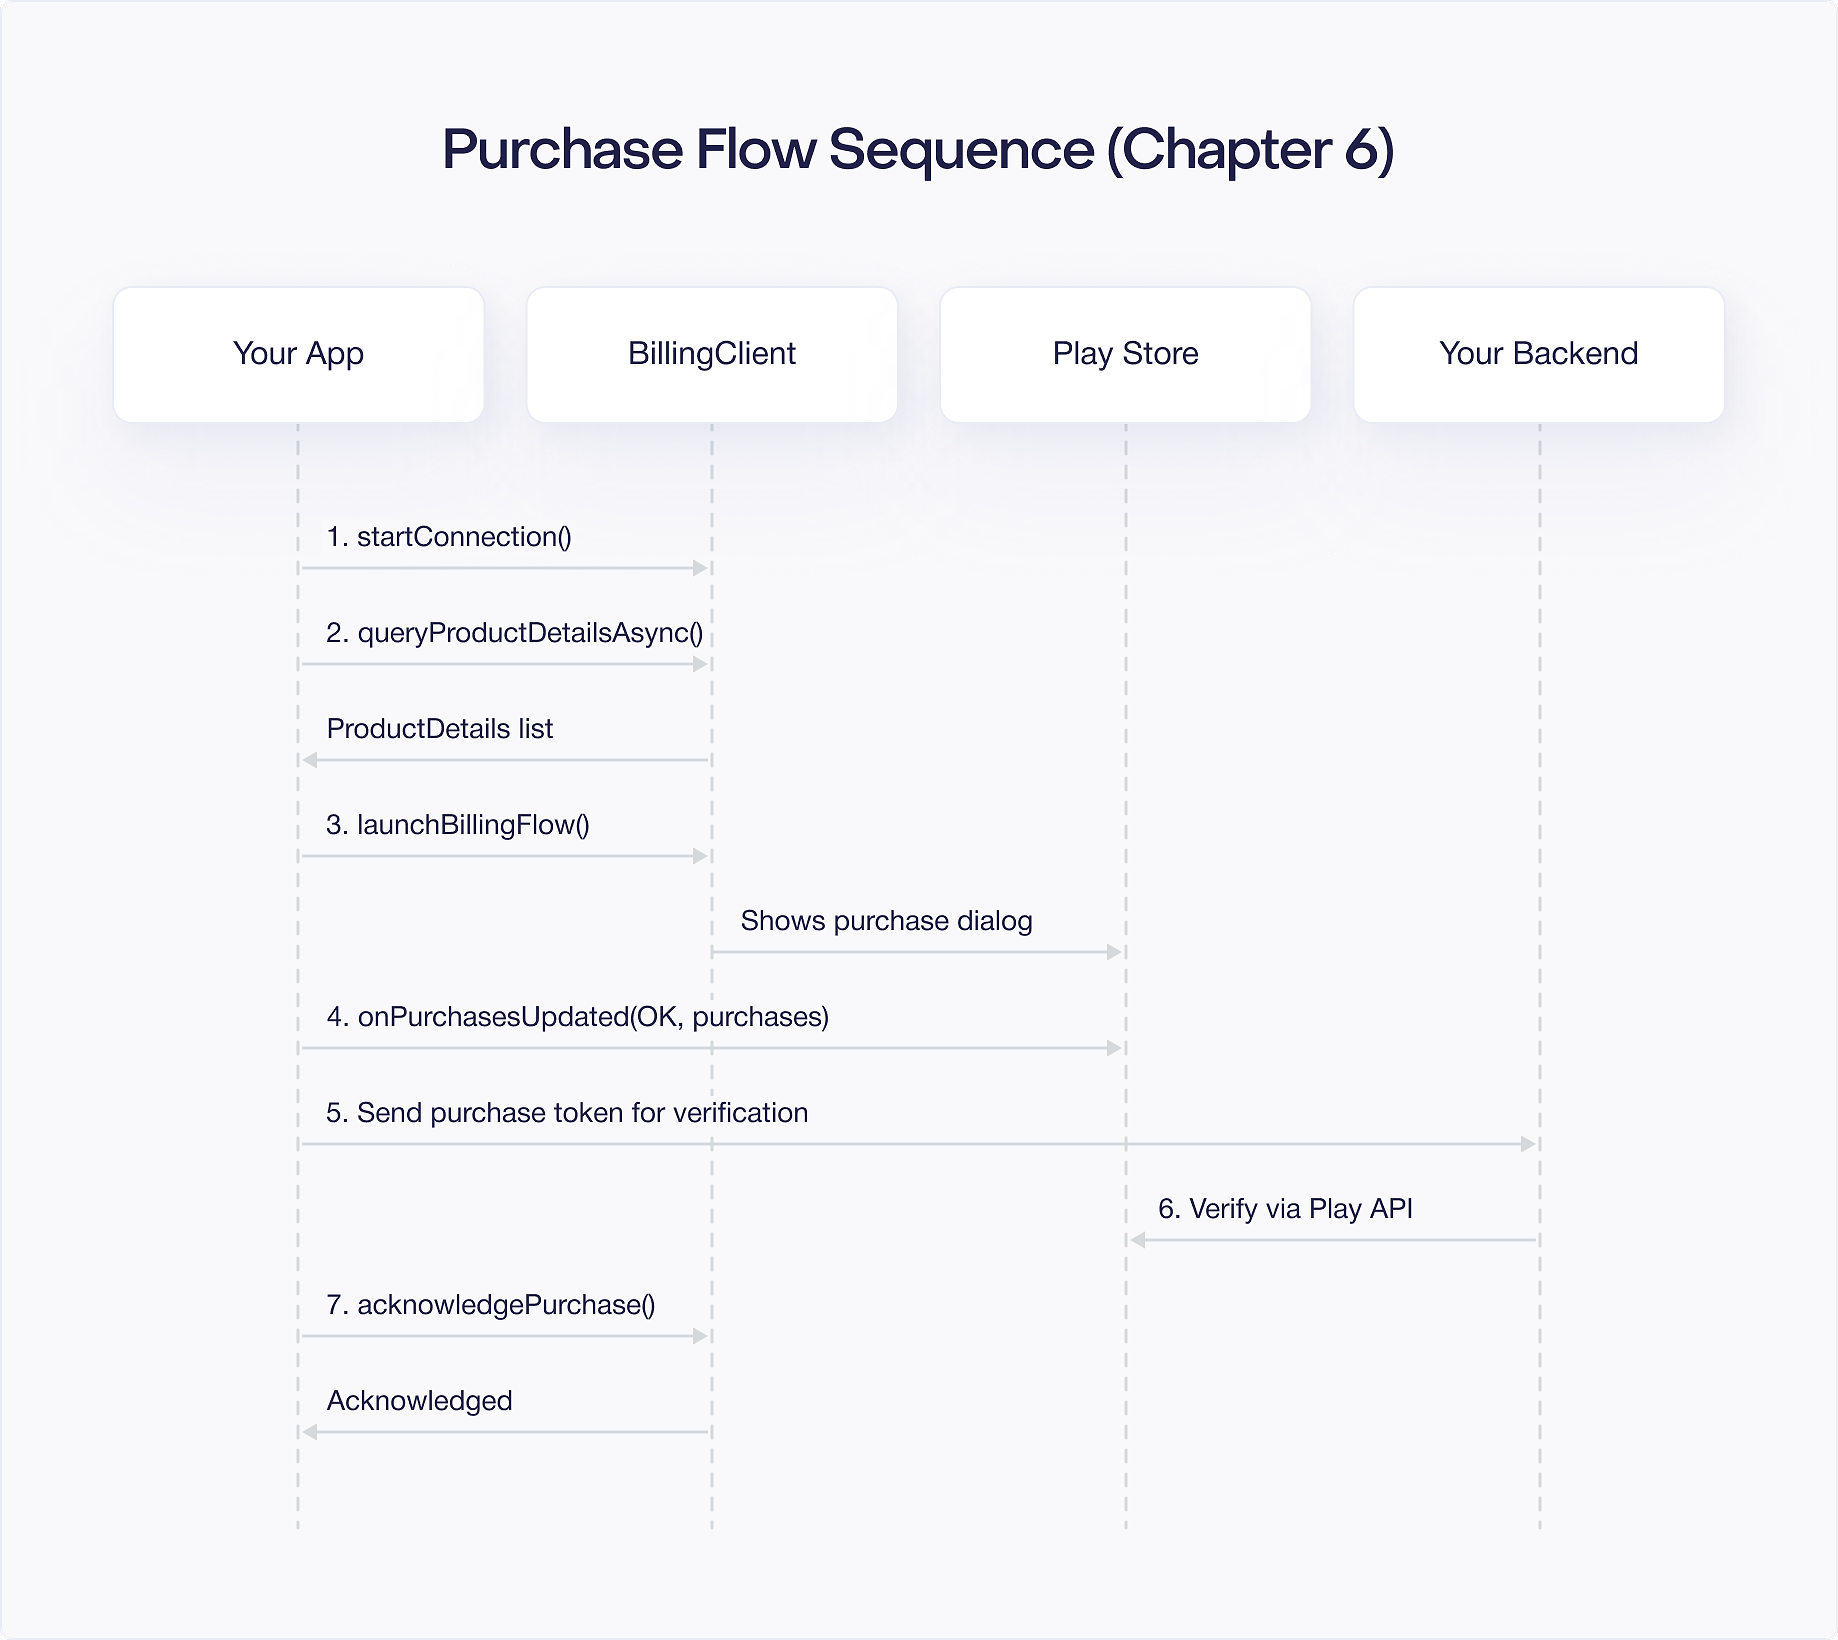
Putting It All Together
Here is the complete purchase flow from start to finish:
- User taps a product in your UI.
- Your app queries
ProductDetails(if not already queried this session). - Your app builds
BillingFlowParamswith the product and offer token (for subscriptions). - Your app calls
launchBillingFlow()with the current activity. - Google Play shows the purchase dialog.
- The user confirms or cancels.
- Your
PurchasesUpdatedListenerfires with the result. - For
PURCHASEDstate: send the token to your backend, verify, grant access, acknowledge/consume, update UI. - For
PENDINGstate: inform the user, do not grant access, check again later. - For errors: handle according to Chapter 8's error handling strategies.
This flow applies to both one time products and subscriptions. The only difference is in how you build BillingFlowParams (subscriptions need an offer token) and what you do after verification (acknowledge for subscriptions, consume for consumable products).