Chapter 1: Understanding Google Play's Billing System
If you have ever tried to sell digital goods in an Android app distributed through the Google Play Store, you have encountered the Google Play Billing system. It is not optional. Google requires every app on the Play Store to use its billing infrastructure for in app digital purchases. Understanding this system is the first step toward building a reliable, production ready purchase experience.
This chapter gives you the big picture. You will learn what Google Play Billing is, who the key actors are, what vocabulary you need, and how the pieces fit together before you write a single line of billing code.
What Google Play Billing Is and Why It Exists
Google Play Billing is the payment infrastructure that handles all in app purchases of digital goods and services on the Google Play Store. It processes payments, manages subscriptions, handles refunds, and provides purchase verification, all through a combination of a client side library (the Play Billing Library), a server side API (the Google Play Developer API), and a management console (the Google Play Console).
Google built this system for a few reasons:
- Consistent user experience: Every purchase in every app follows the same flow. Users see the familiar Google Play purchase dialog, can use their saved payment methods, and manage all subscriptions in one place.
- Trust and security: Google handles payment processing, fraud detection, and dispute resolution. You do not need to become PCI compliant or store credit card numbers.
- Revenue share: Google takes a percentage of each transaction (typically 15% for the first $1M in annual revenue, 30% after that for most developers). This is the business reason the system exists.
As a developer, you get reliable payment processing across 170+ countries and regions, automatic tax handling, and a subscription management system that handles renewals, grace periods, and payment recovery. The trade off is that you must work within Google's framework.
The Big Picture: Three Pillars
Google Play Billing rests on three pillars that work together:
1. The Play Billing Library (PBL)
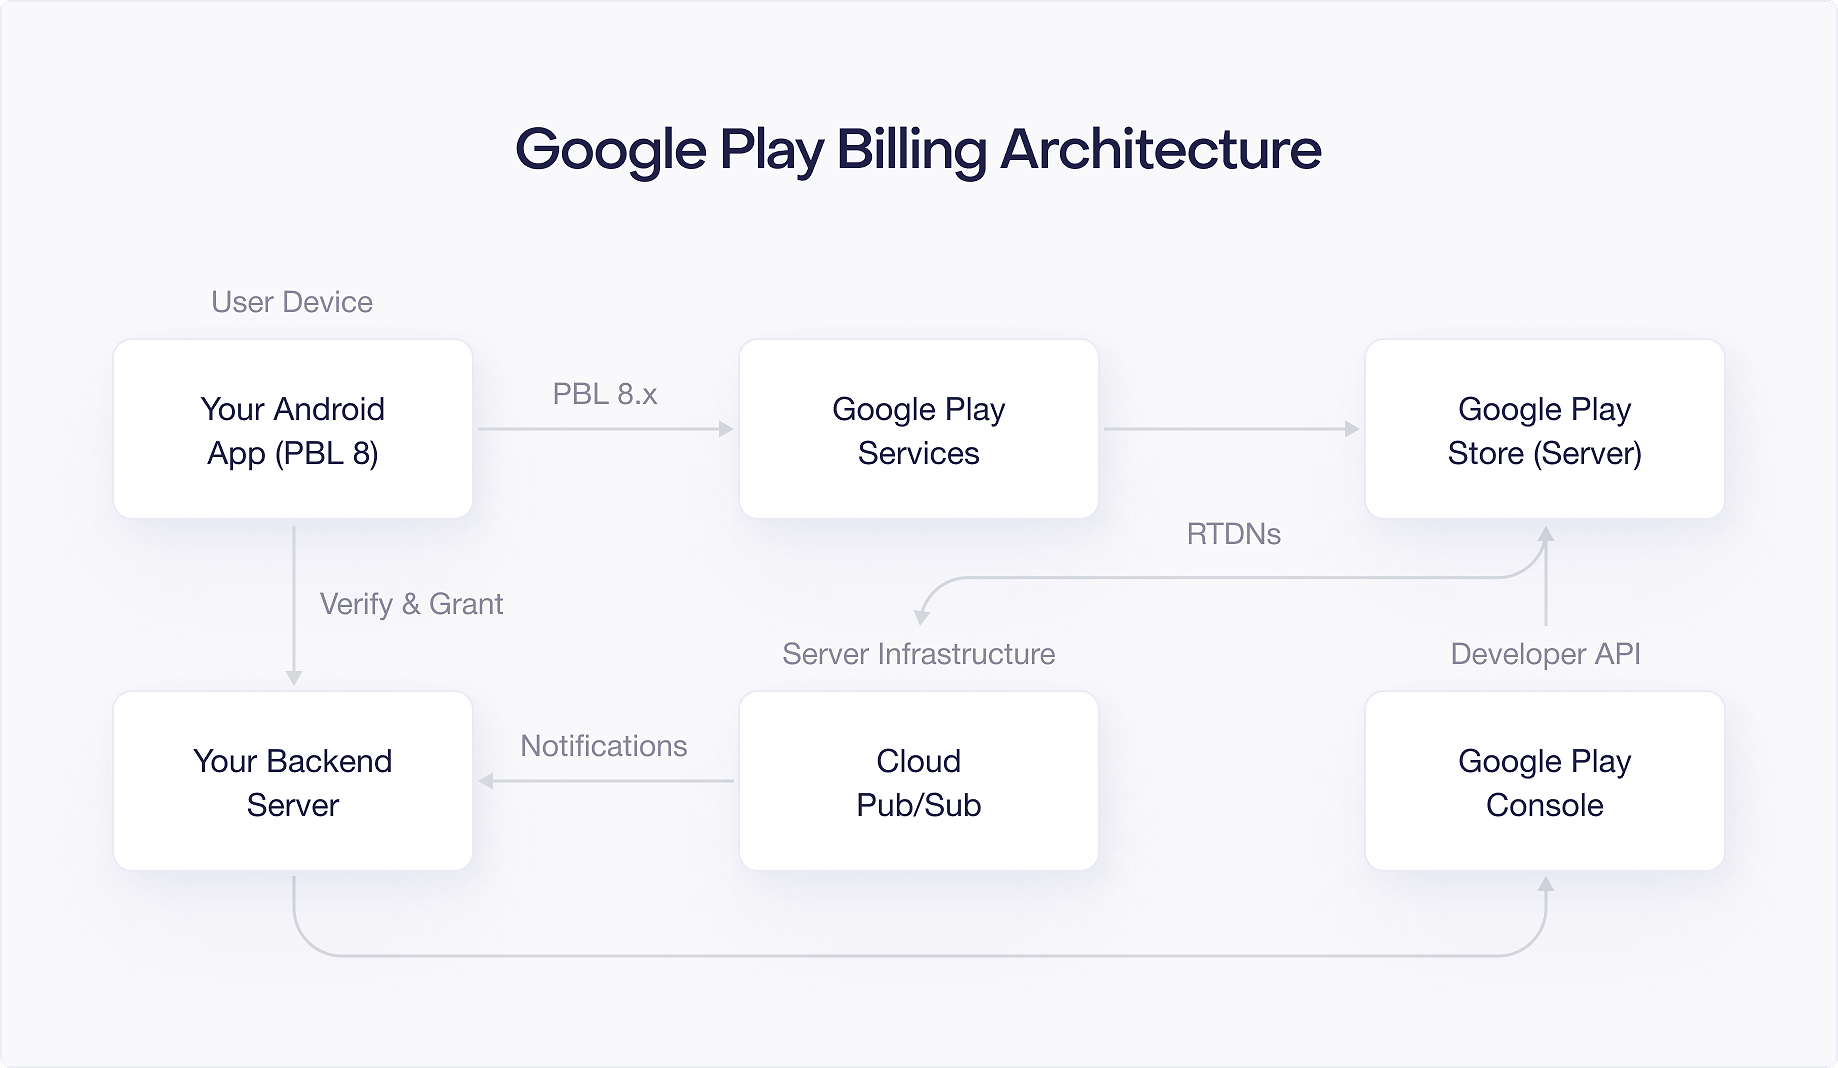
This is the Android client library you add to your app. It communicates with Google Play Services on the device to show purchase dialogs, query available products, and report purchase results back to your app. This book focuses on PBL version 8.x, the latest major version.
PBL handles the client side of the billing experience. It provides APIs to query product details (names, prices, descriptions), launch the Google Play purchase dialog, and receive purchase results. It also lets you acknowledge purchases, consume products, and check what the user currently owns.
The library ships as a Gradle dependency (com.android.billingclient:billing-ktx) and communicates with Google Play Services through interprocess communication (IPC). This means the user must have a Google account signed in and a reasonably recent version of the Google Play Store installed on their device.
2. The Google Play Developer API
This is the server side REST API that your backend uses to verify purchases, check subscription status, acknowledge transactions, and manage your product catalog. It is the source of truth for purchase state.
The API lives at androidpublisher.googleapis.com and uses OAuth 2.0 authentication with service accounts. It provides endpoints for verifying purchases (purchases.subscriptionsv2.get, purchases.products.get), managing subscriptions (cancel, defer, revoke), and performing catalog operations (create, update, delete products and offers).
You should treat this API as the authoritative source of truth for every purchase. The client library provides convenience, but your backend should always verify with the API before granting access to content or features.
3. The Google Play Console
This is the web dashboard where you create and configure your products, set prices, define subscription offers, view financial reports, and manage your app's billing settings. It is also where you configure Real Time Developer Notifications and API access.
The Console is where you define your product catalog: creating one time products, subscriptions, base plans, and offers. You set default prices, configure regional pricing, define offer eligibility rules, and manage your app's billing settings. It also provides financial reports, refund management, and subscriber analytics.
For large catalogs, you can skip the Console UI and manage products programmatically through the catalog management APIs. But the Console remains essential for initial setup, monitoring, and configuration changes that require visual review.
How they work together: Your app uses PBL to initiate purchases, your backend uses the Developer API to verify and manage them, and you use the Console to configure everything. A fourth piece, Cloud Pub/Sub, acts as the communication channel for Real Time Developer Notifications (RTDNs), which push purchase and subscription state changes from Google to your backend in near real time.
Key Actors
Four actors participate in every billing transaction:
Your App
Your Android application uses the Play Billing Library to query products, launch purchase flows, and detect completed purchases. It communicates with your backend to verify purchases and grant entitlements.
Your app is responsible for:
- Querying available products and displaying them to the user
- Building and launching purchase flows when the user decides to buy
- Listening for purchase results and forwarding purchase tokens to your backend
- Acknowledging or consuming purchases (as a fallback; prefer doing this on your backend)
- Querying existing purchases on app launch and foreground resume to stay in sync
Google Play Services
This is the system level service running on the user's Android device. When your app calls PBL methods, PBL delegates to Google Play Services, which handles the actual communication with Google's servers. The user sees this as the Google Play purchase dialog.
Google Play Services handles the payment UI, payment method selection, and secure communication with Google's servers. Your app never sees credit card numbers or payment details. The purchase dialog is a system level overlay that your app cannot customize beyond the product information you provide.
One consequence of this architecture is that billing functionality depends on the version of Google Play Services installed on the device. If the user has an old version, some billing features may not be available. PBL provides the isFeatureSupported() method to check for specific feature availability before calling feature specific APIs.
Your Backend Server
Your server verifies purchases by calling the Google Play Developer API, stores entitlement records in your database, and processes Real Time Developer Notifications (RTDNs) for subscription state changes. Server side verification is essential. Without it, a user could modify local purchase data and get free access to your content.
Your backend is responsible for:
- Receiving purchase tokens from your app and verifying them against the Google Play Developer API
- Storing purchase records and entitlement state in your database
- Processing RTDNs for subscription lifecycle events (renewals, cancellations, payment failures)
- Acknowledging purchases after verifying and granting entitlements
- Managing subscription operations (cancel, defer, revoke) when needed
You can build your backend in any language. The Google Play Developer API is a standard REST API, and Google provides client libraries for Java, Python, Node.js, Go, and other languages. This book shows server side examples in Kotlin for consistency, but the concepts translate directly to any backend language.
The Google Play Store (Server Side)
Google's servers process payments, manage subscription renewals, handle payment recovery (grace periods, account holds), send RTDNs through Cloud Pub/Sub, and serve as the authoritative source of truth for all purchase state.
Google's servers handle the parts of billing that happen without your app's involvement: automatic subscription renewals, payment retry logic during grace periods and account holds, sending renewal receipts to users, and managing the Play Store's subscription management screen where users can cancel, pause, or modify their subscriptions.
Core Vocabulary
Before going further, you need to understand the key terms that appear throughout this book:
Product ID (also called SKU)
A unique string identifier you assign to each product in the Play Console. For example, premium_monthly or 100_coins. Once created, a Product ID cannot be reused, even after deletion. Choose your naming convention carefully.
Purchase Token
A string that Google generates when a user completes a purchase. This is the primary identifier you use to verify and manage a purchase on your backend. Purchase tokens are unique per transaction. When a user upgrades or downgrades a subscription, a new purchase token is generated.
Order ID
A Google generated identifier for a financial transaction. For subscriptions, the Order ID includes a sequence number that increments with each renewal (e.g., GPA.1234-5678-9012..0 for the initial purchase, GPA.1234-5678-9012..1 for the first renewal). One purchase token maps to many Order IDs over the life of a subscription.
Entitlement
The access or content you grant to a user after a verified purchase. Google does not manage entitlements for you. Your app and backend are responsible for tracking what each user has access to based on their purchase history.
Acknowledgement
A required confirmation you send to Google after granting an entitlement. You must acknowledge every purchase within 3 days, or Google will automatically refund it. This mechanism ensures that users only pay for purchases that your app has actually fulfilled.
Consumption
For consumable products (like virtual currency), consumption tells Google that the user has "used up" the product and can purchase it again. Unlike acknowledgement, consumption is specific to consumable one time products. Consuming a product implicitly acknowledges it.
Base Plan
A pricing configuration within a subscription product. Each base plan defines a billing period (weekly, monthly, yearly, etc.) and a price. A single subscription product can have multiple base plans, for example a monthly plan at $9.99 and an annual plan at $79.99.
Offer
A promotional pricing phase attached to a base plan. Offers include free trials, introductory pricing, and upgrade discounts. Each offer generates an offer token that your app uses when launching the purchase flow.
Real Time Developer Notification (RTDN)
A push notification sent by Google through Cloud Pub/Sub when a purchase or subscription event occurs. RTDNs tell your backend about renewals, cancellations, payment failures, and other lifecycle events without requiring you to poll the API.
Linked Purchase Token
When a user upgrades or downgrades a subscription, Google creates a new purchase token. The new token contains a linkedPurchaseToken field pointing back to the original token. Your backend must follow these links to properly deactivate old entitlements and activate new ones.
Product Types Overview
Google Play Billing supports two main product types:
One Time Products
These are products the user purchases once. They come in two flavors:
- Consumable: Products that can be purchased repeatedly because they get "used up." Virtual currency, extra lives, or boost items are typical examples. After the user consumes the product, they can buy it again.
- Non consumable: Products purchased once that provide permanent access. Removing ads, unlocking a premium level, or buying a filter pack are common examples. The user owns these indefinitely.
Subscriptions
Subscriptions grant access to content or features for a recurring period. Google Play supports several subscription models:
- Auto renewing subscriptions: The standard model. Google automatically charges the user at the end of each billing period until they cancel.
- Prepaid plans: The user pays upfront for a fixed period with no automatic renewal. They can manually "top up" to extend access.
- Installment subscriptions: Available in select markets (Brazil, France, Italy, Spain). Users commit to a minimum number of payments but can cancel after the commitment period.
Subscriptions have a hierarchical structure: a Subscription contains one or more Base Plans, and each Base Plan can have Offers attached. You will explore this hierarchy in depth in Chapter 4.
How Product Types Differ in Practice
The key difference between one time products and subscriptions goes beyond "one payment vs. recurring payments." Subscriptions are significantly more complex because they have a lifecycle. A subscription can be active, paused, in a grace period, on hold, canceled but not yet expired, or fully expired. Each state requires different handling in your app and on your backend.
One time products have a simpler lifecycle: the user buys them, you verify and acknowledge (or consume), and you grant access. The main complexity is handling pending transactions, where the payment has not yet completed.
For most apps that sell subscriptions, you will spend the majority of your billing development time handling subscription lifecycle events. Parts III through V of this book cover this in detail.
When You Must Use Google Play Billing
Google's policy is straightforward: if your app is distributed through the Google Play Store and sells digital goods or services, you must use Google Play Billing. This includes:
- App features or functionality (premium upgrades, ad removal)
- Digital content (ebooks, music, videos, game levels)
- Subscription services (streaming, cloud storage, dating services)
- Virtual currencies and in game items
- Access to premium content or services
You do not need to use Google Play Billing for:
- Physical goods (use any payment processor)
- Services performed in the physical world (ride sharing, food delivery, cleaning services)
- Peer to peer payments
- Content that can be consumed outside the app (e.g., songs that can play on external devices)
- Certain regional exceptions where alternative billing is permitted (covered in Chapter 18)
Violating this policy risks your app being removed from the Play Store. When in doubt, consult the Google Play developer policy documentation or contact Google Play support.
There are exceptions to this rule. In certain regions (South Korea, the European Economic Area, India, and the United States), regulatory requirements allow developers to offer alternative billing systems alongside or instead of Google Play Billing. Chapter 18 covers these alternative billing options in detail, including the specific APIs and compliance requirements for each region.
The Purchase Flow at a High Level
Before diving into the details in later chapters, it helps to understand the end to end flow of a purchase:
- Product query: Your app asks PBL for the current details of one or more products. PBL returns pricing, descriptions, and available offers.
- Display: Your app shows the products to the user with localized prices.
- Purchase initiation: The user taps "Buy." Your app builds purchase parameters and calls
launchBillingFlow(). - Google Play dialog: The system shows the Google Play purchase dialog. The user selects a payment method and confirms.
- Payment processing: Google processes the payment. For most payment methods, this is instant. For some (like cash payments at convenience stores), the purchase enters a "pending" state.
- Callback: PBL notifies your app of the result through the
PurchasesUpdatedListener. - Backend verification: Your app sends the purchase token to your backend. Your backend calls the Google Play Developer API to verify the purchase is legitimate.
- Entitlement grant: After verification, your backend records the entitlement and tells your app to unlock the content.
- Acknowledgement: Your backend (or your app as a fallback) acknowledges the purchase within 3 days.
- Ongoing management: For subscriptions, your backend processes RTDNs for renewals, cancellations, and other lifecycle events.
This flow applies to both one time products and subscriptions. The complexity difference lies in step 10: one time products are done after acknowledgement, while subscriptions require ongoing lifecycle management that can span months or years.
What is Ahead
Now that you understand what Google Play Billing is and how its pieces fit together, the next chapter walks you through setting everything up: your developer account, your first product, API access, and Real Time Developer Notifications. By the end of Chapter 2, you will have a working environment ready for development.

