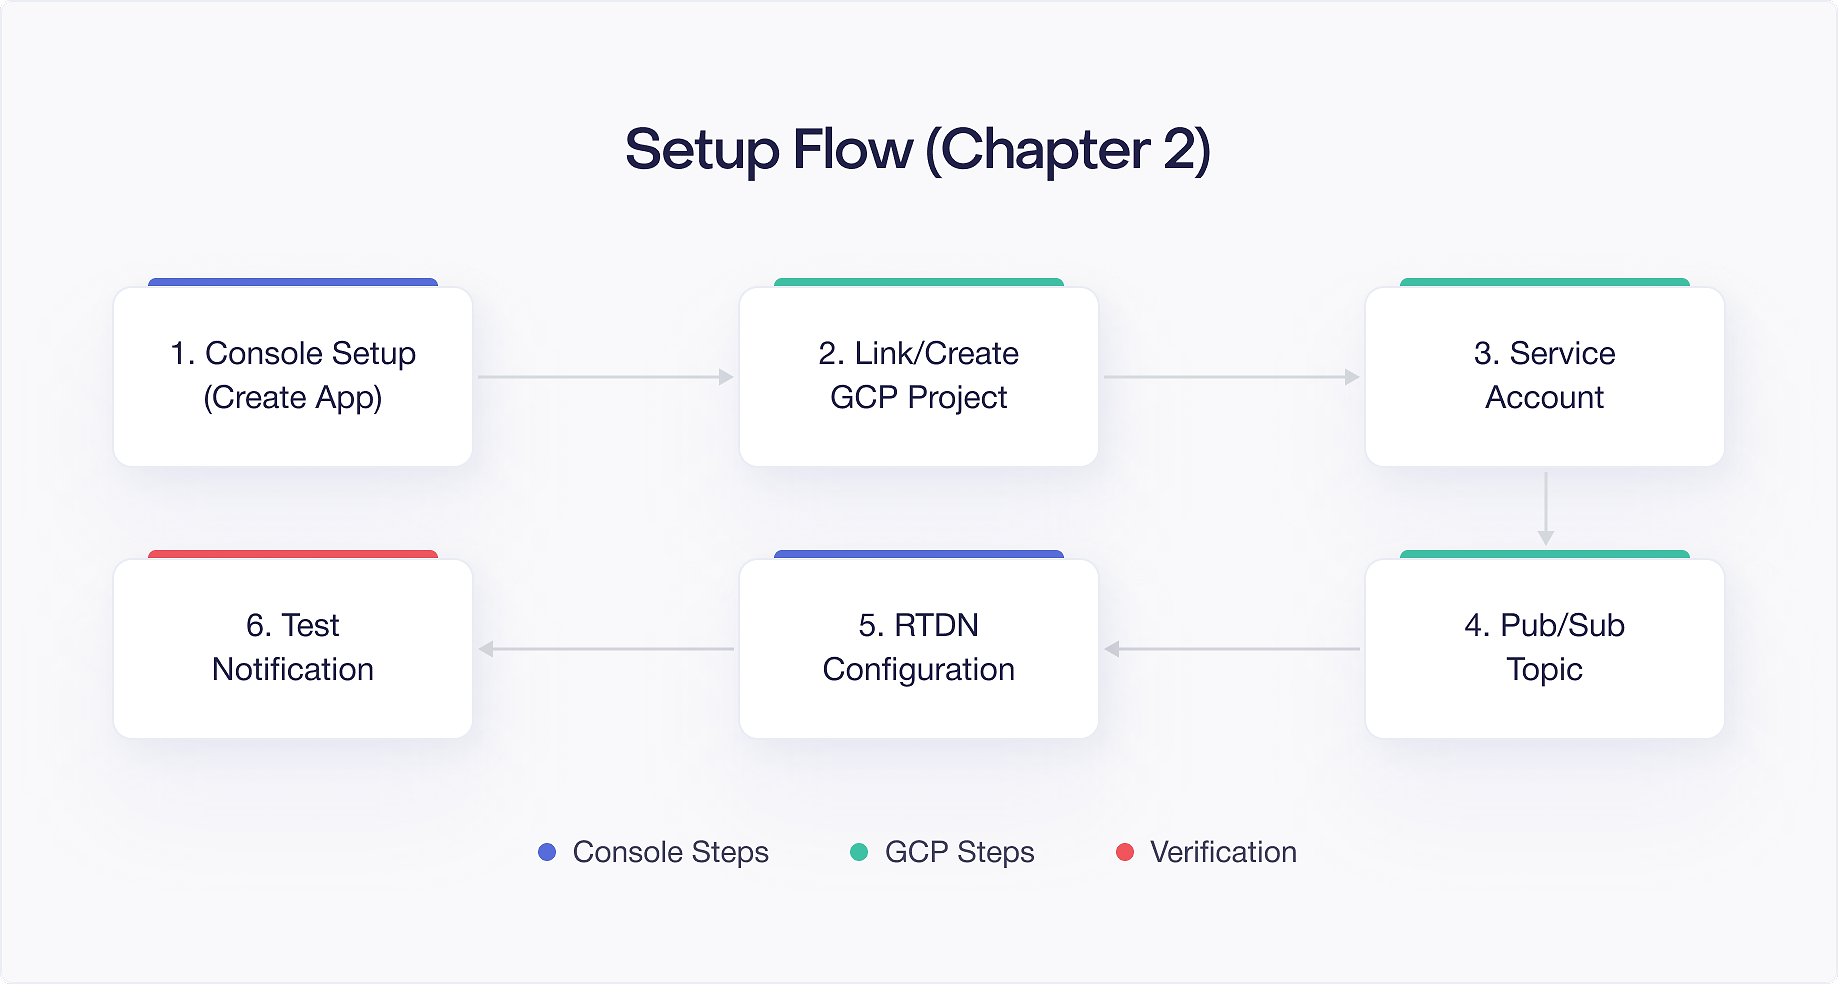
Chapter 2: Setting Up Your Environment
Before you write any billing code, you need a working environment. This means a Google Play Developer Account, a configured app on the Play Console, products to sell, API access for your backend, and Real Time Developer Notifications for keeping your server in sync. This chapter walks you through each step.
Google Play Developer Account
If you do not already have a Google Play Developer Account, you need one. Go to the Google Play Console (play.google.com/console) and follow the registration process. There is a one time $25 registration fee.
Individual vs Organization Accounts
Google offers two account types, and the choice matters more than you might expect.
An individual account is tied to a single person. You provide your legal name, and that name may appear on your Play Store listing. Individual accounts work fine for solo developers shipping free apps, but they come with limitations. If you leave a company or transfer ownership of an app, the process is more complicated because the account belongs to you personally.
An organization account is tied to a business entity. You provide your organization name, a DUNS number (for businesses in the US), and documentation proving the organization exists. Organization accounts unlock additional Play Console features, including managed publishing and the ability to add team members with granular role permissions. For any app that sells subscriptions or has multiple contributors, an organization account is the better choice.
Identity Verification
Both account types require identity verification, but the timeline differs. Individual accounts typically verify within a few days. Organization accounts can take up to two weeks because Google verifies the business entity independently. Plan for this delay if you are setting up a new account. You cannot create products or upload apps until verification completes.
During verification, Google may request additional documentation. Keep your business registration documents, government issued ID, and proof of address accessible. Responding quickly to these requests shortens the overall timeline.
Setting Up the App Listing
Once your account is verified, create your app in the Play Console. Go to All apps > Create app and fill out the basic details: app name, default language, app type (app or game), and whether it is free or paid. You also need to complete several declarations about content, ads, and target audience.
For the store listing itself, you need a short description, full description, app icon, feature graphic, and at least two screenshots. If you are only setting up for internal testing, placeholder content works. However, certain fields like the privacy policy URL are required before you can publish to any track, including internal testing. A simple hosted privacy policy page is sufficient to unblock the process.
Google Payments Center Profile
Before you can sell anything, you need a Google Payments Center merchant profile linked to your developer account. This is where Google sends your revenue.
- In the Play Console, go to Setup > Payments profile.
- If you do not have a payments profile yet, follow the prompts to create one.
- Provide your business information, bank account details, and tax information.
- Wait for verification. Google may take a few days to verify your payment details.
Without a verified payments profile, you cannot create paid products or publish apps with in app purchases.
Supported Countries and Tax Requirements
Google supports merchant profiles in over 60 countries, but availability varies. Check Google's current list of supported merchant locations before assuming your country qualifies. If your business operates in a country that is not supported, you may need to establish a legal entity in a supported region.
Tax ID requirements depend on your country. In the United States, you need an EIN (Employer Identification Number) for businesses or an SSN for individual accounts. Google uses this information for tax reporting and will issue a 1099 at year end if your earnings exceed the IRS threshold. In the European Union, you need a valid VAT number if your business is VAT registered. Other countries have their own requirements. Fill out the tax information forms completely during setup because incomplete tax details can block payouts later.
Payout Schedule and Thresholds
Google pays out revenue on a monthly basis. Earnings from a given month become available for payout approximately 30 days after the month ends. For example, revenue earned in March is typically paid out by the end of April. The minimum payout threshold varies by currency, but for USD it is $1.
Payouts go to the bank account you configure in the Payments Center. You can set up wire transfers for most countries. Double check your bank details before saving because incorrect information can delay payments by an entire cycle. You can also set a custom payout threshold if you prefer to accumulate earnings before receiving a transfer.
Keep in mind that Google takes a 15% commission on the first $1M of annual revenue per developer account, and 30% beyond that. These percentages apply to subscription revenue as well, though subscriptions drop to 15% after 12 months of continuous paid service from a given subscriber.
Adding the Play Billing Library Dependency
Add the Play Billing Library to your app module's build.gradle.kts:
The billing-ktx artifact includes the core billing library plus Kotlin coroutine extensions. If you prefer callback based APIs, you can use billing instead of billing-ktx, but the KTX extensions make async operations significantly cleaner. Throughout this book, all client side code examples use the KTX variant.
Version Management
PBL 8.x is the current major version at the time of writing. Google follows semantic versioning for the billing library, so minor version bumps (8.0 to 8.1) add features without breaking changes, while major version bumps (7.x to 8.x) can include breaking API changes.
Pin your billing library version explicitly rather than using dynamic version ranges like 8.+. Dynamic versions can cause builds to break unexpectedly when a new release introduces changes you have not tested against. When a new PBL version ships, read the release notes, update the version string, test your purchase flows, and then commit the change.
You can check for new releases on the Google Maven repository or in the Android developer documentation. If your project uses a version catalog (libs.versions.toml), define the billing version there:
Then reference it in your build.gradle.kts:
Compatibility and minSdk Requirements
PBL 8 requires a minSdk of at least 21 (Android 5.0). If your app targets a lower API level, you need to either raise your minSdk or stay on an older PBL version. In practice, Android 5.0 covers over 99% of active devices, so this is rarely a meaningful constraint.
PBL 8 also requires the Google Play Store app to be installed and up to date on the user's device. This is relevant if you distribute your app outside of Google Play (for example, through sideloading or alternative stores). Devices without the Play Store cannot use the Play Billing Library at all.
Sync your Gradle project and verify the dependency resolves. If you are behind a corporate proxy or using a custom Maven repository, ensure that google() and mavenCentral() are in your settings.gradle.kts repository configuration. If the dependency fails to resolve, check that your project's repository block includes both sources and that your network allows access to dl.google.com.
Uploading Your App to the Internal Test Track
You cannot test in app purchases with a locally installed debug build. Google Play Billing requires your app to be uploaded to the Play Console, even for testing.
Understanding Test Tracks
Google Play offers three test tracks, each serving a different purpose:
Internal testing is limited to up to 100 testers that you add by email. Releases publish in minutes, sometimes seconds. There is no review process. This is the track you should use during active development. It gives you the fastest iteration cycle and requires the least amount of store listing completeness.
Closed testing lets you create tester groups that are larger than the internal testing limit. You can define up to 200 email lists, each containing thousands of testers. Closed test releases go through a lightweight review process that typically takes hours, not days. Use closed testing when you need broader beta feedback from a controlled audience before a public launch.
Open testing makes your app available to anyone who visits your store listing and opts in. Open test releases go through the standard review process, similar to production releases. Use open testing when you want public beta feedback, stress testing at scale, or when you want to validate your store listing and conversion rates before a full launch.
For the purpose of setting up your billing development environment, the internal test track is sufficient. You will expand to other tracks later when you are ready for broader testing.
Uploading to Internal Testing
- In the Play Console, create a new app (or use an existing one).
- Fill out the required store listing information. For testing purposes, placeholder content works fine, but you still need a privacy policy URL.
- Build a signed APK or App Bundle. You need a release signing configuration, even for the internal test track. If you use Play App Signing (recommended), you upload your app signing key during your first upload.
- Go to Testing > Internal testing and create a new release.
- Upload your signed artifact.
- Add testers by email address. These email addresses must be Google accounts. Each tester must accept the testing invitation link before they can install the app from the Play Store.
- Roll out the internal testing release.
After rolling out, it takes a few minutes for the release to become available. Your testers can then install the app from the Play Store using the opt in link. The important thing is that Google Play recognizes your app and its package name, which enables the billing APIs to function.
Creating Your First Product in the Play Console
With your app uploaded, you can create products. Let us start with a simple one time product.
- Go to Monetize > Products > In-app products in the Play Console.
- Click Create product.
- Enter a Product ID (e.g.,
remove_ads). This ID is permanent and cannot be changed or reused after activation, so choose carefully. - Enter a name and description. These are what users see in the purchase dialog.
- Set a default price. Google will auto convert to other currencies, but you can customize individual country prices.
- Set the tax and compliance settings appropriate for your product type.
- Activate the product.
Naming Conventions
Product IDs are permanent. Once you create a product ID and activate it, you cannot change it, delete it, or reuse it, even if you deactivate the product later. This means your naming convention matters from day one.
A common pattern is <category>_<descriptor>, for example premium_monthly, coins_500, or remove_ads. Keep IDs lowercase with underscores. Avoid encoding prices or promotional details in the ID because those things change over time while the ID does not.
For subscriptions, you will also name base plans and offer IDs. A consistent scheme like premium_monthly (subscription), standard (base plan), and intro_7d_free (offer) keeps things readable when you are debugging purchase flows six months from now.
Pricing Strategies and Regional Pricing
When you set a default price in your home currency, Google automatically converts it to local prices in all other countries. These auto converted prices follow Google's price tiers, which are designed to land on clean numbers in each currency (for example, $4.99 USD might convert to 549 JPY or 4.49 EUR).
You can override the auto converted price for any country individually. This is useful when you want to optimize for purchasing power in specific markets. A price that feels reasonable in the United States might be too expensive in Southeast Asia or South America. Adjusting regional prices can significantly increase conversion rates in those markets.
Google also lets you run pricing experiments through the Play Console, where you A/B test different price points for a given product. This is covered in more detail in later chapters, but be aware that the feature exists when you are initially setting up products.
Activating Products
For subscriptions, the creation process is similar but involves creating a Subscription, then adding Base Plans and Offers within it. You will learn the subscription hierarchy in Chapter 4.
A product must be in the Active state before your app can query or sell it. New products may take a few minutes to propagate after activation. If you query for a product immediately after activating it and get an empty result, wait a few minutes and try again. This propagation delay is normal and only affects newly created or recently modified products.
Configuring Google Play Developer API Access
Your backend needs to call the Google Play Developer API to verify purchases, check subscription status, and acknowledge transactions. This requires a service account.
Creating a Service Account
- Go to the Google Cloud Console (console.cloud.google.com).
- Select or create a project. Link this GCP project to your Play Console app.
- Go to IAM & Admin > Service Accounts.
- Click Create Service Account.
- Give it a descriptive name (e.g.,
play-billing-backend). - Create a JSON key for this service account and download it securely.
- Go to the Play Console, then Setup > API access.
- Link your GCP project if you have not already.
- Grant the service account the appropriate permissions.
Role Permissions
The Play Console lets you assign granular permissions to each service account. For billing verification and subscription management, you need at least:
- View financial data: Allows reading revenue reports and financial information.
- Manage orders and subscriptions: Allows verifying purchases, acknowledging transactions, revoking subscriptions, and issuing refunds via the API.
Avoid granting broader permissions like Admin unless you have a specific need. Follow the principle of least privilege. If your backend only needs to verify purchases and check subscription status, those two permissions are sufficient.
If you have multiple services that access the Play Developer API for different purposes (for example, one service for purchase verification and another for analytics), create separate service accounts with appropriate permissions for each.
Key Management
The JSON key file is a secret. Do not commit it to version control, do not share it over email, and do not embed it in client side code. Store it in a secrets manager like Google Secret Manager, AWS Secrets Manager, or HashiCorp Vault.
Rotate your service account keys periodically. Google allows up to 10 keys per service account, so you can create a new key, deploy it, and then delete the old one without downtime. If a key is ever compromised, delete it immediately from the Google Cloud Console and create a replacement.
For production environments running on Google Cloud (Cloud Run, GKE, App Engine), consider using workload identity federation instead of downloaded key files. This approach lets your service authenticate as the service account without managing key files at all.
Testing API Access
Verify your setup by making a simple API call. Using the Google API client library for your backend language, authenticate with the service account and call any read endpoint, such as listing in app products:
If the call succeeds, your service account is properly configured.
Setting Up Cloud Pub/Sub for Real Time Developer Notifications
Real Time Developer Notifications (RTDNs) let Google push purchase and subscription events to your backend as they happen. Without RTDNs, you would need to poll the API constantly to detect changes like renewals, cancellations, or payment failures.
RTDNs flow through Google Cloud Pub/Sub. Here is how to set it up:
Step 1: Create a Pub/Sub Topic
- In the Google Cloud Console, go to Pub/Sub > Topics.
- Click Create Topic.
- Name it something descriptive (e.g.,
play-billing-notifications). - Leave default settings and create.
Step 2: Grant Google Publish Access
Google needs permission to publish messages to your topic. Add the Google Play service account as a publisher:
- On your topic, click the Permissions tab.
- Add the principal:
google-play-developer-notifications@system.gserviceaccount.com - Assign the role: Pub/Sub Publisher.
Step 3: Create a Subscription
You need a subscription to receive messages from the topic. You have two options, and the choice depends on your infrastructure.
Push subscriptions work by having Google Cloud send an HTTP POST request to your endpoint for each message. The message body contains a base64 encoded JSON payload. Your endpoint must return a 2xx status code to acknowledge the message. If it returns an error or times out, Pub/Sub retries delivery with exponential backoff. Push subscriptions are the simpler option if you have a publicly accessible HTTPS endpoint. You do not need to manage polling loops or maintain persistent connections.
Pull subscriptions work by having your server explicitly request messages from the subscription. Your server calls the Pub/Sub API (or uses a client library) to pull a batch of messages, process them, and then acknowledge each one. Pull subscriptions give you more control over processing rate and are a better fit if your server is behind a firewall, if you want to process messages in batches, or if you need to control concurrency precisely.
For most production setups, a push subscription is the simplest approach and the one this book assumes in later chapters.
Dead Letter Queues
If your endpoint repeatedly fails to acknowledge a message, the message keeps getting retried. By default, Pub/Sub retries indefinitely, which can create noise and waste resources. To handle this, configure a dead letter topic. After a configurable number of delivery attempts (the default maximum is between 5 and 100, you choose), Pub/Sub forwards the undeliverable message to the dead letter topic instead of retrying forever.
Monitor your dead letter topic regularly. Messages that land there represent events your system failed to process, which could mean missed subscription renewals or unacknowledged purchases that need manual attention.
Message Format Preview
Each RTDN message from Google contains a JSON payload with several fields. The most important are version, packageName, eventTimeMillis, and then one of subscriptionNotification, oneTimeProductNotification, or testNotification. Here is a simplified example of what a subscription notification looks like:
The notificationType integer tells you what happened (renewal, cancellation, pause, etc.). You will learn how to handle each notification type in Chapter 10.
Step 4: Enable RTDNs in Play Console
- In the Play Console, go to Monetize > Monetization setup.
- Under Real time developer notifications, enter the full Pub/Sub topic name:
projects/your-project-id/topics/play-billing-notifications. - Save.
Verifying Your Setup with a Test Notification
After configuring RTDNs, send a test notification to verify the pipeline works:
- In the Play Console's RTDN settings, click Send test notification.
- Check your Pub/Sub subscription for the test message.
- If using a push subscription, verify your endpoint received the HTTP POST.
The test notification has a testNotification field instead of the usual subscriptionNotification or oneTimeProductNotification fields. Your notification handler should recognize and acknowledge test messages without attempting to process them as real events.
If the test notification does not arrive, check:
- The Pub/Sub topic name in the Play Console matches exactly.
- The Google Play service account has Publisher permissions on the topic.
- Your subscription is active and your endpoint (for push) is reachable and returns a 200 status.
Troubleshooting Common Setup Problems
Setting up the billing environment involves multiple systems (Play Console, Google Cloud, Pub/Sub, your app, your backend), and things can go wrong at any junction. Here are the most common problems and how to resolve them.
"This version of the app is not configured for billing through Google Play." This error appears when you try to launch a purchase flow from an app that Google Play does not recognize. The usual causes are: your app is not uploaded to any test track, the version code of your locally installed build does not match the one on the Play Console, or the signing key does not match. Make sure you are running the exact same signed build that you uploaded, or at minimum ensure the package name and signing certificate match.
Products return empty when queried. If queryProductDetails returns an empty list, check that the product is in the Active state in the Play Console. Also verify that you are querying with the correct product ID and product type (INAPP vs SUBS). Newly activated products can take several minutes to propagate. If you just activated a product, wait and try again.
Service account API calls return 403 Forbidden. This means your service account does not have the right permissions, or the GCP project is not linked to the correct Play Console app. Go to the Play Console under Setup > API access and verify the link. Then check that the service account has the necessary permissions granted in the Play Console, not just in the GCP IAM settings. Play Console permissions and GCP IAM permissions are separate systems.
Pub/Sub test notification never arrives. First confirm the topic name in the Play Console matches the fully qualified topic name exactly (projects/your-project-id/topics/your-topic-name). Then verify that the Google Play service account (google-play-developer-notifications@system.gserviceaccount.com) has the Pub/Sub Publisher role on your topic. If using a push subscription, check that your endpoint is publicly accessible over HTTPS and returns a 200 status code. Check the Pub/Sub monitoring dashboard in the Google Cloud Console for delivery error metrics.
"The developer account associated with this app is not eligible for testing." This happens when the Google account you are testing with is the same as the developer account. The account that owns the Play Console cannot make test purchases. Use a different Google account for testing, and add that account as a license tester under Setup > License testing in the Play Console.
Gradle fails to resolve the billing dependency. Verify that your settings.gradle.kts includes both google() and mavenCentral() in the repositories block under dependencyResolutionManagement. If you are behind a corporate firewall, you may need to configure a proxy in your gradle.properties file or use an internal Maven mirror that proxies the Google Maven repository.
Your Environment Checklist
Before moving on, verify you have completed each step:
- Google Play Developer Account registered and verified
- Google Payments Center profile linked and verified
- Play Billing Library 8.x added to your app dependencies
- App uploaded to the internal test track
- At least one product created and activated in the Play Console
- Service account created with appropriate Play Console permissions
- Cloud Pub/Sub topic created with Google publish permissions
- Pub/Sub subscription (push or pull) configured
- RTDNs enabled in Play Console pointing to your topic
- Test notification sent and received successfully
With all of this in place, you have a complete environment for developing, testing, and eventually shipping your billing integration. In the next chapter, you will start building: creating and selling one time products.

