Chapter 4: Subscriptions Deep Dive
Subscriptions are the most sophisticated product type in Google Play Billing. A one time product has a single price and a single purchase event. A subscription has billing periods, renewal logic, offers, upgrades, downgrades, grace periods, and a three tier product hierarchy that determines how everything fits together. This chapter breaks down that hierarchy, walks through every subscription model Google Play supports, and shows you how to configure and sell subscriptions in your app.
The Subscription Product Hierarchy
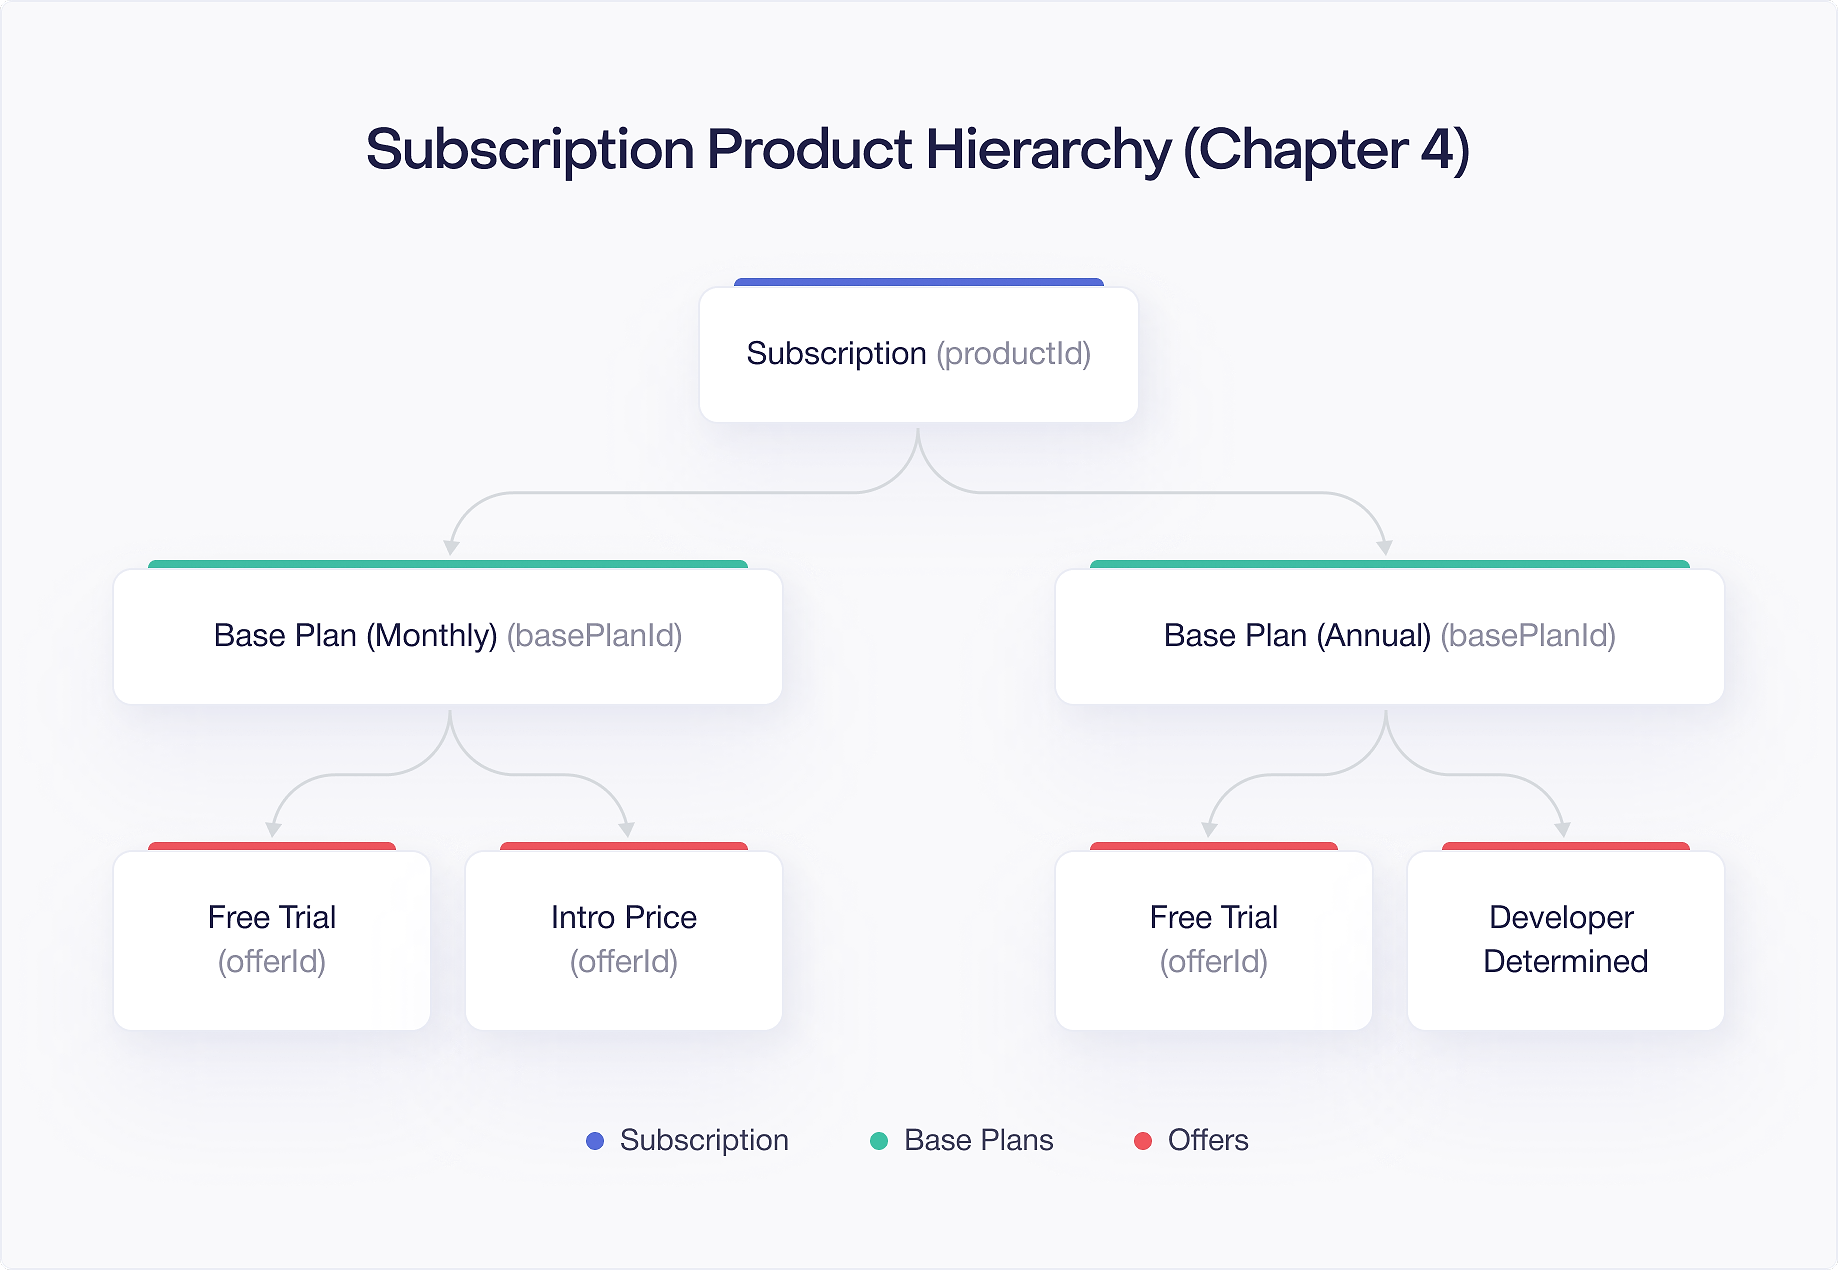
Google Play organizes subscriptions into three levels: Subscription, Base Plan, and Offer. Understanding this hierarchy is essential because it determines how you create products in the Play Console, how you query them with the Play Billing Library, and how you present purchasing options to your users.
Subscription
A Subscription is the top level container. It represents a single subscription product in your app, like "Premium Access" or "Cloud Storage Plan." You give it a Product ID (e.g., premium) and a name. The Subscription itself does not define a price or billing period. It is just a container that groups related plans together.
Think of it this way: the Subscription answers the question "what is the user subscribing to?" The details of how they pay come from the levels below.
Base Plan
A Base Plan lives inside a Subscription and defines the actual billing terms: the billing period (weekly, monthly, every two months, quarterly, every six months, yearly), the price, and whether the plan auto renews or is prepaid. A single Subscription can have multiple Base Plans. For example, your "Premium Access" subscription might have a monthly Base Plan at $9.99/month and a yearly Base Plan at $79.99/year.
Each Base Plan has its own identifier (the Base Plan ID) and its own pricing. This is where you decide if the plan auto renews or requires manual top up (prepaid). You can also create installment plans at this level for supported markets.
The key insight is that a single Subscription can offer multiple ways to pay. The user sees one product, but you can present several pricing options.
Offer
An Offer attaches to a Base Plan and provides a discount or incentive. This is where free trials, introductory pricing, and other promotional pricing live. Offers are optional. A Base Plan works just fine without any Offers, in which case the user pays the full Base Plan price from the start.
Each Offer has its own identifier (the Offer ID), eligibility criteria, and one or more pricing phases. A pricing phase defines a price and duration for one segment of the offer. For example, a "try then discount" offer might have two phases: 7 days free, then 3 months at $4.99/month, before the user moves to the full Base Plan price.
Here is how the hierarchy maps out in practice:
When you query product details with PBL 8.x, the ProductDetails object reflects this hierarchy. You get the subscription level information, a list of SubscriptionOfferDetails entries (one per Base Plan or Offer), and each entry contains pricing phases and an offer token you use to launch the purchase.
Auto Renewing Subscriptions
Auto renewing subscriptions are the standard subscription model. The user subscribes, Google charges them at the end of each billing period, and the subscription continues until the user cancels or a payment fails beyond recovery.
When you create an auto renewing Base Plan, you choose a billing period and set a price. Google handles the rest: charging the user on schedule, sending renewal notifications, and managing payment failures through grace periods and account holds.
From your app's perspective, an auto renewing subscription is straightforward. You query the product, present it to the user, launch the billing flow, and verify the purchase on your backend. After that, Google manages the renewal cycle. Your backend receives RTDNs for each renewal event, and you can check the subscription status through the Google Play Developer API at any time.
The user can cancel an auto renewing subscription at any time through the Play Store's subscription management screen. Cancellation does not immediately revoke access. The user retains access until the end of the current billing period. After that, the subscription expires.
Prepaid Plans
Prepaid plans work differently from auto renewing subscriptions. The user pays upfront for a fixed period, and there is no automatic renewal. When the period ends, access expires unless the user manually purchases more time.
This model is common in markets where users prefer pay as you go over recurring charges, or where credit card penetration is low and users pay with prepaid cards or carrier billing. It also works well for users who want to control spending precisely.
To create a prepaid plan, you add a Base Plan to your Subscription and set its type to prepaid. You choose a billing period (e.g., 30 days, 1 year) and set the price. Users buy time on this plan, and when it runs out, they can "top up" by purchasing again.
The top up model means your app needs to handle extending an existing prepaid subscription. When a user tops up, Google extends the expiration date. You detect this through a new purchase event and update your entitlement records accordingly.
There are a few important differences between prepaid and auto renewing plans:
- No free trials or introductory pricing: Offers are not available for prepaid Base Plans. The user always pays the full price.
- No grace periods or account holds: Since there is no automatic renewal, there is no payment retry mechanism. When the period ends, it ends.
- Shorter acknowledgement windows: For prepaid plans shorter than 7 days, the acknowledgement window is shorter than the standard 3 days. More on this later.
Here is how you check whether a plan is prepaid when processing ProductDetails:
Installment Subscriptions
Installment subscriptions are available in Brazil, France, Italy, and Spain. They let users commit to a subscription for a fixed number of payments (the commitment period), after which the subscription continues on a month to month basis. This model works well in markets where users are accustomed to installment purchasing.
For example, you might create an installment plan where the user commits to 12 monthly payments of $4.99. During those 12 months, the user cannot cancel without consequences (Google may charge an early termination fee, depending on the market). After the 12 payments, the subscription auto renews monthly at the same price, and the user can cancel freely.
To create an installment plan, you add a Base Plan with the installment type and specify:
- The billing period (monthly)
- The price per installment
- The number of committed payments (the commitment count)
The commitment count is the minimum number of billing cycles the user agrees to. Google communicates this commitment clearly to the user in the purchase dialog.
From a code perspective, you can detect installment plans through the InstallmentPlanDetails on the offer:
The commitmentPaymentsCount tells you how many payments the user commits to initially. The subsequentCommitmentPaymentsCount tells you how many payments apply if the user renews into another commitment period (which may be zero, meaning month to month renewal after the initial commitment).
Subscriptions with Add Ons
Google Play supports the concept of subscription add ons, where users can purchase additional features or content on top of an existing subscription. This is useful when your app has a base subscription tier and you want to offer optional extras.
For example, a music streaming app might have a "Premium" subscription that includes ad free listening, and an add on for "Hi-Fi Audio" that the user can purchase separately on top of their existing subscription. Add ons appear as separate subscription products in the Play Console, but they are logically connected to a parent subscription.
When designing add ons, keep these points in mind:
- Each add on is a separate Subscription product with its own Base Plans and Offers.
- Your app and backend manage the relationship between the parent subscription and the add on. Google does not enforce this relationship automatically.
- The user must have an active parent subscription to use the add on, but your app is responsible for checking this.
- Billing for the add on follows the same rules as any other subscription (auto renewing, prepaid, or installment).
Your backend should validate that the parent subscription is active before granting the add on entitlement. If the parent subscription expires or is cancelled, you should revoke the add on access as well.
Creating Subscriptions and Base Plans in the Play Console
Now that you understand the hierarchy, here is how you create subscriptions in the Google Play Console:
Step 1: Create the Subscription
- Go to Monetize > Products > Subscriptions in the Play Console.
- Click Create subscription.
- Enter a Product ID (e.g.,
premium). This is permanent and cannot be reused. - Enter a Name and Description. Users see these in the purchase dialog and the Play Store subscription management screen.
- Add any benefits you want shown to the user.
- Save the subscription.
At this point, you have an empty container. It has no plans and cannot be sold.
Step 2: Add Base Plans
- Within your subscription, click Add base plan.
- Enter a Base Plan ID (e.g.,
monthly). - Choose the plan type: auto renewing, prepaid, or installment.
- Choose the billing period: weekly, monthly, every 2 months, every 3 months, every 4 months, every 6 months, or yearly.
- Set the default price. Google will auto generate prices for other countries based on exchange rates. You can customize individual country prices.
- For installment plans, set the commitment count (minimum number of payments).
- Activate the Base Plan.
You can add multiple Base Plans to a single Subscription. A common pattern is to create a monthly and a yearly auto renewing plan, with the yearly plan priced at a discount compared to 12 months of the monthly plan.
Step 3: Activate the Subscription
After adding at least one active Base Plan, activate the Subscription itself. It may take a few minutes for the new subscription to propagate and become queryable from your app.
Configuring Offers
Offers let you incentivize users to subscribe by providing discounted pricing for an initial period. You attach Offers to auto renewing Base Plans. Prepaid plans do not support Offers.
Free Trials
A free trial gives the user full access for a period at no charge. After the trial ends, the subscription converts to the full Base Plan price.
To create a free trial:
- Open a Base Plan in the Play Console.
- Click Add offer.
- Enter an Offer ID (e.g.,
free-trial). - Set the eligibility criteria (more on this below).
- Add a pricing phase with Free pricing and the trial duration (e.g., 7 days, 14 days, 1 month).
- Activate the offer.
Free trials are the most common offer type. They lower the barrier to entry by letting users try your product before committing.
Introductory Pricing
Introductory pricing charges a reduced price for an initial period. For example, $0.99/month for the first 3 months instead of the regular $9.99/month.
To create an introductory price offer:
- Add an offer to a Base Plan.
- Add a pricing phase with the discounted price and the number of billing periods it applies to.
- After this phase, the subscription automatically moves to the full Base Plan price.
You can combine a free trial and introductory pricing in a single offer by adding multiple pricing phases. The phases execute in order: first the free trial, then the intro price, then the full price. An offer can have up to two pricing phases before the regular Base Plan price kicks in.
Upgrade and Downgrade Offers
When a user changes from one Base Plan to another within the same Subscription (or across Subscriptions), you can configure offers that apply specifically to these transitions. These are useful for incentivizing users to move to a higher tier or for softening the blow of a downgrade.
Upgrade and downgrade offers work like any other offer, but their eligibility is tied to the user currently holding a specific subscription. You configure these by selecting the appropriate eligibility criteria when creating the offer.
Win Back Offers
Win back offers target users who have previously subscribed but whose subscription has lapsed. These offers appear in the Play Store to encourage former subscribers to resubscribe at a discounted rate.
Win back offers are configured in the Play Console like other offers, but they target cancelled or expired subscribers. Google surfaces these offers to eligible users in the Play Store's subscription management area, making them a passive re engagement tool that works without requiring users to open your app.
Offer Eligibility and Developer Determined Criteria
Not every offer should be available to every user. Google Play supports several eligibility models:
Google Managed Eligibility
For new customer acquisition offers (like free trials), Google can manage eligibility automatically. Google tracks whether a user has previously redeemed a free trial for a given subscription and prevents them from getting another one. You do not need to track trial eligibility yourself.
When you create an offer and select New customer acquisition as the eligibility type, Google handles the rest. This is the simplest approach for free trials and introductory pricing.
Developer Determined Eligibility
For more complex scenarios, you can control offer eligibility on your backend. This is called developer determined eligibility.
With developer determined offers, you assign one or more eligibility tags to the offer in the Play Console. When your app queries product details, every offer comes back in the response, but your backend decides which tagged offers a specific user qualifies for. Your app then passes only the appropriate offer token when launching the purchase flow.
This model is useful for:
- Loyalty discounts: Users who have been active for more than 6 months get a special renewal price.
- Cohort based pricing: Users acquired through a specific campaign get different pricing.
- Cross product offers: Users who subscribe to Product A get a discount on Product B.
- Win back with custom logic: You determine which lapsed users deserve a comeback offer based on their usage history.
Here is how to check offer tags when filtering eligible offers for a user:
Your backend should expose an endpoint that returns the set of eligible offer tags for the current user. Your app calls this endpoint, then filters the offers returned by ProductDetails to show only the ones the user qualifies for.
Combining Eligibility Models
A single Subscription can have offers with different eligibility models. For example, you might have a Google managed free trial for new users and a developer determined loyalty discount for long term subscribers. Both can coexist on the same Base Plan.
Offer Tokens and the Purchase Flow
Every SubscriptionOfferDetails entry in the ProductDetails response includes an offer token. This token is a string that encodes which Base Plan and Offer (if any) the user is purchasing. You must pass this token when launching the billing flow. If you do not pass an offer token, the purchase will fail.
This is one of the most common mistakes when integrating subscriptions with PBL 8.x. Unlike one time products, you cannot simply pass a ProductDetails object to the billing flow. You must select an offer token and include it in the BillingFlowParams.
Here is the flow:
- Query
ProductDetailsfor your subscription. - Read the
subscriptionOfferDetailslist. - Choose the appropriate offer (based on eligibility, user preference, or your business logic).
- Extract the
offerTokenfrom the chosenSubscriptionOfferDetails. - Build
BillingFlowParamswith the offer token and launch the flow.
Every Base Plan without an offer also has its own SubscriptionOfferDetails entry with an offer token. So even if you are not using offers, you still need to extract and pass an offer token. The token for a Base Plan without an offer simply points to the full price plan.
When a user has multiple eligible offers, your app decides which one to present. You might show the best available offer by default, or present a chooser if you want the user to pick. The offer token you pass determines the pricing the user sees in the Google Play purchase dialog.
The 3 Day Acknowledgement Rule
Every purchase, whether a one time product or a subscription, must be acknowledged within 3 days (72 hours) of the purchase. If you do not acknowledge a purchase within this window, Google automatically refunds it and revokes the entitlement.
This rule exists to protect users. Acknowledgement is your app's way of telling Google, "I have received this purchase and granted the user their entitlement." Without it, a user could pay for something and never receive it, with no recourse.
For subscriptions, you acknowledge the initial purchase. You do not need to acknowledge each renewal. Google handles renewals automatically, and they do not require separate acknowledgement.
You can acknowledge a purchase either on the client or the server:
Client side acknowledgement:
Server side acknowledgement (recommended):
Acknowledging on your backend is more reliable. Your server calls the Google Play Developer API's purchases.subscriptions.acknowledge endpoint (or purchases.products.acknowledge for one time products) with the purchase token. This way, acknowledgement only happens after your backend has verified the purchase and stored the entitlement. If your app crashes after the purchase but before acknowledgement, your backend can still catch it by processing the RTDN.
Shorter Windows for Short Prepaid Plans
The 3 day acknowledgement window assumes the product grants access for at least 3 days. But what if you sell a 1 day prepaid plan? The user's access would expire before the acknowledgement window closes.
For prepaid plans shorter than 3 days, the acknowledgement window is the same as the plan duration. A 1 day prepaid plan must be acknowledged within 1 day. A 2 day prepaid plan must be acknowledged within 2 days. This ensures Google can refund the user before their access period ends if your app fails to acknowledge the purchase.
The practical takeaway: always acknowledge purchases as soon as possible, ideally within seconds or minutes of the purchase completing. Do not rely on having the full 3 days. Network issues, app crashes, and edge cases can all eat into that window.
Putting It Together: Querying and Displaying Subscription Options
Let us walk through a complete example of querying a subscription's plans and offers, then presenting them to the user. This pulls together the hierarchy, offer tokens, and eligibility concepts from this chapter.
From the returned list, each SubscriptionOfferDetails entry gives you:
basePlanId: Which Base Plan this entry belongs to.offerId: The specific offer, or null if this is the base price.offerToken: The token you pass to launch the purchase.pricingPhases: The list of pricing phases (free period, intro price, then full price).offerTags: Tags for developer determined eligibility filtering.installmentPlanDetails: Present if this is an installment plan.
Your UI logic iterates through these entries, filters by eligibility, groups by Base Plan, and presents the best option (or multiple options) to the user. When the user taps "Subscribe," you extract the offer token from their chosen entry and launch the billing flow as shown earlier.

